
Getting started
Who is PII Tools for?
CISO, InfoSec, Security, Legal & Privacy teams, who need to quantify privacy risk inside endpoints, emails, file shares, databases and cloud storages.
MSPs, service providers and consultants who need to audit customer data and manage breach incidents.
Data management platforms to enhance their solution with our powerful AI technology for PII discovery and redaction.
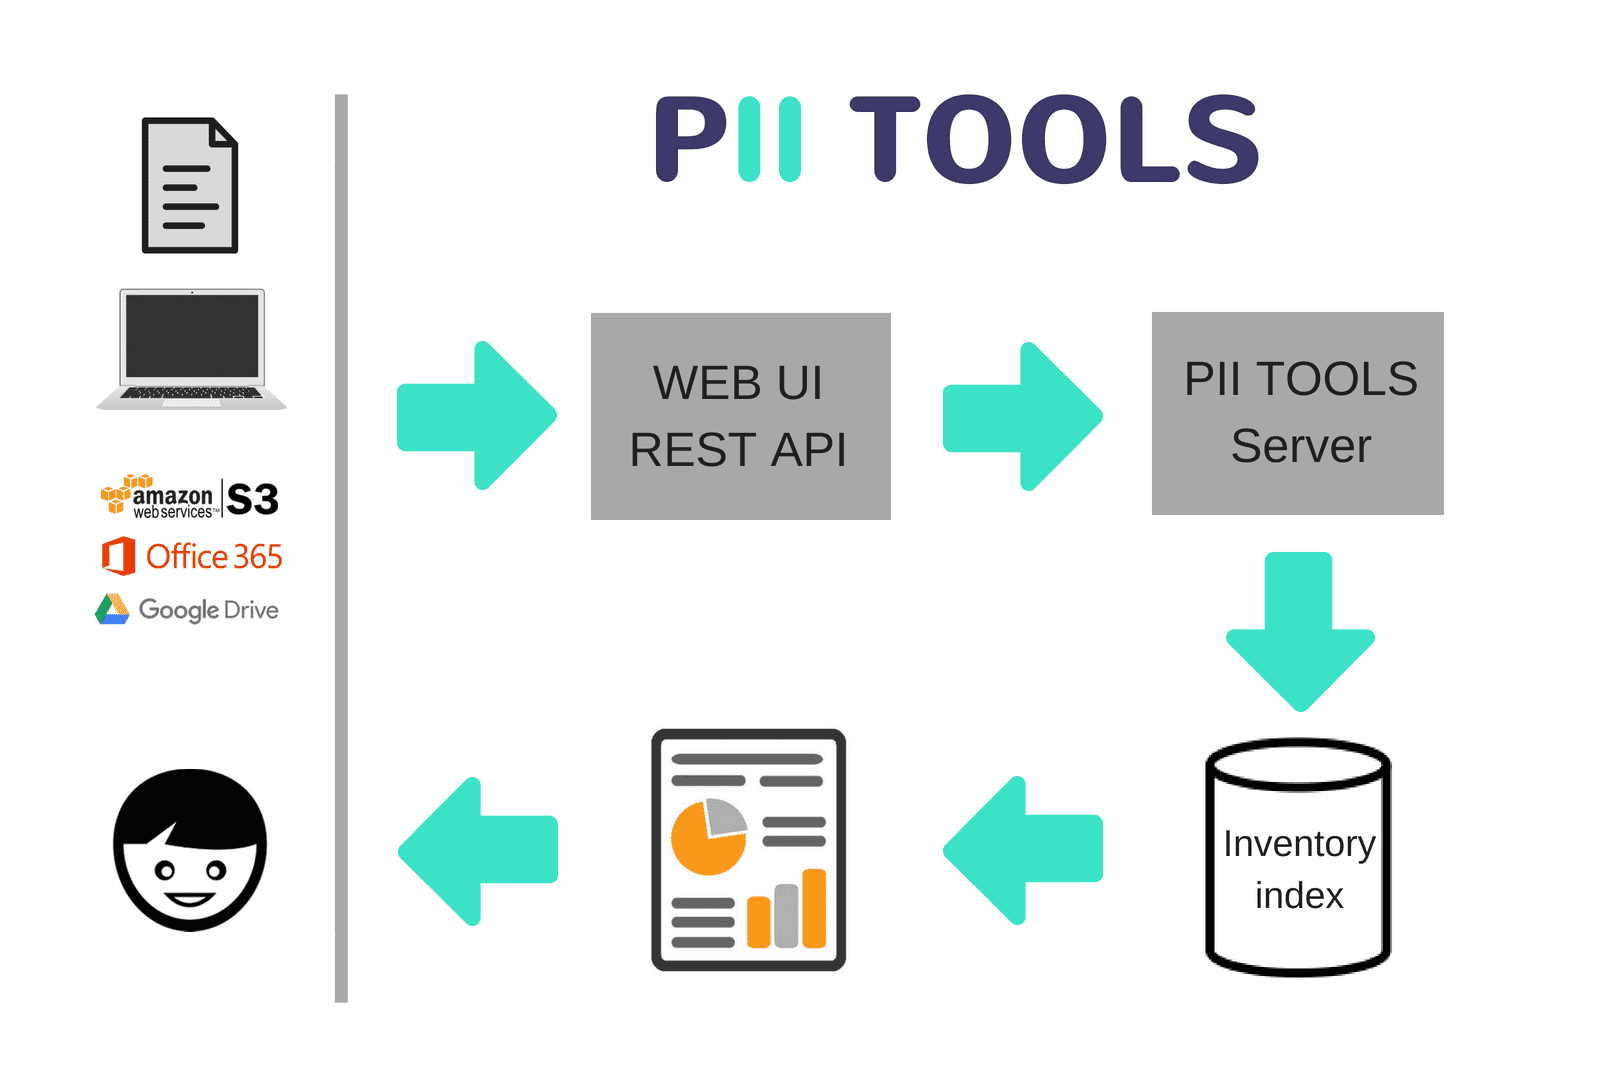
This website documents PII Tools, an AI solution for automated discovery and remediation of sensitive and personal data across corporate digital assets.
We built PII Tools to be:
- Secure. PII Tools runs on your hardware, either on-prem or in your cloud. Data never leaves your environment, doesn't call any 3rd parties, can run air-gapped.
- Accurate: Actionable results with unmatched accuracy, thanks to PII Tools' proprietary AI algorithms.
- Comprehensive: Scans local and cloud storages, emails, databases. Both structured, unstructured, and images.
- Fast with a highly scalable architecture to process big data quickly.
- Quick to deploy using a turn-key VMware or Docker virtual image.
- Easy to integrate: accessible through both a modern web interface (for humans) and Open API (for machines).
How do I start?
If you are new to PII Tools, start by reading the section on Installation and deployment.
Read Running a scan on how to submit scanning requests to PII Tools through its web interface or REST API.
Scan reports covers how to access and interpret the output PII Tools generates.
For product support or suggestions, reach out to PII Tools support.
Term glossary
| Term | Meaning |
|---|---|
| Document | A digital artefact (file, database table, email…) that may contain personal information. Example: Word, CSV, Excel, PDF, scanned PDF with OCR, JPEG, web server log, Outlook, XML, JSON… |
| Storage | A repository containing documents to be scanned. Example: file share, Office 365, AWS S3 bucket, SQL database, Salesforce… |
| PII Tools server | Your locally deployed server that performs data discovery scans on documents and storages. |
| Connector | A software component inside PII Tools that knows how to reads documents from a particular type of storage. Example: Exchange Online connector, Windows endpoint connector, SharePoint connector, MS SQL connector, Salesforce connector, S3 connector. |
| Device Agent | An executable file that is run on a file share server or local device, enabling scanning its content. |
| Scan | The process of automatically detecting personal information. Scans can be either batch or streamed. |
| Batch scan | A large scan that analyzes an entire storage or device at once, by pulling individual documents from it. Example: scanning an employee laptop; scanning an email archive; scanning an S3 bucket. |
| Stream scan | Scans a single individual document pushed to the server, returning the scanning results synchronously, in real-time. Doesn't access any storages. Example: scanning one PDF document, one Word document, one email. |
| Inventory index | PII Tools maintains a detailed index of all personal data detected across all batch scans. From this inventory, you can generate drill-down reports or run PII analytics for SAR requests. |
| Scan report | A summary report generated from a particular inventory index. Can be in drill-down HTML format for easy reviews, or in machine-readable JSONL format to answer automated SAR requests. |
| Web interface, web UI | Users can submit scanning requests and manage scanning results from an integrated (local) web interface. |
| REST API | Users looking to integrate PII Tools can also submit scans and generate reports by means of HTTPS requests to a PII Tools server. |
Data persistence and security
Personal data is by definition sensitive — where and for how long does PII Tools store it?
For stream scans, no data is ever persisted. The HTTPS request (whether coming from the web UI or the REST API) is immediately executed, personal information detected and sent back as the request response. See Stream scans.
For batch scans, as the scan progresses, the detected information is being collected and persisted into an internal database within your PII Tools instance, called the "inventory index". This inventory index is used to generate reports and answer analytics queries. To permanently delete all information associated with a particular batch scan, including its configuration, call the Delete scan index API, or click the trash can icon in the web UI next to the scan under "Actions".
The original file content is never stored (mirrored) inside PII Tools.
If you set
STORE_PII=1(default) in yourdocker-compose.ymlconfig during the service installation, only the detected PII is stored in the inventory index for batch scans.If you set
STORE_PII=0in yourdocker-compose.ymlconfig during the service installation, only a placeholder token (e.g.<CREDIT_CARD>) is stored inside PII Tools, instead of the actual detected PII instance (e.g.12345678). Reports or analytics searches will only show these placeholders, not the actual concrete PII value.
No data is transmitted or stored outside the PII Tools server, nor are any external services called. You can run PII Tools completely air-gapped.
All data is transmitted encrypted using the HTTPS protocol, such as between your PII Tools server and the file server or cloud storage to be scanned.
Web interface
In addition to the programmatic access via REST API, PII Tools also offers scanning capabilities through a user-friendly web interface.
This web interface is installed automatically when you deploy PII Tools, and runs on the same address and port as the server itself (see Deployment).
For example, if you deployed PII Tools on a machine with IP 195.201.160.29 and REST port 443, open your browser and go to https://195.201.160.29.
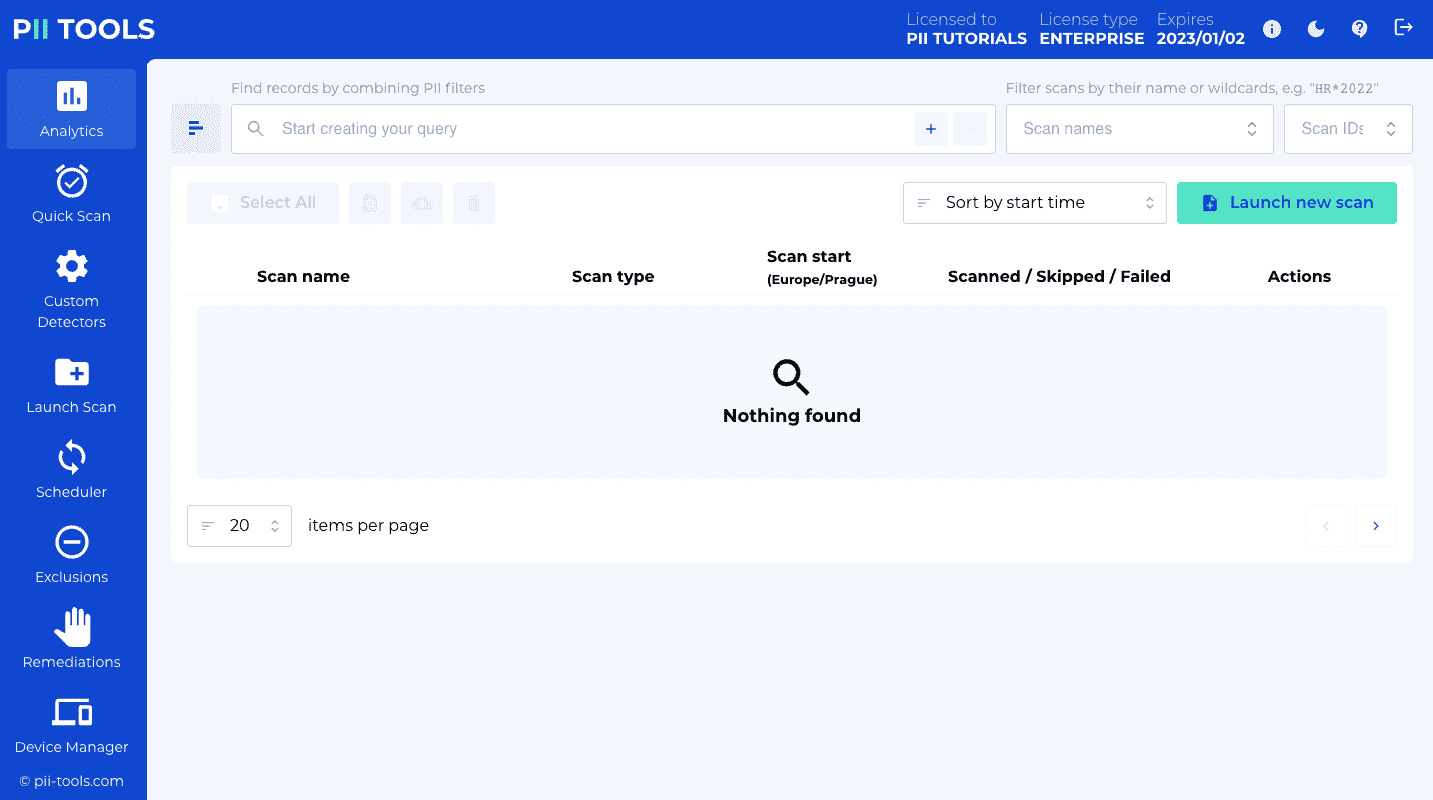
You should see a welcome screen like this:
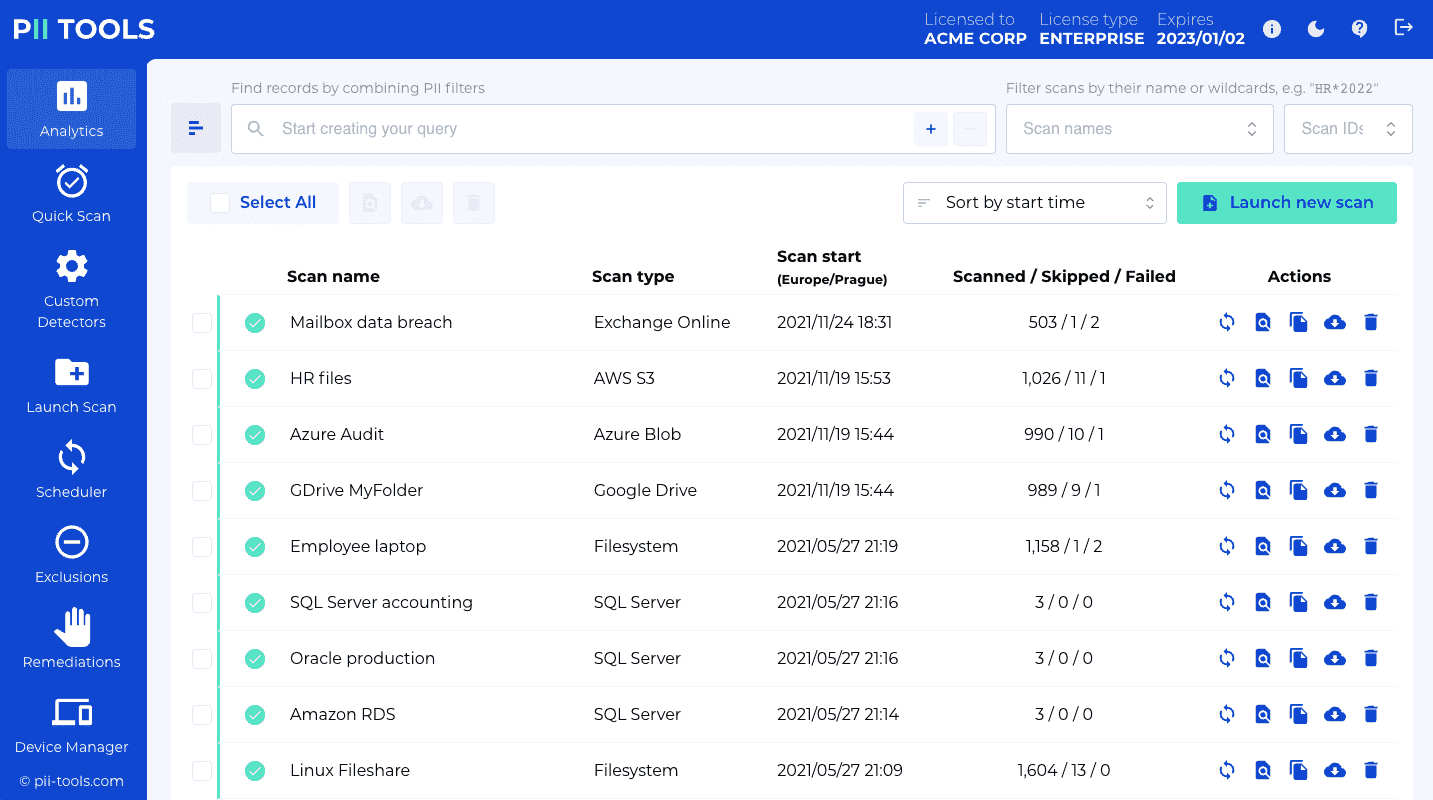
The web interface allows you to:
- Launch and track progress of stream and batch scans
- Generate and download scan reports
- Create and update your own custom detectors
The parameters exposed in the web UI correspond to (a subset of) parameters supported by the REST API. This means all operations that can be performed through the web UI can be also performed using REST, but not necessarily vice versa.
REST API
Sample stream scanning request against the PII Tools REST API:
$ curl -k -s --user username:password -XPOST https://127.0.0.1:443/v3/stream_scan -H 'Content-Type: application/json' -d'
{
    "filename": "bank_form.pdf",
    "content": "'$(base64 -w0 /tmp/bank_form.pdf)'"
}'
This request will generate a response like this:
{
    "status": "SCANNED",
    "processing": {
        "_time": 0.2773430347442627,
        "_time_children": 0.2770969867706299,
        "_time_self": 0.0002460479736328125,
        "language": "en",
        "language_confidence": 1.0,
        "severity": "3-CRITICAL"
    },
    "pii": [
        {
            "confidence": 1.0,
            "pii": "Mustafa Abdul",
            "context": "\nFrom: Name: Mustafa Abdul\nThe Branch Manager\nAddress",
            "pii_category": "Personal",
            "pii_type": "name",
            "position": {
                "bboxes": [
                    [
                        [0.5627627403907527, 0.16604167283183396],
                        [0.6775784461326848, 0.16604167283183396],
                        [0.6775784461326848, 0.17992424242424243],
                        [0.5627627403907527, 0.17992424242424243]
                    ]
                ],
                "page": 0
            }
        },
        {
            "confidence": 1.0,
            "pii": "GL28 0219 2024 5014 48 ",
            "context": "Account Transfer  \nA/c No. GL28 0219 2024 5014 48",
            "pii_category": "Financial",
            "pii_type": "bank_account",
            "position": {
                "page": 0,
                "bboxes": […]
            }
        }
    ],
    "storage": {
        "content_type": "application/pdf",
        "doctype": "pdf",
        "file_hash": "gs5RE4Eyj10OvS2VSHNt",
        "filename": "bank_form.pdf",
        "filesize": 43019,
        "location": "bank_form.pdf"
    },
    "errors": [],
}
Once the PII Tools service is running, users may issue programmatic scanning requests using its REST interface. The requests are described in detail in the Running a scan section and can be submitted from any language and environment, using standard libraries and tooling, such as Java, Python or C#.
PII Tools uses HTTPS with Basic Authentication. Non-authenticated requests are rejected. You can set your desired username and password during the PII Tools Deployment.
In order to continue to work even in local air-gapped installations, PII Tools uses a self-signed SSL certificate. Configure your HTTPS client to not check the certification authority, such as with curl -k in the examples to the right. Another option is to insert your own SSL certificate into PII Tools during the deployment: SSL Certificates.
Overview
All REST requests follow the same structure:

- Request headers
- use standard HTTP methods:
GET(to retrieve an object),POST(to create),DELETE - parameters are always in JSON format (
Content-type: application/json)
- use standard HTTP methods:
- Protocol
https:// - Domain and port of the PII Tools server as configured during Deployment
- PII Tools API version; currently
v3 - Parameters of the scanning action to take (see scan configuration)
The REST API responses are in JSON too (Content-type: application/json), and will return an HTTP status according to the success/failure of each operation. PII tools uses a combination of HTTP status codes and descriptive error messages to give you a more complete picture of what has happened with your request.
For example, if you request a non-existent resource, a 404 error is returned:
$ curl -k -XGET https://username:password@127.0.0.1:443/v3/scans/1234

HTTP/1.1 404 NOT FOUND
{
    "_success": false,
    "error": "Parameter error: Scan with id 1234 not found."
}
| HTTP status | Meaning | To Retry or Not to Retry? |
|---|---|---|
| 2xx | Request was successful. | – |
Example: 200 Success |
||
| 4xx | A problem with request prevented it from executing successfully. | Never automatically retry the request. |
| If the error code indicates a problem that can be fixed, fix the problem and then retry the request. | ||
| 5xx | The request was properly formatted, but the operation failed on PII Tools's end. | In some scenarios, requests should be automatically retried using exponential backoff. |
Basically, any request that did not succeed will return a 4xx or 5xx error and the JSON response will contain the {"error": "<message>"} field. The 4xx range means there was a problem with the request, such as a missing parameter. The 5xx range indicates an internal PII Tools error.
Main REST endpoints
This is a list of the main REST endpoints. For details and examples, see the main sections below.
| Endpoint | Purpose |
|---|---|
GET /status |
Get service overview status. |
GET /scans/ |
Get a list of all batch scans. |
GET /scans/?name_pattern=*est* |
Get a list of all batch scans matching a name pattern. |
POST /scans/ |
Launch a new batch scan. |
GET /scans/<scan_id> |
Get detailed metadata info for a scan. |
PUT /scans/<scan_id> |
Update a scan, for example pause or rename a scan, or change the configuration of an existing scheduled scan. |
DELETE /scans/<scan_id> |
Delete a scan. |
GET /scans/<scan_id>/objects/<object_id> |
Get detailed metadata info for a file. |
DELETE /scans/<scan_id>/objects/<object_id> |
Remediate a one or several files from PII Tools. This includes the options of "Forget object", "Secure erase (optionally with quarantine)", "Redact in-place (optionally with quarantine)", and "Download redacted". |
GET /scans/<scan_id>/objects?format=X |
Download scan report in {audit, json, jsonl, csv, xlsx, xlsx_simple, html, names, duplicates} format. |
POST /stream_scan |
Launch a stream scan, real-time scanning API. |
POST /analytics |
Run analytics over all scans and objects that match a query, download in one of {facets, csv, xlsx, xlsx_simple, html, json, jsonl, audit, names, duplicates} formats. |
POST /search |
Alias for POST /analytics. |
DELETE /analytics |
Remediate files matched by an analytics query from PII Tools; "Forget objects", "Secure erase (optionally with quarantine)", "Redact in-place (optionally with quarantine)", and "Download redacted". |
GET /analytics/_field_mapping |
Get mapping for all available Analytics query keys. |
GET /remediations |
List submitted remediation tasks, with pagination. |
GET /remediations/task_id |
Download a detailed report for one remediation task, in CSV format. |
DELETE /remediations/task_id |
Delete one remediation task. |
GET /redaction_profiles/ |
Get the list of all redaction profiles. |
POST /redaction_profiles/ |
Create a new redaction profile. |
GET /redaction_profiles/<profile_id> |
Get an existing redaction profile. |
PUT /redaction_profiles/<profile_id> |
Update an existing redaction profile. |
DELETE /redaction_profiles/<profile_id> |
Delete a redaction profile. |
GET /detectors/ |
Get all built-in and custom detectors. |
GET /detectors/builtin |
Get all builtin detectors. |
GET /detectors/custom |
Get all custom detectors. |
POST /detectors/custom |
Create a new custom detector. |
GET /detectors/custom/<detector_id> |
Get an existing custom detector. |
PUT /detectors/custom/<detector_id> |
Update an existing custom detector. |
DELETE /detectors/custom/<detector_id> |
Delete a custom detector. |
GET /exclusions |
List custom PII exclusions. |
POST /exclusions |
Create a new custom PII exclusion. |
PUT /exclusions |
Update an existing custom PII exclusion. |
GET /state |
Export custom state of this PII Tools installation: all custom detectors and exclusion rules. |
POST /state |
Import custom state of this PII Tools installation: all custom detectors and exclusion rules. |
GET /storages?storage_type=X |
List all storages of the given type. |
GET /storages/<storage_name> |
List details of one particular storage. |
PUT /storages/<storage_name> |
Update a storage, for example to change its Note. |
DELETE /storages/<storage_name> |
Delist a storage, but otherwise keep its existing scans intact. |
GET /cluster |
List information on all nodes in a cluster installation. |
GET /users |
List all PII Tools users. |
GET /users/<user_id> |
Get information on a single user. |
POST /users |
Create a new PII Tools user. |
PUT /users/<user_id> |
Update information of a single user. |
DELETE /users/<user_id> |
Delete a user (user must not own any resources). |
GET /roles |
Fetch all RBAC (role-based access control) roles. |
GET /roles/<role_id> |
Get details on a single RBAC role. |
POST /roles |
Create a new RBAC role. |
PUT /roles/<role_id> |
Update an RBAC role. |
DELETE /roles/<role_id> |
Delete an RBAC role (role must not have any active users). |
OpenAPI specification of all API endpoints is available on request.
Supported scans
Supported PI types
The lyrics.txt file is a great litmus test for detection quality. It contains words like "medicine", "sexual" and "healing" used in non-personal context, which will (incorrectly) trigger many rule-based systems. PII Tools correctly ignores it as a false positive. We recommend running this file on any discovery tool you're evaluating, to check the results!
The following types of personal and sensitive information are supported out of the box:
| Covered data | PII types |
|---|---|
| Personal | full name, home address, face, phone number, date of birth, email, first name, last name, city, country, street |
| Financial | bank account number, credit card number, routing number, scanned US checks (cheques) |
| Sensitive | sexual preferences, race, gender, religious views |
| Health | Medicare IDs, personal health information (PHI), medical records, WHO ICD codes |
| National | passport and ID card scans, passport numbers, driving license, SSN, personal tax ID |
| Security | username, password, IP address |
You can also define your own detectors dynamically, using custom rules and regexps. See Custom Detectors.
Supported storages
In addition to Stream scans, PII Tools can scan entire storages. Here is the full list of PII Tools storage connectors available out-of-the-box:
| Storage | scan_type |
Comment |
|---|---|---|
| File shares | device |
File shares, SMB and mounted drives are scanned using Device Agents. |
| Filesystems | device |
Both remote and local file systems are scanned using Device Agents. |
| Devices and work stations | device |
Windows, MacOS and Linux computers are scanned using Device Agents. |
| DropBox | device |
Only locally synced Dropbox folders are supported: use device with root_folder pointed at the DropBox sync folder. |
| Amazon S3 | s3 |
Scan AWS S3 buckets. |
| Google Drive | gdrive |
Scan Google Drive storages, using either a refresh token or a service account. |
| Microsoft SQL Server | odbc |
Scan MS SQL databases, schemas and tables. Versions 2008, 2008R2, 2012, 2014, 2016, 2017 and Azure SQL. |
| Oracle | odbc |
Scan Oracle databases, schemas and tables. Supports both pluggable databases (PDB, Oracle 12c+) and 11g. |
| Postgres | odbc |
Scan Postgres and Amazon RDS databases, schemas and tables. |
| MySQL | odbc |
Scan MySQL and MariaDB databases and tables. |
| Office 365: Exchange Online | mgraph-exchange |
Scan Microsoft Exchange Online mailboxes and users. |
| Office 365: OneDrive | mgraph-onedrive |
Scan Microsoft OneDrive storages. |
| Office 365: Sharepoint Online | mgraph-sharepoint |
Scan Microsoft SharePoint Online sites. |
| Microsoft Azure Blob | azure-blob |
Scan Azure Blob storages. |
| Salesforce | salesforce |
Scan Salesforce installations. |
Supported file formats
Use the free PII Tools trial to verify how PII Tools will process your particular files.
PII Tools supports more than 400 file formats, including structured files (CSV, Excel, JSON, XML, Parquet, SAS…) and unstructured files (PDF, emails, Word, images, OCR, …). It will analyze files of different types accordingly, using the appropriate context parser, to maximize accuracy.
For conversions of more exotic document formats, PII Tools also uses the Apache Tika framework internally. You can find the list of all supported file formats here.
Supported archive formats include PST, MBOX, ZIP, ZIPX, RAR, TAR.
Supported severity levels
Not all personal information is created equal: an IP address in a web server log does not carry the same risk as a spreadsheet full of names, home addresses and credit card numbers.
Considering data in context allows PII Tools to assess not only the presence, but also the severity of the detected information. Assigning severity levels to files improves the information filtering and review experience.
PII Tools will automatically classify document into four severity levels:
| Severity | Description |
|---|---|
| NONE | No personal data related risk identified in this file. |
| LOW | Some potentially identifying information detected, such as an isolated IP address or user name. This personal data is also covered by GDPR, but people typically don’t care to protect this type of data. |
| HIGH | Sensitive data, a person would unhappy if made public. HIGH risk is also assigned when PII Tools detects a lot of PII, even if low risk, indicating a PII dump in risk of breach. |
| CRITICAL | Direct risk of identity theft, blackmail, financial damage or loss of job. |
Installation and deployment
Code examples in this documentation use the curl command to send HTTPS requests. While
curlis great for demonstrations, you can of course issue the same requests using your favourite web library, such as requests for Python or Unirest for Java.
This section describes how to install PII Tools on your own server, whether on-premises or in your cloud.
The installation process is simple and involves two main steps:
- Configure PII Tools: set your desired service parameters, login username, password etc.
- Launch PII Tools from its virtual image.
The installation process requires a working network connection to download the virtual image, done by your own IT team, and takes 15-30 minutes.
Installation contains
As a part of your purchase, you should have received:
- A license agreement plus one or more license keys allowing self-hosted installation.
- An OVA image for installing PII Tools into VMware, or a
docker-compose.ymlfile for a Docker installation.- Either way, PII Tools is installed from a single virtual image.
- No other third party software, configurations nor additional licenses are required.
- A
README.txtfile containing the username and password for accessing PII Tools' private VMware and Docker registry. - This documentation.
Hardware requirements
The AI models running inside PII Tools require significant HW resources. It is essential you provision a powerful server that is able to handle your expected data loads and project timelines:
CPU cores
- 4 cores absolute minimum
- Adding more CPU cores improves performance significantly, thanks to PII Tools' parallelized architecture
- 64 CPU cores recommended for best performance
RAM
- Minimum 8 GB of RAM plus additional 2 GB RAM per CPU core:
- ≥24 GB RAM for 8 cores
- ≥40 GB RAM for 16 cores
- ≥72 GB RAM for 32 cores
- ≥104 GB RAM for 48 cores
- ≥136 GB RAM for 64 cores, etc
- 256 GB RAM recommended for best performance
Disk space
- 10 GB of free disk space for base installation, plus 30 GB per every 1,000,000 files in your scanned inventory
- With cloud storage such as EBS, choose a fast disk with maximum IOPS
- A local 2 TB SSD/NVMe disk recommended for best performance
The Device Agents for scanning local devices have no dependencies. They are simple executable files (".exe" and ".msi" on Windows, "binary" on Linux and MacOS) that are run on the device to be scanned. They only must be able to connect to a running PII Tools server via HTTPS.
VMware installation
To install PII Tools into a VMware ESXi environment:
Download the OVA image using the credentials from your
README.txtfile.Deploy the OVA into your VMware installation. Make sure to expand the CPUs, RAM and disk space as needed (see Hardware requirements). The more CPU, the faster your scans will run.
Launch the VM and proceed according to the on-screen instructions.
The initial VM username and password are
root/root; you will be prompted to change those immediately on your first login.Next, you will be asked for your Registry username and Registry password. You can find both in the
README.txtfile that came with your purchase.Go to the
PII Tools Configurationmenu and at the very least, enter your purchased license key, and set a desired username & password that your users will use to log into the PII Tools web dashboard.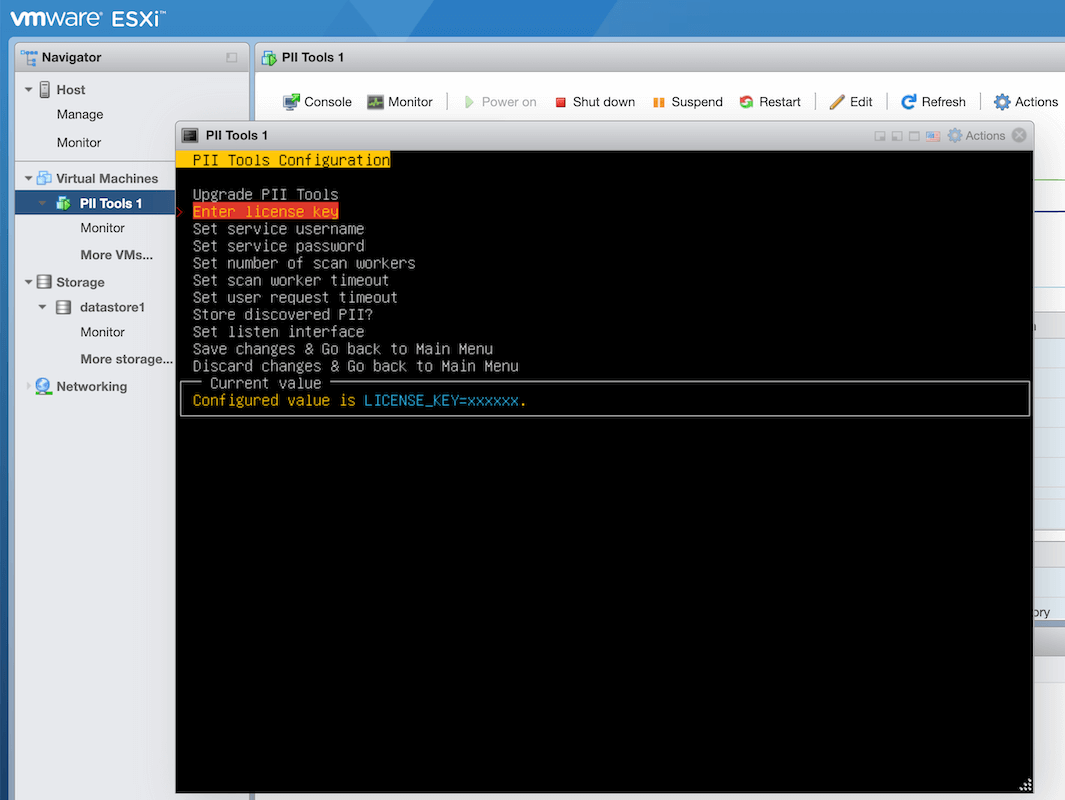
Feel free to review and configure other available options there as well. All menu items include on-screen help for easier navigation.
The PII Tools VM is set up to discover your IPv4 network settings dynamically from DHCP. If you wish to assign a static IP instead, please continue into
Configure VM=>Configure network, and configure the desired network interface there.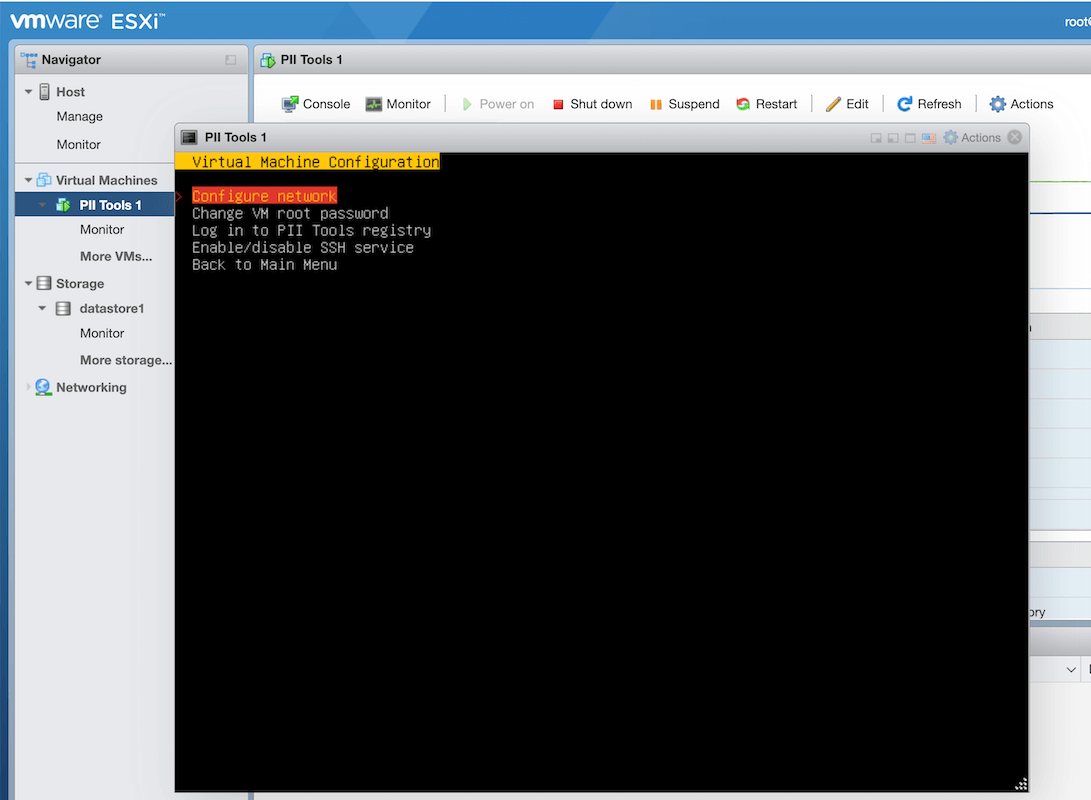
That's it. Save your configuration when prompted and PII Tools will automatically download, install and launch with the provided settings.
Congratulation! Now you can access your PII Tools web interface at https://ip-of-your-vm. You'll see an initial screen like this in your browser:
Docker installation
As an alternative to installing PII Tools into VMware, you can install PII Tools into Docker.
This results in exactly the same PII Tools service, but with parameters configuration entered through a docker-compose.yml text file, rather than a VMware menu.
Steps to install PII Tools into Docker:
Install Docker itself, on the machine (server) where you wish to host PII Tools. Docker supports MacOS, Microsoft Windows 10, Amazon Web Services (AWS), Microsoft Azure, IBM Cloud, CentOS, Debian, Fedora and Ubuntu. Check success with the command
docker version.(only if not already installed alongside Docker in the previous step) Install Docker Compose manually. Check success with the command
docker compose version.
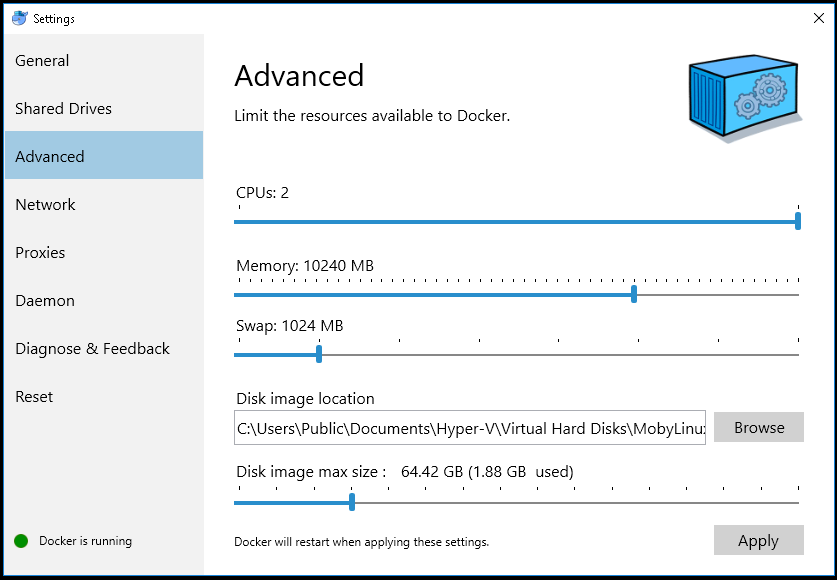
Windows and MacOS: Increase the RAM and CPU available in Docker Advanced Settings. As a rule of thumb, allow as many CPU cores and as much RAM as possible (see Minimum HW Requirements). This step is not needed on Linux servers, where virtualization is more efficient and can use all hardware resources by default.
Run
docker login registry.pii-tools.com --username <USERNAME> --password <PASSWORD>to log into the private Docker registry of PII Tools.<USERNAME>and<PASSWORD>were provided to you as part of your license purchase inREADME.txt(see Installation contains). If you authenticated successfully, you'll see aLogin Succeededmessage in your console.Edit the
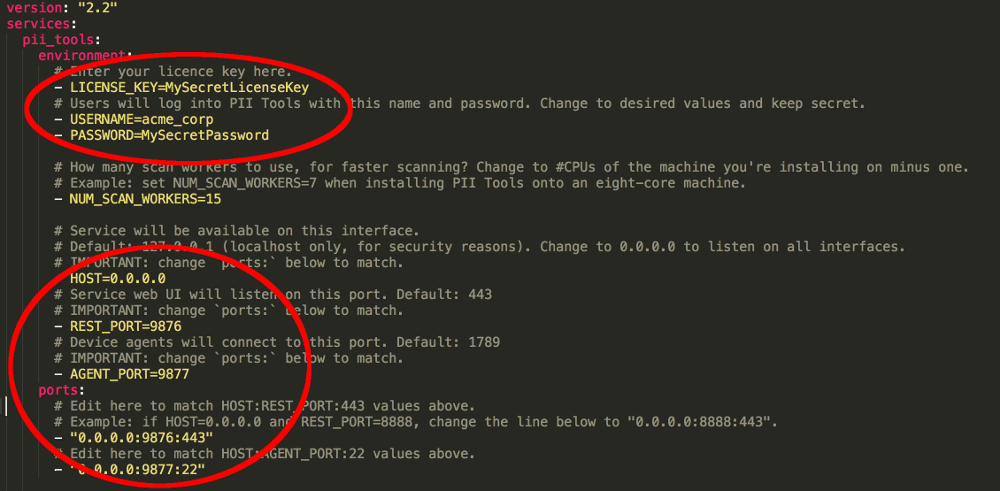
docker-compose.ymlconfiguration file provided to you as part of your purchase with a text editor. This YAML file contains critical instructions for PII Tools configuration:
- Set
LICENSE_KEYto your license key. PII Tools won't function without a valid license key. Set
USERNAMEandPASSWORDaccording to your preferences. These will be the username and password you use to log in to the web interface or issue API requests.Note for advanced users: If you don't want to store your password in plaintext in the
docker-compose.ymlfile, you can calculate its bcrypt hash instead and set that hash asPASSWORDhere. Make sure to escape any$character by doubling it, i.e. replace all$by$$. PII Tools will automatically detect that the config password is a bcrypt hash, and authenticate your API requests accordingly. Of course, if you select a high number of bcrypt rounds (implying slower password-hash validation), your API requests will get accordingly slower. We recommend using 10 (ten) bcrypt salt rounds, which will add around 100ms delay to each API request.Set
NUM_SCAN_WORKERSto the number of parallel scan workers. Each worker will be able to process one file in parallel, soNUM_SCAN_WORKERScontrols the level of parallelization and thus scanning speed. The default (and recommended) value isNUM_SCAN_WORKERS=0, which means set the value dynamically, automatically, based on the number of actual CPU cores available.Change
HOST,REST_PORTto the IP and port you want your PII Tools server to run on. The defaults are to listen on all the network interfaces at the standard HTTPS port 443 (0.0.0.0:443).Optionally, plug in your own SSL certificates into
SSL_PRIVATE_KEYandSSL_DOMAIN_CERT, as per SSL certificates.
Save the edited configuration file without changing its file name (docker-compose.yml), and exit the text editor.
6. Run docker compose up -d. This process may take 2-30 minutes, depending on your internet connection speed, but is only done once, at the PII Tools server installation time.
To test that the installation was successful and the REST API is active, run this command:
$ curl -k -XGET https://username:password@127.0.0.1:443/v3/status
After which you should see:
{
    "uptime": "0d 5h 26m",
    "version": "3.0.0",
    "customer_name": "ACME CORP",
    "license_type": "enterprise",
    "expires": "2022/01/02",
    "hostname": "0.0.0.0",
    "rest_port": 443,
    "agent_port": 1789,
    "num_rest_workers": 15,
    "num_scan_workers": 4,
    "rest_worker_timeout": 60,
    "scan_worker_timeout": 60,
    "total_scans": 0,
    "unfinished_scans": 0
}
Congratulation! Now you can access your PII Tools web interface at https://your-server-ip. You'll see an initial screen like this in your browser:
Software maintenance
To stop PII Tools without erasing your inventory (non-destructive stop), execute this command on the machine that hosts the PII Tools server:
$ # Stop a PII Tools Docker container; no data is lost.
$ docker compose stop

Stopping pii_tools         ... done
Stopping inventory         ... done
PII Tools operates as a long-running service and does not require any maintenance.
If you installed into Docker, you might wish to run docker system prune --all after each upgrade, to remove images of old releases, in order to reclaim disk space. A VMware installation does this pruning automatically.
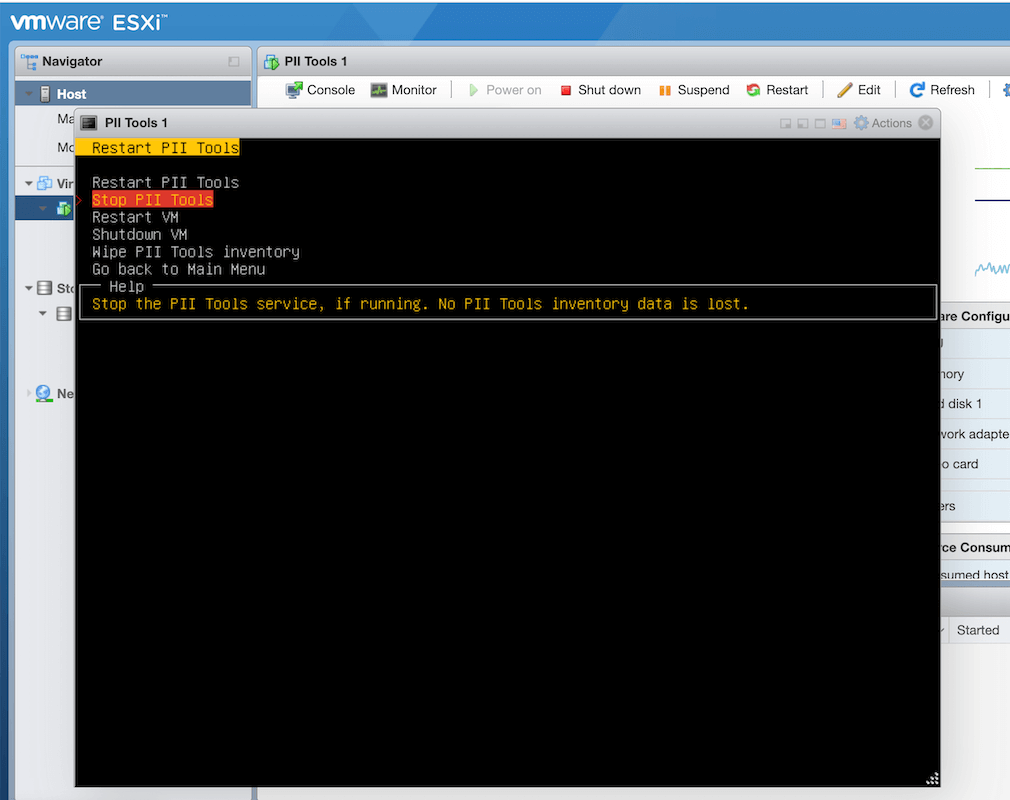
To stop PII Tools, simply stop its Docker container using the command to the right. In VMware installations, use the Launch or Restart VMware menu:
To start up a stopped PII Tools Docker container again:
$ docker compose up -d
Factory reset
To terminate PII Tools and wipe all indexes (all scans, schedules, exclusions, custom detectors and everything else), run docker compose down --volumes.
Use this command to reset PII Tools to a clean, fresh installation. In VMware installations, this is the Wipe PII Tools inventory option in the Launch or Restart menu.
Product upgrade
To check your current service version, click on
ⓘin the top-right screen corner in the UI, or run this REST request:
$ curl -k -XGET --user username:pwd https://127.0.0.1:443/v3/status
{
    "uptime": "0d 18h 2m",
    "version": "3.0.0",
    "customer_name": "ACME CORP",
    "license_type": "enterprise",
    "expires": "2022/01/02",
    "hostname": "0.0.0.0",
    "rest_port": 443,
    "agent_port": 1789,
    "num_rest_workers": 15,
    "num_scan_workers": 4,
    "rest_worker_timeout": 60,
    "scan_worker_timeout": 60,
    "total_scans": 0,
    "unfinished_scans": 0
}
From time to time, we may release a new version of PII Tools with upgrades and bug fixes. If your license allows for it, this upgrade is made available to you by means of a new Docker or VMware image.
To install an upgrade (optional), read its release notes carefully. If you wish to proceed:
- For VMware, log in to your VM and select the
Upgrade PII Toolsoption underConfigure PII Tools. For Docker, edit the
docker-compose.ymlconfiguration file to change the version at the end of the line starts withimage:.For example, to install version v4.1.0, edit that line to read
image: registry.pii-tools.com/pii_tools:v4.1.0.Or to install version
1234ab5e, useimage: registry.pii-tools.com/pii_tools:1234ab5eetc.Then restart PII Tools with
docker compose down && docker compose up -dto apply the changes.To verify you are indeed running the new version, open the PII Tools web UI and click the ⓘ button in the top-right corner.
That's it, your upgraded version is now active. Congratulations!

SSL certificates
PII Tools is normally accessed via HTTPS on https://HOST:REST_PORT, e.g. https://172.168.1.100:443. Since popular browsers do not recognize the self-signed certificate installed by PII Tools by default, a common request is to use PII Tools behind your own domain name, using your own SSL certificate.
Prerequisites:
IP address of the server where PII Tools runs, or will be running. E.g.
172.168.1.100.DNS record that points from your custom domain (e.g.
piitools.mycompany.com) to PII Tools' IP address (e.g.172.168.1.100).The SSL private key certificate. Various SSL providers call this file differently:
privkey.pem,key.pem,private.pem,private.cert,private.crtetc. Its content should look like this:-----BEGIN PRIVATE KEY----- … your SSL private key here … -----END PRIVATE KEY-----
The opening and closing lines with
-----BEGIN PRIVATE KEY-----are mandatory and a part of the key, so please keep them included in the subsequent steps.Domain name certificate. Usually called
domain.crt,domain.cert,domain.pemetc. The certificate looks like this:-----BEGIN CERTIFICATE----- … your domain certificate here … -----END CERTIFICATE-----
Some SSL vendors also supply one or more intermediate certificates (
intermediate.pem,intermediate.certetc). In that case, concatenate both the domain and intermediate certificates into a single value in subsequent steps, like so:-----BEGIN CERTIFICATE----- … your domain certificate here … -----END CERTIFICATE----- -----BEGIN CERTIFICATE----- … your intermediate domain certificate here … -----END CERTIFICATE-----
Again, the
-----BEGIN CERTIFICATE-----and-----END CERTIFICATE-----lines are vital, so make sure to keep them in.
Steps to install a custom SSL certificate into PII Tools:
VMware users:
Go to the
Configure PII Toolsmenu and selectConfigure SSL.Copy-paste your private key and domain certificate as instructed.
Select
Save changes & Go backand when prompted, restart PII Tools. The restart is necessary for your changes to take effect.
Docker users:
Edit your
docker-compose.ymlconfiguration file.Find the line that starts
SSL_PRIVATE_KEY=and copy-paste your private key below. Indent all lines to start at the same offset as theSSL_PRIVATE_KEY=line: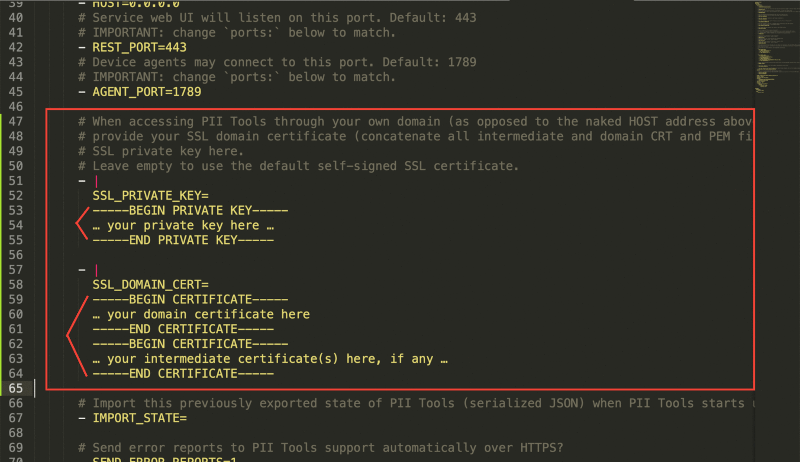
Do the same for the domain certificate: copy-paste it below
SSL_DOMAIN_CERT=and indent all lines.Save your changes to
docker-compose.yml.Run
docker compose up -dto apply your changes and restart PII Tools.
Once PII Tools comes up, you will be able to access it under https://piitools.mycompany.com (or whatever domain name you used for your DNS record) in your browser. That's it!
Cluster installation
To speed up your scans, you may install PII Tools on multiple servers and connect those together for a cluster (multi-node) installation.
Such horizontal scaling contrasts with installing PII Tools on a single server, which works fine but is limited by the number of CPUs on that single server (vertical scaling).
Multi-node installations effectively pool CPUs across all servers connected into the cluster, leading to faster scans while still presenting a single unified UI and API for the user.
Conceptually, a cluster consists of two types of nodes:
Master node: A designated PII Tools installation (one server) that orchestrates scans, generates reports, presents the web UI dashboard.
There is exactly one master node in a cluster installation. PII Tools users interact with this master node exclusively.
Slave node: Zero or more PII Tools installations (additional servers), used by the master node to offload scanning.
These slave nodes are not visible to the user at all – the master distributes scanning tasks to slaves, and then collects their scanning results, completely transparently.
Cluster HW requirements
To get additional information on all slave nodes connected to the cluster:
$ curl -k -XGET --user username:pwd https://127.0.0.1:443/v3/cluster
{
  "1.2.3.5": {
    "uptime": "2d 6h 12m",
    "version": "4.8.2",
    "cpu": {
      "count": 32,
      "freq": {
        "current": 1981.3592187499999,
        "max": 4787.5,
        "min": 800
      },
      "logical": 32,
      "physical": 24
    },
    "disk": {
      "free": 971592646656,
      "percent": 44.8,
      "total": 1853812338688,
      "used": 787975712768
    },
    "num_scan_workers": 11,
    "ram": {
      "active": 32909103104,
      "available": 51109613568,
      "buffers": 1326133248,
      "cached": 43043524608,
      "free": 7510372352,
      "inactive": 23676559360,
      "percent": 24,
      "shared": 14192640,
      "slab": 2738601984,
      "total": 67222355968,
      "used": 15342325760
    },
    …
  "1.2.3.6": {
    "uptime": "0d 1h 2m",
    "version": "4.8.2",
    "cpu": {
      "count": 8,
      "freq": {
        "current": 3592.7117499999995,
        "max": 4200,
        "min": 800
      },
      "logical": 8,
      "physical": 4
    },
    "disk": {
      "free": 4271361396736,
      "percent": 54.7,
      "total": 9920822677504,
      "used": 5149402939392
    },
    "num_scan_workers": 0,
    "ram": {
      "active": 43500273664,
      "available": 55409266688,
      "buffers": 10965778432,
      "cached": 45849747456,
      "free": 1151983616,
      "inactive": 15995781120,
      "percent": 17.7,
      "shared": 1812779008,
      "slab": 6288027648,
      "total": 67304116224,
      "used": 9336606720
    },
    …
  },
  "_request_seconds": 0.002,
  "_success": true
}
Minimum cluster HW configuration
| minimum HW | master node | slave node |
|---|---|---|
| disk | 300 GB | 20 GB |
| CPU | 4 cores | 4 cores |
| RAM | 32 GB | 12 GB |
Recommended cluster HW configuration
| recommended HW | master node | slave node |
|---|---|---|
| disk | 1 TB SSD | 20 GB |
| CPU | 16 cores | 32 cores |
| RAM | 64 GB | 64 GB |
The critical resource for a master node is its fast disk. This is because the master node hosts the inventory database which needs fast disk operations. Make sure to allow plenty of room with the fastest disk available on master.
The critical resource for a slave node are its processor(s). Use as many CPU cores as available for slave nodes. Slave nodes do not store any information on disk, so their disks are irrelevant – use just enough disk space to host the operating system plus the PII Tools image, such as a 20 GB disk on each slave.
For optimal performance, both master and slave nodes should have a fast connection to each other (connectivity within the cluster), as well as a reasonably fast connection to the target data-to-be-scanned (target file server, cloud storage, database).
Cluster deployment
To create a cluster of PII Tools nodes:
Choose a server to act as the master node and install PII Tools on it. Use the standard installation steps above, but during the
docker-compose.ymlconfiguration, uncomment (enable) these two lines underports:- "0.0.0.0:6666:6666"- "0.0.0.0:6667:6667"Choose zero or more servers to act as slaves, and install PII Tools on each one. Use the standard installation steps above (VMware image, Docker image), but during their
docker-compose.ymlconfiguration, pointPII_TOOLS_MASTERto the IP_ADDRESS:REST_PORT of the master node above:- PII_TOOLS_MASTER=1.2.3.4:443Also make sure to enter a valid license key, and a username/password to match the master.
That's it. With these two minor config changes, launch your PII Tools master and slave instances as usual. On startup, each slave node will automatically connect to the master node and become a part of the cluster. No other action is required.
Cluster resizing
Once launched, each slave node will automatically connect to the master node – or keep trying to connect, in case the master is temporarily unavailable.
Similarly, the master will accept new slaves at any time. You can resize your cluster by shutting down / starting up additional slave nodes as needed.
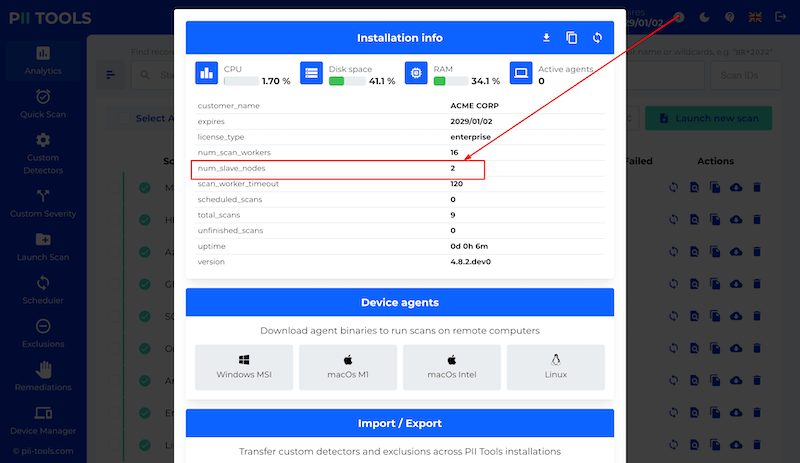
To check the size of your cluster, see the number of currently connected slave nodes under the ⓘ button in your PII Tools dashboard:
Support
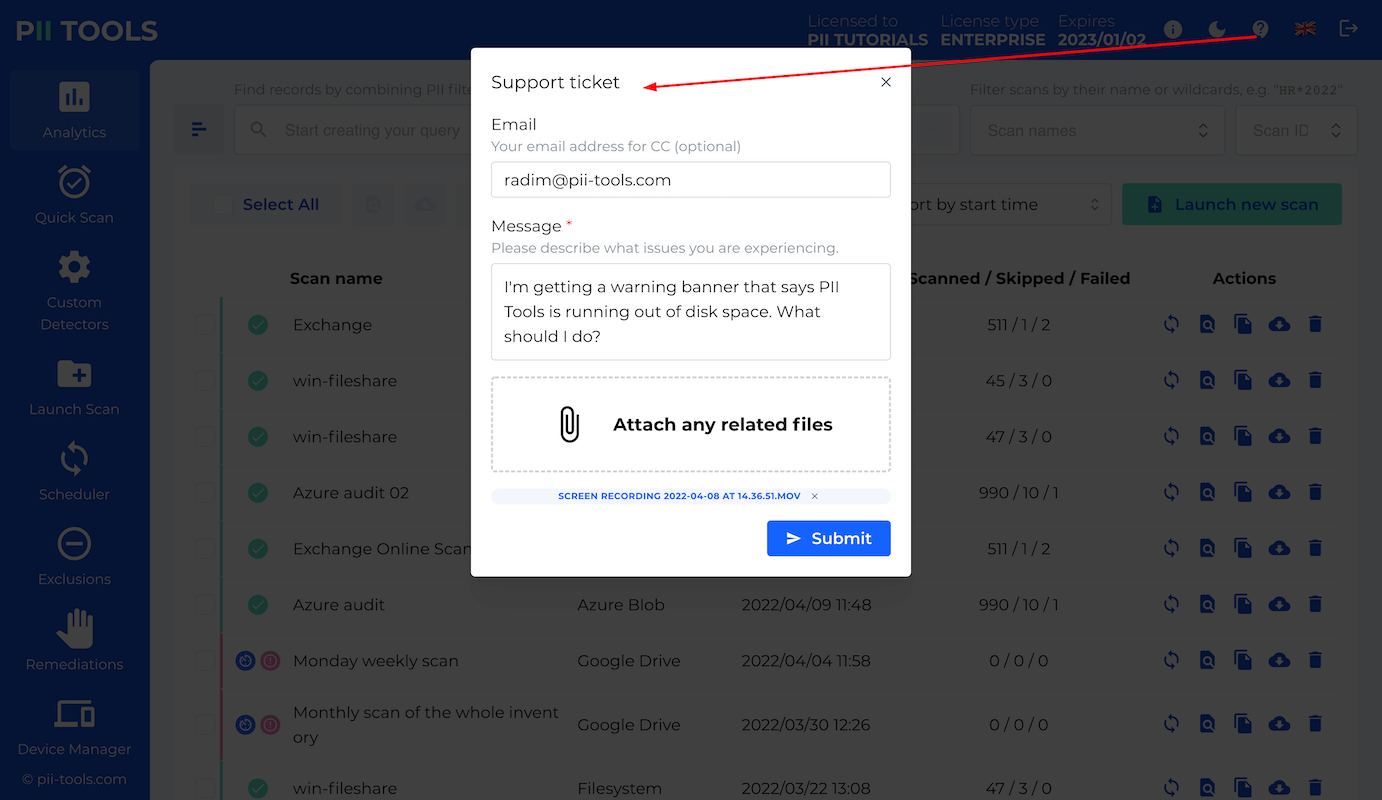
Support is available using the Contact Support button in the top-right corner of your dashboard.
When submitting a support ticket, please be clear in your description of the problem:
- What results did you get?
- What did you expect instead?
- Attach any screenshots or sample files as appropriate.
This helps us resolve your request faster. Thanks!
If you need anything else, please reach out directly to support@pii-tools.com.
Authenticating connectors
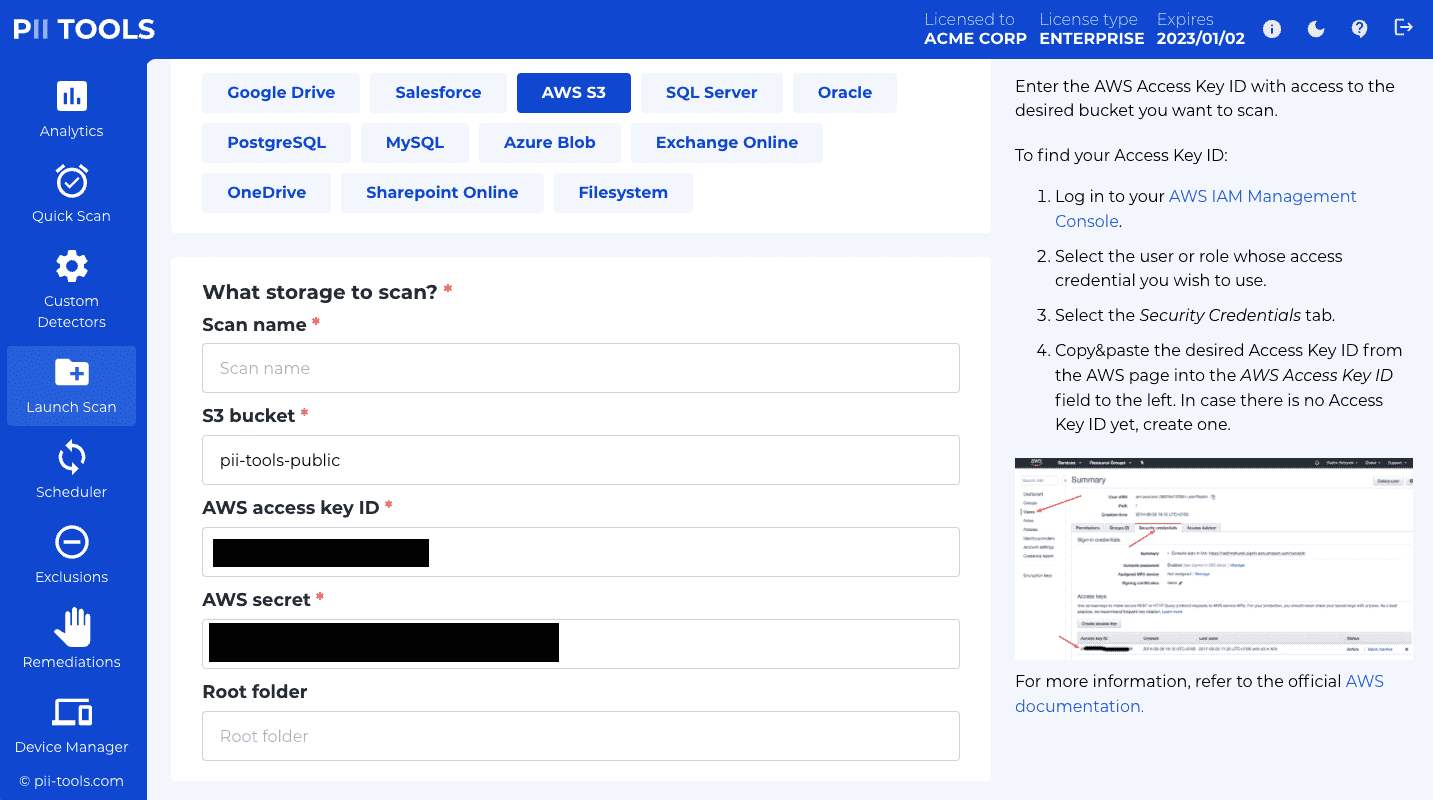
Some connectors, such as Office 365, Google Drive or Amazon S3, require authorizing PII Tools in order to scan the data stored inside.
To streamline the process of authorizing PII Tools and obtaining the necessary credentials, we prepared the step-by-step instructions with screenshots below. But keep in mind that in principle, you can obtain the necessary parameters any other way. These instructions are just a guideline for your convenience. PII Tools only needs the access credentials as input in order to run a scan, no matter where you got them from.
Microsoft Office 365
Microsoft Graph is Microsoft's API for accessing data stored on Microsoft Office 365 services, such as Exchange Online, OneDrive, and SharePoint Online.
In order for PII Tools to scan data inside Office 365, you'll need the following access credentials. This section describes how to obtain them in detail:
- client ID (
client_id), - client secret (
client_secret) - tenant ID (
tenant_id)
In a nutshell, PII Tools needs to be registered by an administrator in the Microsoft Azure Registration Portal. This creates the client_id and client_secret for PII Tools. tenant_id is the ID of the organization whose data is to be scanned by PII Tools, i.e. your company.
Prerequisites
- An Microsoft Office 365 account with administrator privileges.
- PII Tools deployed on a server accessible from your local computer. See Deployment. We will refer to this server as
https://<pii-tools-server-ip-address-and-port>/below.
Registering PII Tools
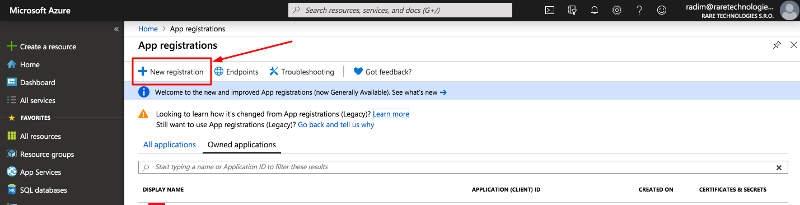
Go to https://portal.azure.com/#blade/Microsoft_AAD_RegisteredApps/ApplicationsListBlade and log in as an administrator.
Click on New registration in the top left corner:
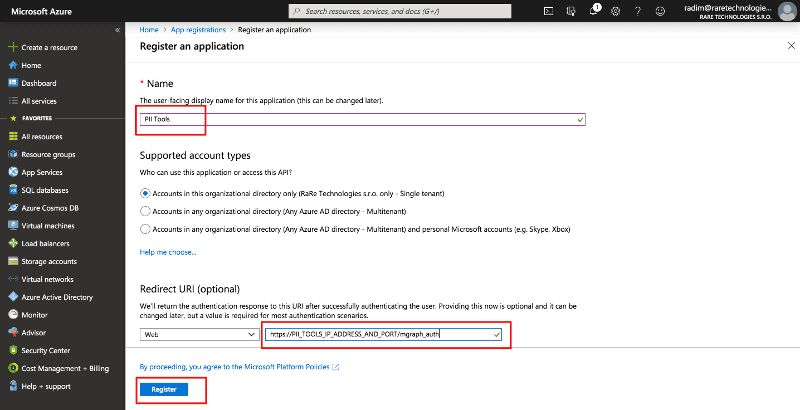
On the Register an application form:
- Set Name to "PII Tools".
- Fill in
https://<pii-tools-server-ip-address-and-port>/auth/mgraphinto the Redirect URI, replacing<pii-tools-server-ip-address-and-port>with your PII Tool server IP address. For example, if you installed PII Tools at175.28.1.10and port443, fill inhttps://175.28.1.10:443/auth/mgraphhere. - Click on Register.
On the Overview page of the newly created application:
- Take note of the Application (client) ID. This is your
client_id. - Take note of the Directory (tenant) ID. This is your
tenant_id. - Next, click "View API permissions".
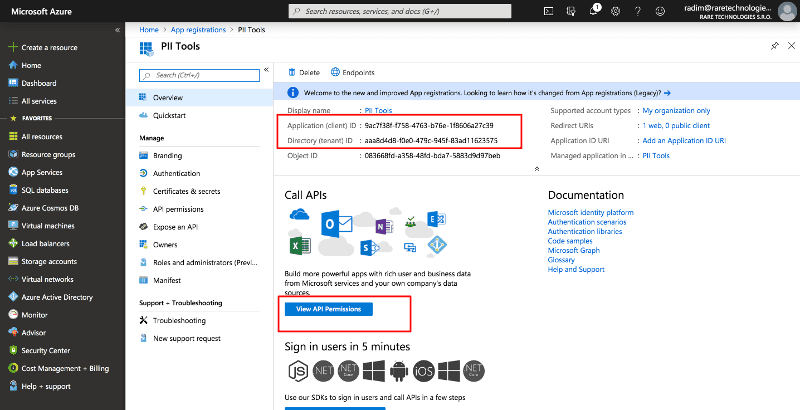
- Take note of the Application (client) ID. This is your
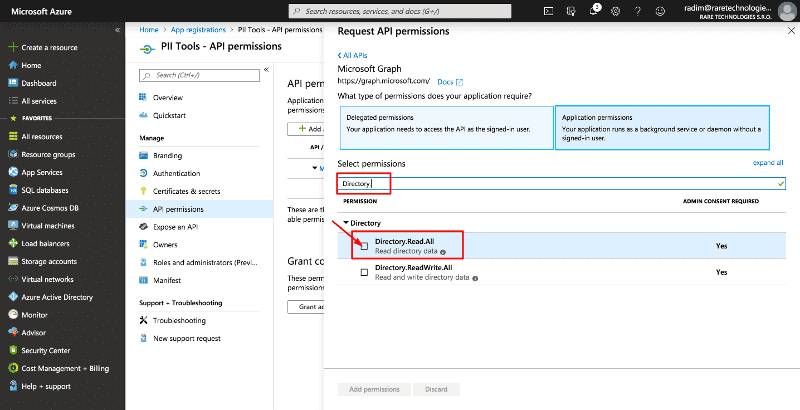
On the PII Tools - API permissions page
- Click on Add a permission.
- In the pop up, select Microsoft Graph and then Application permissions (not "Delegated permissions"!).
- Select the following permissions, by entering each permission into the Type to search box and then clicking the checkbox to the left of the permission to add it:
Directory.Read.All(required for OneDrive and SharePoint Online)Files.Read.All(required for OneDrive and SharePoint)Mail.Read(required for Exchange)Sites.Read.All(required for OneDrive and SharePoint Online)User.Read.All(required for Exchange and OneDrive)- (only if you wish to also enable remediation of Exchange emails)
Mail.ReadWrite - (only if you wish to also enable remediation of OneDrive and Sharepoint files)
Files.ReadWrite.AllandSites.ReadWrite.All - When done adding these permissions, click the Add permissions button at the bottom of the screen.
- You can also select only a subset of the permissions if you are not going to use all available connectors. For example, you can exclude
Mail.Readif you're not going to scan Exchange Online data.- You'll be able to adjust these permissions at any time in the future, by revisiting this Azure Portal page and changing the settings.
- Scroll down to the bottom of the page and click on Grant admin consent for
<my organization>.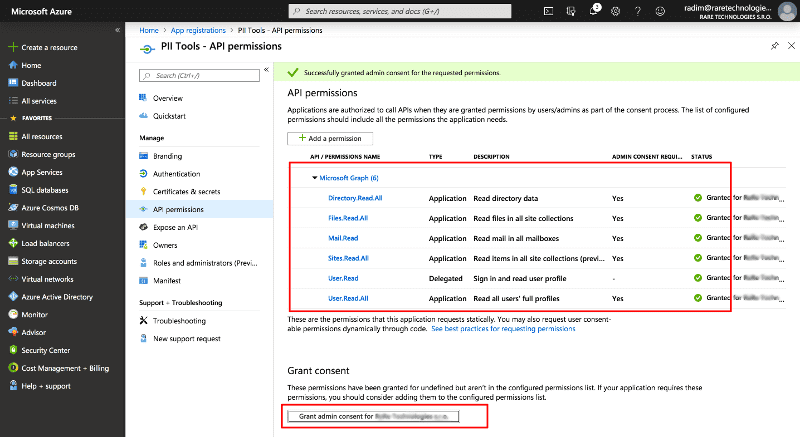
Go to the Certificates & secrets page in the left menu and:
- Click New client secret near the bottom of the screen. A sub-window with Description and Expiration will pop up.
- Enter
mgraph API secretinto Description. - Select Expires: Never.
- Click Add to confirm.
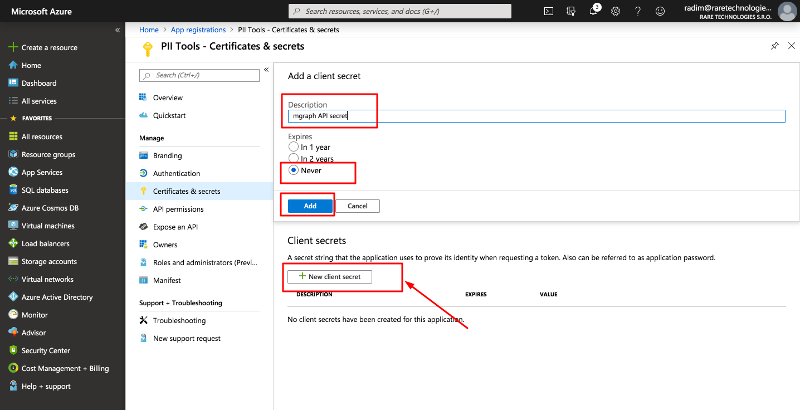
- Take note of the generated Value: this is your
client_secret.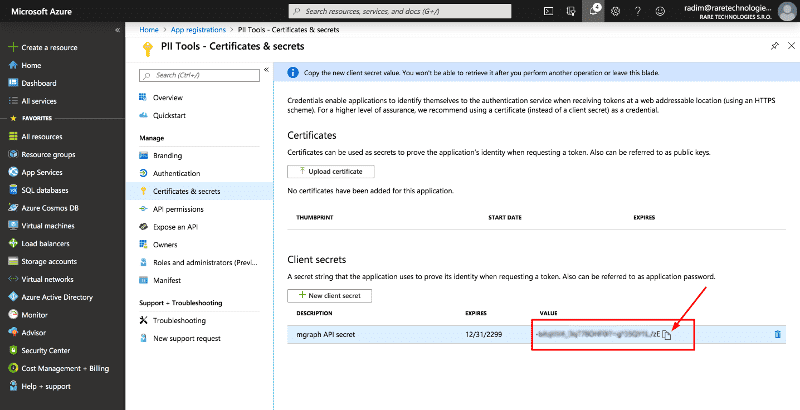
Congratulations. You are now ready to scan your Microsoft Office 365 data, using the client_id, tentant_id and client_secret obtained above. See Running a scan.
Security notes
The client_secret is required for PII Tools to authenticate against the Microsoft Graph API and needs to be provided when initializing an Office 365 scan (Exchange, OneDrive, or SharePoint). If you lose your Office 365 client_secret, PII Tools cannot help you retrieve it. You'll have to generate a new one, using the steps above.
Google Drive
To scan a Google Drive storage, you'll need to enable Drive SDK API and obtain one of the following credentials:
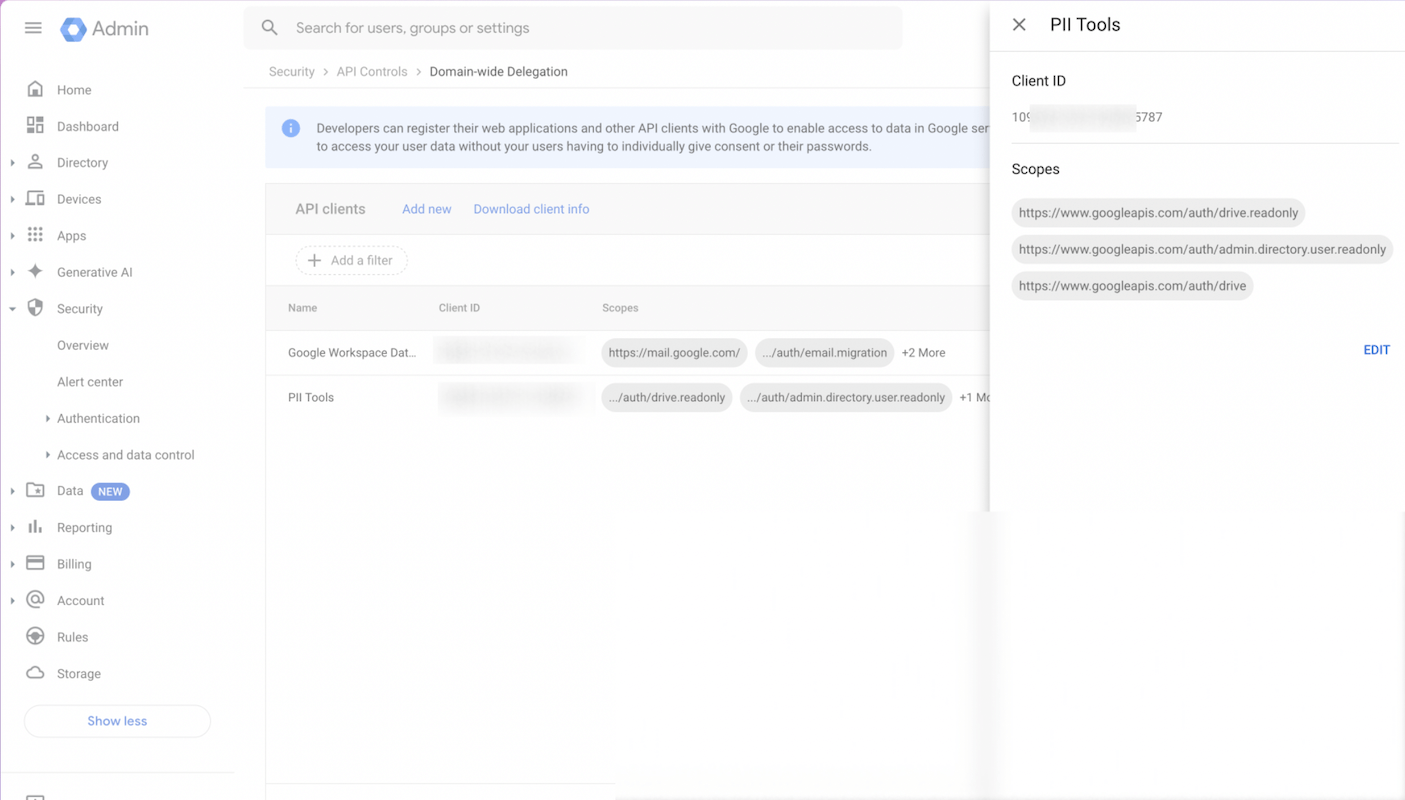
- JSON credentials for a Google Workspace service account, with domain-wide delegation.
client_id,client_secretandrefresh_tokenOAuth2 tokens, to scan a single GDrive account.
We recommend the Service account approach, because it is easier to manage and allows scanning multiple users more easily.
GDrive using OAuth
Use OAuth authentication to grant PII Tools access to GoogleDrive of one specific user. If you wish to scan multiple users, or your whole Google tenancy, see the "service account" option below instead.
Granting OAuth access involves two steps. First, set up OAuth access following Google's official guide:
- Go to the Google API console.
- On the left, select
Credentials. - On top, click
+ Create credentialsand selectOAuth client ID: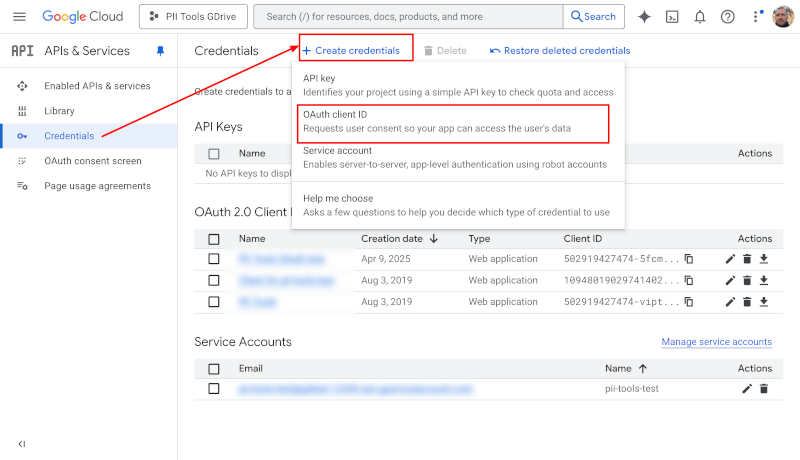
- Select
Web Applicationas the application type. - Choose any name you like; for example "PII Tools OAuth".
- Under
Authorized redirect URIs, enterhttps://developers.google.com/oauthplaygroundas the redirect URI. - Click
Createat the bottom. - On the resulting screen, take note of the displayed
Client IDandClient secret. You will need those in the next steps.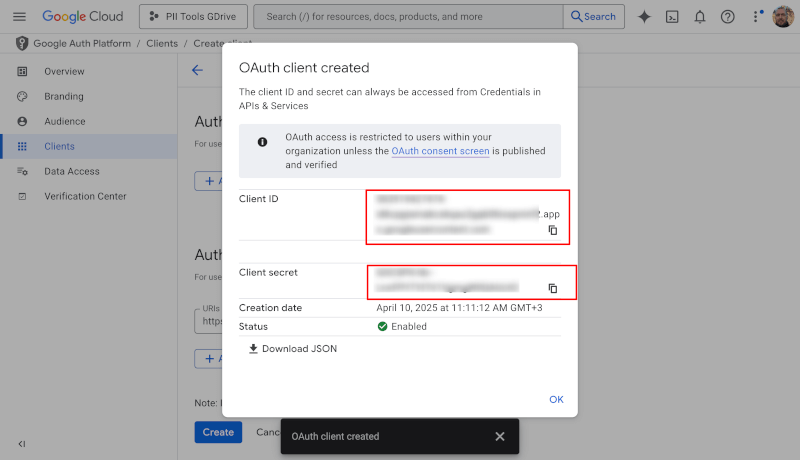
Next, have the user whose GDrive you want to scan generate an OAuth refresh token. They will need to log into their Google account during the steps below:
- Go to https://developers.google.com/oauthplayground.
- In the top right corner, click the settings icon, check "Use your own OAuth credentials" and paste your Client ID and Client Secret from above.
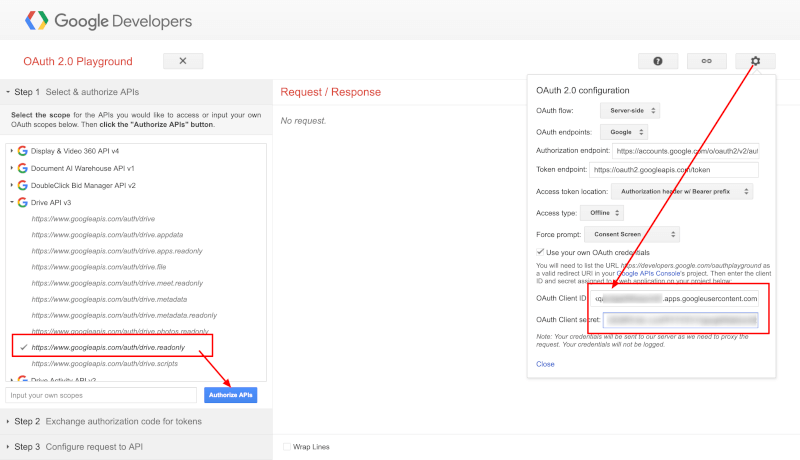
- In Step 1 on the left, under
Drive API v3selecthttps://www.googleapis.com/auth/drive.readonly(needed for scanning). If you wish to also remediate Google Drive files (erase documents, redact documents), also selecthttps://www.googleapis.com/auth/drive. - Click
Authorize APIsand allow access to your account when prompted. - On the resulting screen, select
Auto-refresh the token before it expires. - Click the blue
Exchange authorization code for tokensbutton. - Take note of the
Refresh tokenvalue in Step 2. You will need this refresh token later in PII Tools. You can ignore theAccess token.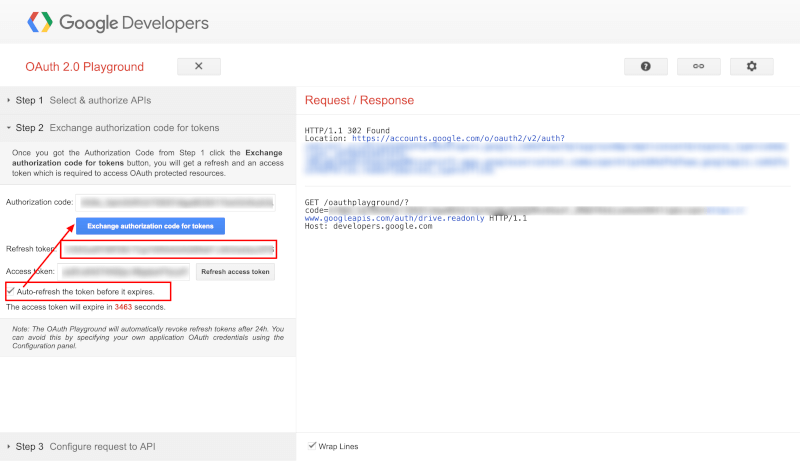
Congratulations! Equipped with the Client ID, Client secret and Refresh token generated above, you can now proceed to launching Google Drive scans and remediations.
GDrive using Service Account
Service accounts are more convenient than tokens in case you are the domain administrator, and wish to scan Google Drives of multiple users. Instead of generating a token for each user account, which can be tedious, you can set up one service account to impersonate any user in your domain.
To set up a service account and delegate authority, follow the official Google steps at https://developers.google.com/identity/protocols/OAuth2ServiceAccount#delegatingauthority. The only permission scope required for scanning is:
https://www.googleapis.com/auth/drive.readonly- plus (optional)
https://www.googleapis.com/auth/admin.directory.user.readonlyif you plan to launch "Scan all users" (all_users=1) scans. - plus (optional)
https://www.googleapis.com/auth/driveif you wish to remediate files: Secure Erase documents, Redact-in-place documents.
Microsoft Azure Blob
To scan an Azure Blob storage, you'll need two authentication pieces: an account_name, and either an account_key or a sas_token.
In order to obtain these credentials:
- Log into the Azure Portal.
- Choose Storage accounts and select the storage you wish to scan.
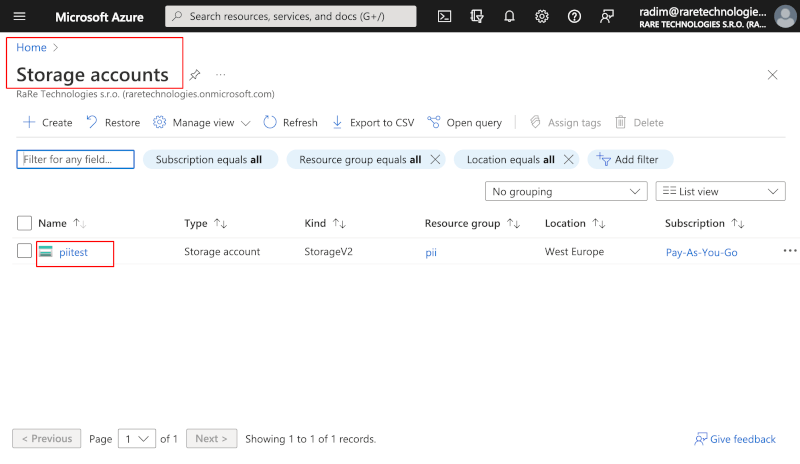
- To authenticate via an account key, choose "Access Keys" from the left hand side menu. Find the
account_nameunder Storage account name and youraccount_keyunder key1: Key.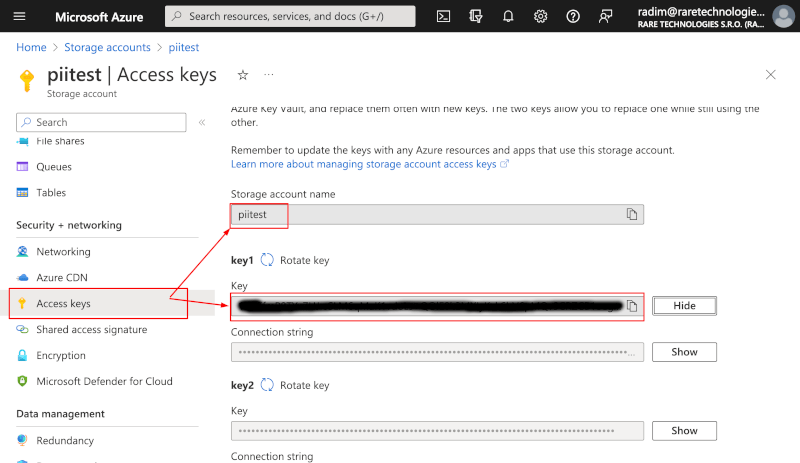
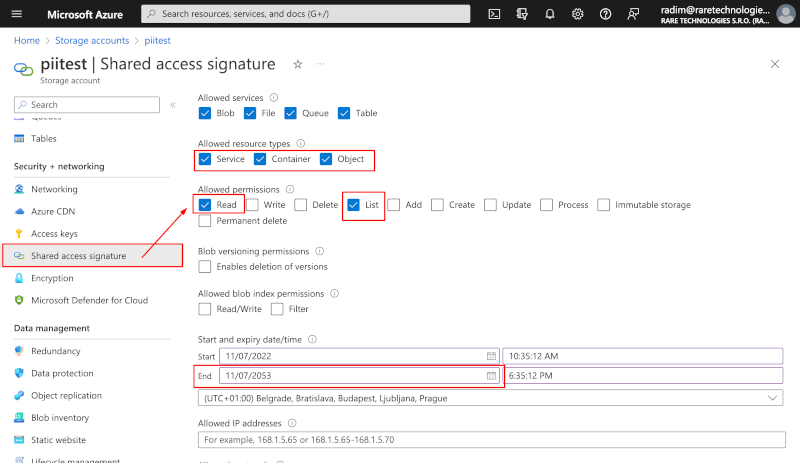
- Recommended: Alternatively, configure a more fine-grained authentication model for PII Tools using a shared access signature (SAS) token instead of Account Key:
- Select "Shared access signature" from the left hand side menu.
- Select all "Service", "Container" and "Object" under "Allowed resource types".
- Under "Allowed permissions", select "Read" and "List".
- Only if you purchased the Remediation module for PII Tools and wish to remediate your Azure Blob objects, additionally select "Write", "Delete", "Permanent Delete" permissions; select "Enable deletion of versions" under Blob versioning; and select "Read/Write" under "Allowed blob index permissions".
- Set the "Expiry date" and "Allowed IP addresses" according to your project and infrastructure needs.
- Leave the other parameters ("HTTPS only" etc) at their default values.
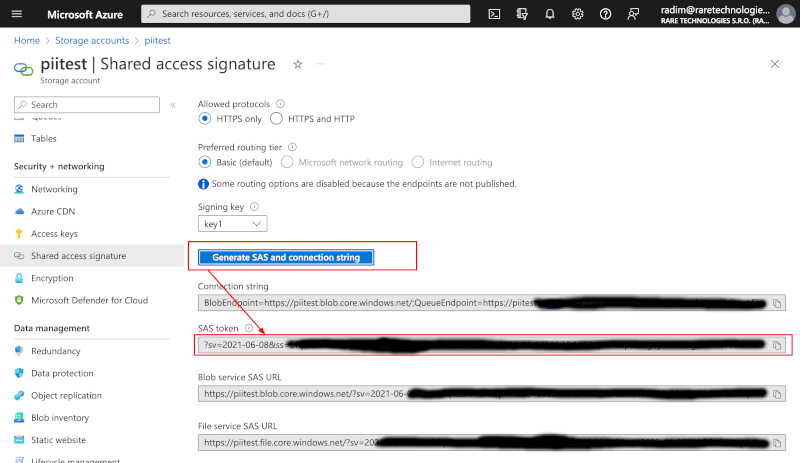
- Click "Generate SAS and connection string" at the bottom and take note of the "SAS token" value. This value is only displayed once, so copy it to a safe location.
Salesforce
PII Tools is able to scan content of Salesforce installations using the Salesforce Lightning API. Once you authorize PII Tools using the instructions below, it will be able to scan all SFDC records (files, users, accounts…) in your SFDC account.
This guide describes how to obtain the three Lightning API OAuth credentials needed for scanning:
- client ID (
client_id), - client secret (
client_secret) - refresh token (
refresh_token)
In a nutshell, PII Tools needs to be registered inside your Salesforce installation as a Connected App. This creates the client_id and client_secret for PII Tools. After that, using our instruction guide below, you will generate a refresh_token for a SFDC user account under which you'd like to run your scan(s).
These client_id, client_secret and refresh_token credentials are only generated once and then entered into PII Tools with each Salesforce scan. At no point are they shared with outside parties nor persisted outside of PII Tools. See Security Notes. If you lose your Salesforce credentials, you must go through the steps in this guide again to retrieve or regenerate them.
Prerequisites
- An active Salesforce account with privileges to create Connected Apps and enough API quota to scan desired objects.
- A deployed PII Tools installation, see Deployment. We will refer to this server as
https://<pii-tools-server-ip-address-and-port>/below. Make sure you can openhttps://<pii-tools-server-ip-address-and-port>/in your browser before proceeding.
Registering PII Tools
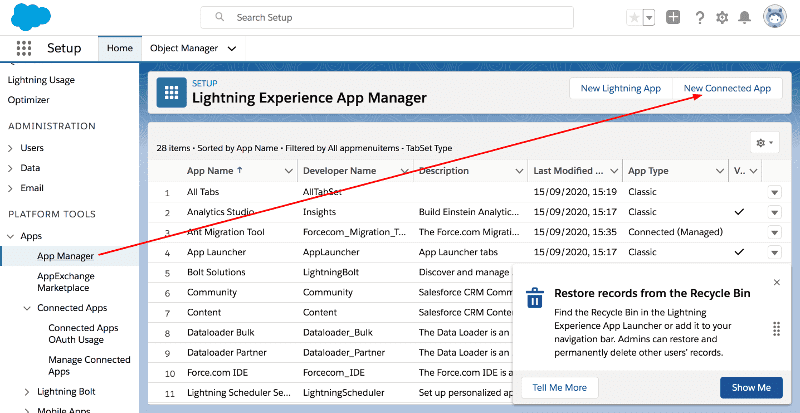
Go to Setup page of your Salesforce installation. The Setup page URL will look like
https://{your_sfdc_instance}.lightning.force.com/lightning/setup.Select App Manager on the left and then click New Connected App on the top.
On the opened form page, set Connected App Name and API Name to "PIITools", and set Contact email to your email.
- These values are not used by PII Tools but are mandatory by Salesforce.
Select Enable OAuth settings and fill in
https://<pii-tools-server-ip-address-and-port>/auth/salesforceinto the Callback URL, replacing<pii-tools-server-ip-address-and-port>with your PII Tool server IP address and REST port.- For example, if you installed PII Tools at
175.28.1.10and port443, fill inhttps://175.28.1.10:443/auth/salesforceinto Callback URL.
- For example, if you installed PII Tools at
Select two OAuth scopes:
Manage user data via APIs (api)andPerform requests at any time (refresh_token, offline_access).Uncheck the
Require Proof Key for Code Exchange (PKCE)andRequire Secret for Refresh Token Flowcheckboxes: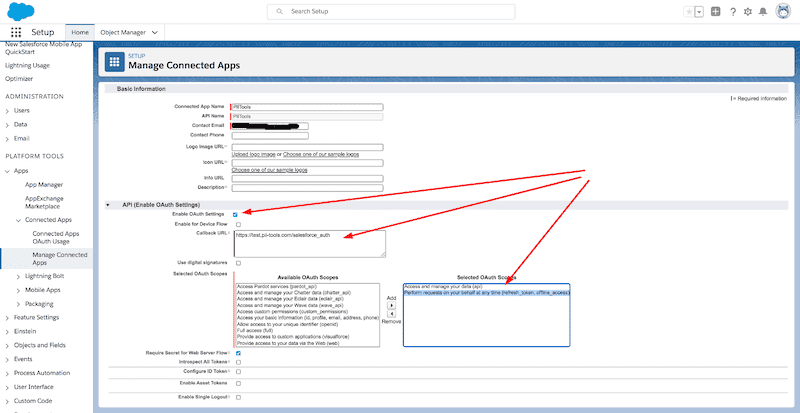
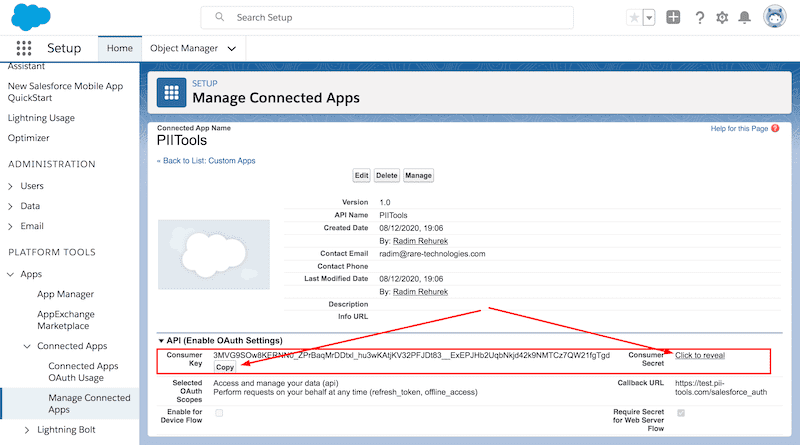
Click the Save button at the bottom and take note of the Consumer key (aka Client id) and Consumer secret (aka Client secret) of your newly created Connected App. You will need these two values to authorize scans later:
Open
https://<pii-tools-server-ip-address-and-port>/auth/salesforcein your browser.- Enter the Client ID and Client Secret from above and click Submit.
- A Salesforce authorization screen will appear. Log in with the user under whose account you’d like to run the data scan and confirm access.
- Take note of the displayed Refresh token. This refresh token can be reused across multiple scans – by default, SFDC doesn’t expire it. There is no need to regenerate a new refresh token until the current one is explicitly revoked or invalidated by you or your Salesforce administrator.
Congratulations! You are now ready to scan your Salesforce data, using the client_id, client_secret and refresh_token obtained above.
Note that you can restrict which Salesforce objects to scan using the Root folder field. By default, PII Tools will ignore all internal SFDC objects as well as SFDC objects inaccessible to the scanning SFDC user account.
Security notes
Internally, PII Tools will call the following Salesforce Lightning API endpoints during its scanning:
GET https://login.salesforce.com/services/oauth2/token: Generate access token from the provided refresh token.GET /services/data: Fetch and verify available Lightning API versions.GET /sobjects/: Fetch all available entity types.GET /sobjects/{type}/describe: Fetch available record fields for an entity type.GET /query: SOQL queries to fetch records for an entity type.
PII Tools scans never modify any data and do not need write access at all.
The OAuth credentials are not shared by PII Tools outside of your PII Tools and SFDC installation. It is your responsibility to manage and secure those credentials – PII Tools support has no access to them, and cannot help you secure, manage or retrieve them.
Device Agents
Device agents (DAs) are thin clients that scan a device (file shares, PCs, Windows, MacOS, Linux, laptop, workstation…). Each DA runs locally as a small background task on the target device, and communicates with a running PII Tools server over the network. One PII Tools server can scan many devices.
Device agents are long-running background processes that can be used for a single scan, or repurposed across multiple scans, for scheduled repeat scans and for file remediations.
Installing DA
To install a DA, copy the appropriate binary for the device's operating system (Windows, Linux, MacOS) to the machine you want to scan, either manually or in bulk using Intune or Active Directory (see headless agent installations on Windows).
These device agent binaries can be downloaded from your PII Tools dashboard:
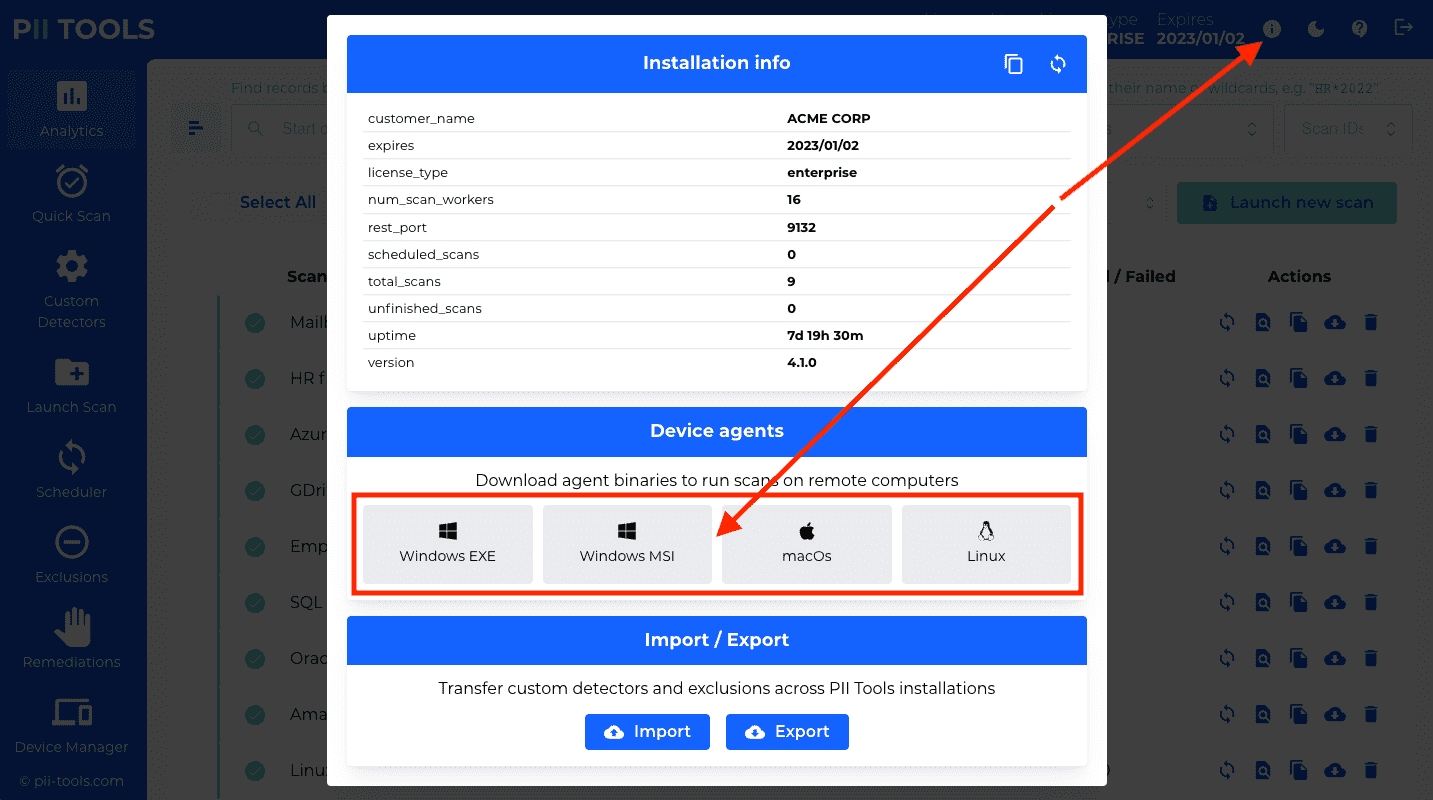
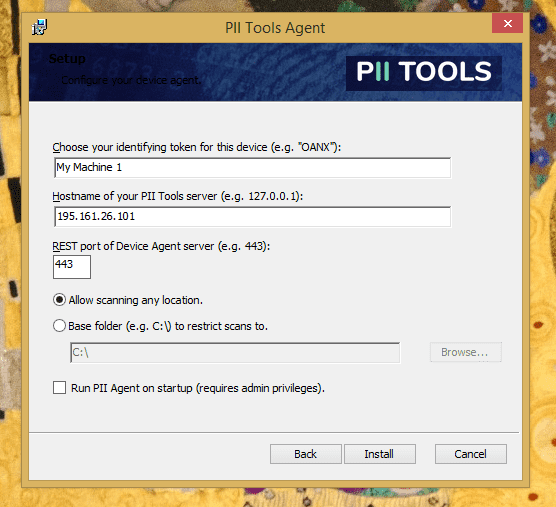
The installation will require four parameters.
- Base Folder is a folder path that restricts which parts of this machine PII Tools may scan, such as
C:\or%userprofile%or/home/jake/public. When launching a new agent scan, only scans inside this Base Folder directory will succeed; any scans outside this directory will automatically fail. Leave Base Folder empty to allow scanning of any location on this device (no restriction). - Quarantine Folder is a folder path into which PII Tools will upload quarantined files during Remediation. Leave empty to not allow any uploads = quarantine disabled for this agent (default). Set to a folder with write permissions to enable quarantine on this agent, for example
D:\pii_quarantine\. - Token is the unique identifier of this device. The device will be visible under this name in the PII Tools dashboard. For example, you can set the token to this device's IP address (e.g.
192.168.20.1), or to any other name that's meaningful to your organization (e.g.HR department: Mike's laptop). The maximum token length is 255 characters. - REST port and Host are the
REST_PORTandHOSTparameters from your PII Tools installation. This is how your agent knows which PII Tools server to connect to. These two parameters are the same across all your agents.
Windows Installation
To install a Device Agent on a Windows machine, double-click the pii-agent-windows.msi installer you downloaded here, and follow the installation instructions on your screen.
- Base Folder is a folder path that restricts which parts of this machine PII Tools may scan, such as
C:\or%userprofile%or/home/jake/public. When launching a new agent scan, only scans inside this Base Folder directory will succeed; any scans outside this directory will automatically fail. Leave Base Folder empty to allow scanning of any location on this device (no restriction). - Quarantine Folder is a folder path into which PII Tools will upload quarantined files during Remediation. Leave empty to not allow any uploads = quarantine disabled for this agent (default). Set to a folder with write permissions to enable quarantine on this agent, for example
D:\pii_quarantine\. - Token is the unique identifier of this device. The device will be visible under this name in the PII Tools dashboard. For example, you can set the token to this device's IP address (e.g.
192.168.20.1), or to any other name that's meaningful to your organization (e.g.HR department: Mike's laptop). The maximum token length is 255 characters. - REST port and Host are the
REST_PORTandHOSTparameters from your PII Tools installation. This is how your agent knows which PII Tools server to connect to. These two parameters are the same across all agents. - Run on startup: Select this if you'd like the Device Agent run automatically on machine startup in the background, for all users. You'll need Windows administrator privileges to enable this option.
The installation will automatically install and run the PII Tools agent as a background task. No further action is needed. Congratulations!
If you wish to verify that the PII Tools agent is running, open Windows' built-in Task Manager app and switch to its Details tab. You should see four (4) processes named pii-agent-windows there, running under the SYSTEM Windows account.
Remote Windows Installation
In some environments, you may want to install Device Agents on a large number of Windows machines at once (for example using Active Directory or Intune), instead of going through the installation manually on each machine.
In this case, you can use the MSI installer package with the "quiet" (headless) option, and install the agent remotely to multiple machines at once.
The headless installation command is:
msiexec /quiet /package "pii-agent-windows.msi" BASE_FOLDER="C:\" QUARANTINE_FOLDER="D:\quarantine\" SERVER_REST_PORT="443" SERVER_HOSTNAME="127.0.0.1" TOKEN="My laptop" RUN_ON_STARTUP="0"
- The
pii-agent-windows.msiinstaller file can be downloaded from the PII Tools dashboard: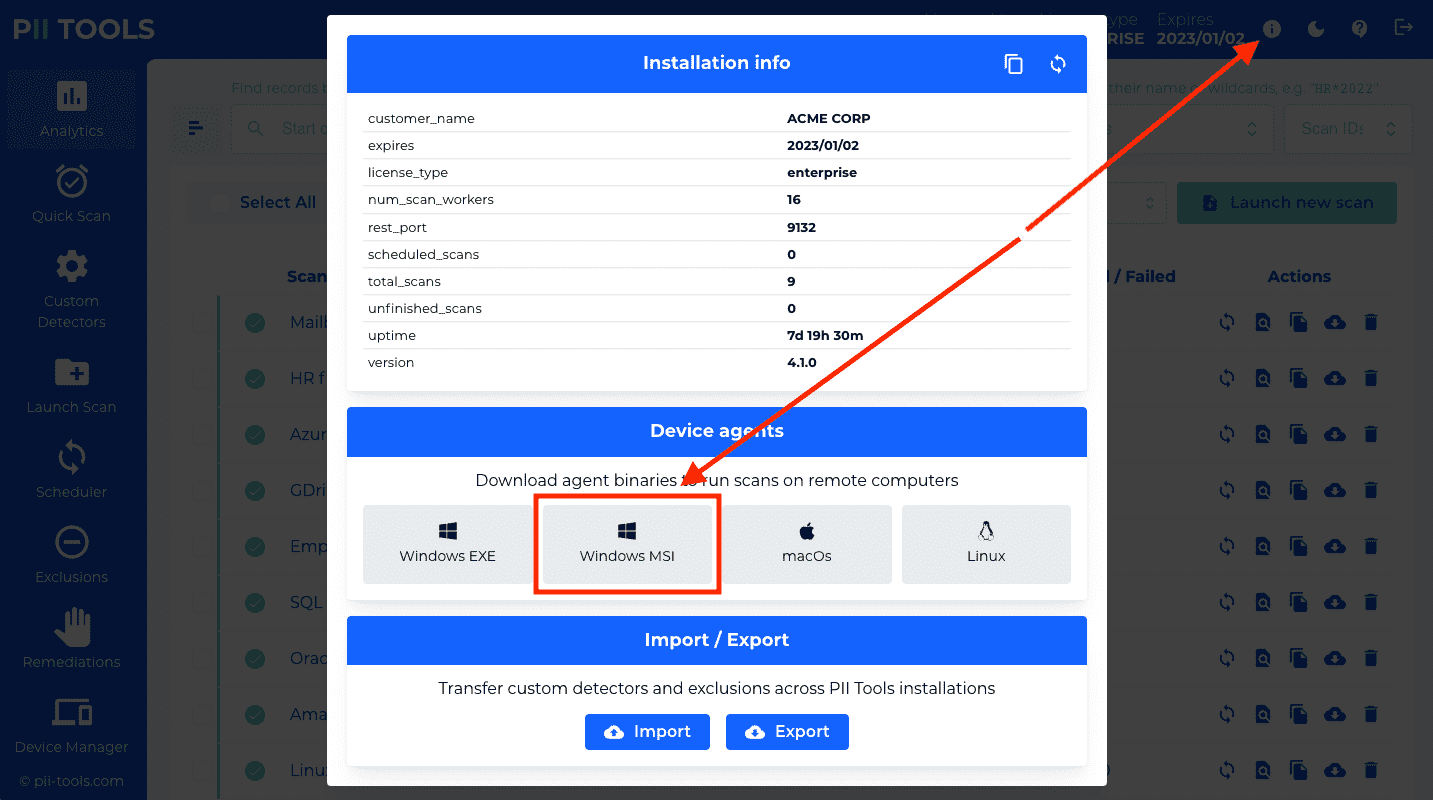
- The
quietoption enables silent installation, without any user prompts. RUN_ON_STARTUP: Choose0to not run on startup;1to run on startup for all users;2to run on startup for the installing user only.- The rest of the parameters have the same meaning as above.
Launch DA on device startup
In case you want to scan the same device repeatedly, we recommend launching the device agent on machine startup, and leave the agent running in the background. This means the same token will be associated with this device, and you can (re)launch scans easily on that device in the future.
For Windows, use the MSI installer and check the "Run on startup" option.
For Linux, use the following commands to have cron launch the agent automatically on device startup, after each reboot:
  # For Linux.
  chmod a+x /path/to/downloaded/pii-agent-linux
  EDITOR=nano crontab -e
  # Add this line at the end, save and exit:
  @reboot /path/to/pii-agent-linux cli --hostname 175.201.160.29 --port 443 --token "my machine 1" --base-folder "/home" --quarantine-folder "/backup/pii/"
In the above, replace the hostname and port values with your own IP and REST port you configured during PII Tools installation. Set base-folder to the directory sub-tree you wish to scan: any scans outside this directory will be forbidden. Leave the quarantine-folder parameter out completely if you do not wish this device to serve as the quarantine destination during remediation.
For macOs, we offer automation of agent deployment via JamfPro or similar. Get in touch with PII Tools support for macOs fleet scans, including for Macs with the older Intel (x86_64) as well as the newer ARM ("Apple Silicon", M1, M2, etc) CPU architectures.
The agent process will remain running in the background after a reboot, waiting for scanning instructions from the PII Tools server.
Running DA scans
Run scans against a running device agent from the PII Tools server as described in Running a scan. Use the token specified above to identify which device agent you want to scan.
You can have multiple device agents associated with a single PII Tools server, or even with a single device. All tokens must be unique though – two agents must never share the same token.
Stopping DA
If you installed the agent from MSI and selected "Run automatically on startup", the agent task will be among the scheduled tasks on your device. Use the Windows Task Scheduler to stop or uninstall the task.
On the other hand, if you launched the agent manually, as a foreground process, simply close the executable (e.g. pii-tools-windows.exe, click X in the top right corner) and its window.
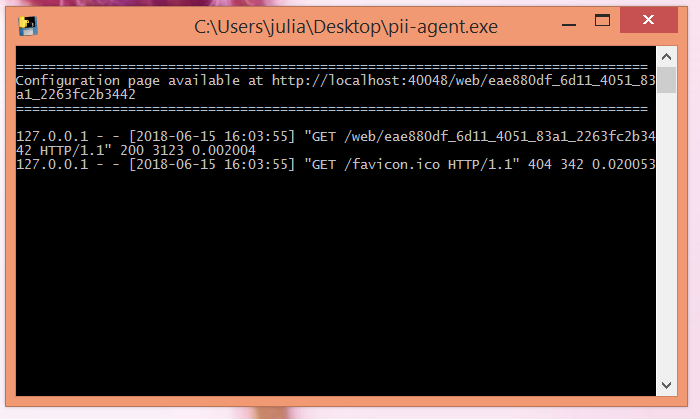
If you close the DA window while a scan is running, the scan will be interrupted and marked as "FAILED".
After terminating the Device Agent, no more scans will be possible against this machine. To re-enable scans on this device, you must follow the above steps to re-launch the Device Agent.
Device Management
To list, update or delete device storage from Device Management, use a corresponding GET / PUT / DELETE query:
curl -k -XGET --user username:pwd https://127.0.0.1:443/v3/storages?storage_type=device
Response:
{
  "_request_seconds": 0.012,
  "_success": true,
  "storages": [
    {
      "config": null,
      "info": null,
      "last_scanned": "2021-10-13 23:53:35.348768",
      "note": "Bob's laptop, HR office",
      "num_scans": 22,
      "num_schedules": 2,
      "storage_name": "osx",
      "storage_type": "device"
    },
    …
  ]
}
For installations with many endpoints, PII Tools offers a convenient way to manage your devices. You'll find it under "Device Manager" in the left-hand side menu:
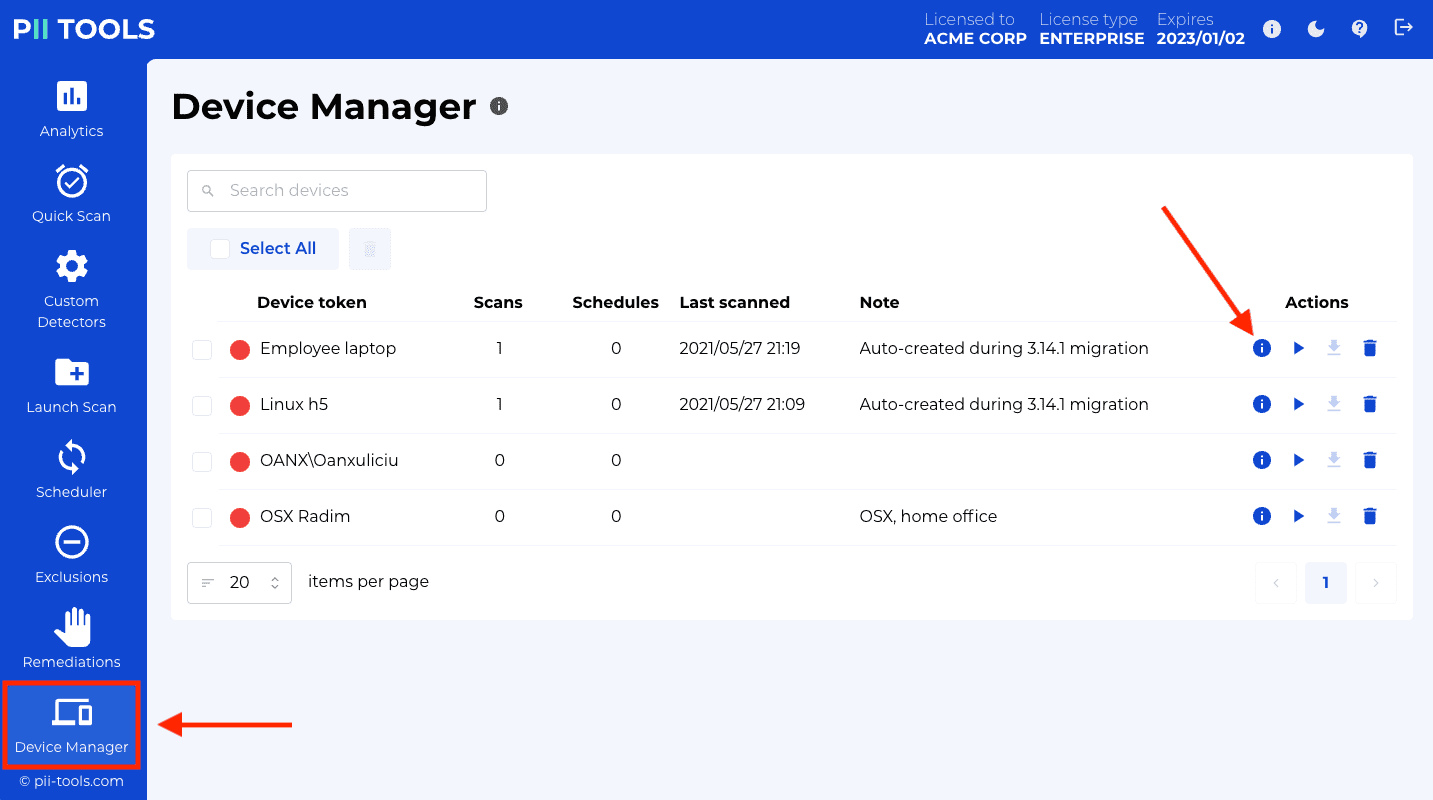
The device management screen lists all registered devices, whether currently running or not. For each device, you're able to:
- Inspect all completed scans of this device.
- Launch a new scan of this device.
- Inspect and edit all scheduled scans that include this device.
- Assign a custom device note to each device, by clicking the pencil icon under Note. A note can serve to associate additional information with the device, such as its scanning policy, location, ownership etc. Feel free to enter any text that helps your workflow.
- Find a particular device using the "Search devices" box at the top of the screen. Your search will match on the device token as well as the device note, to display all matching devices.
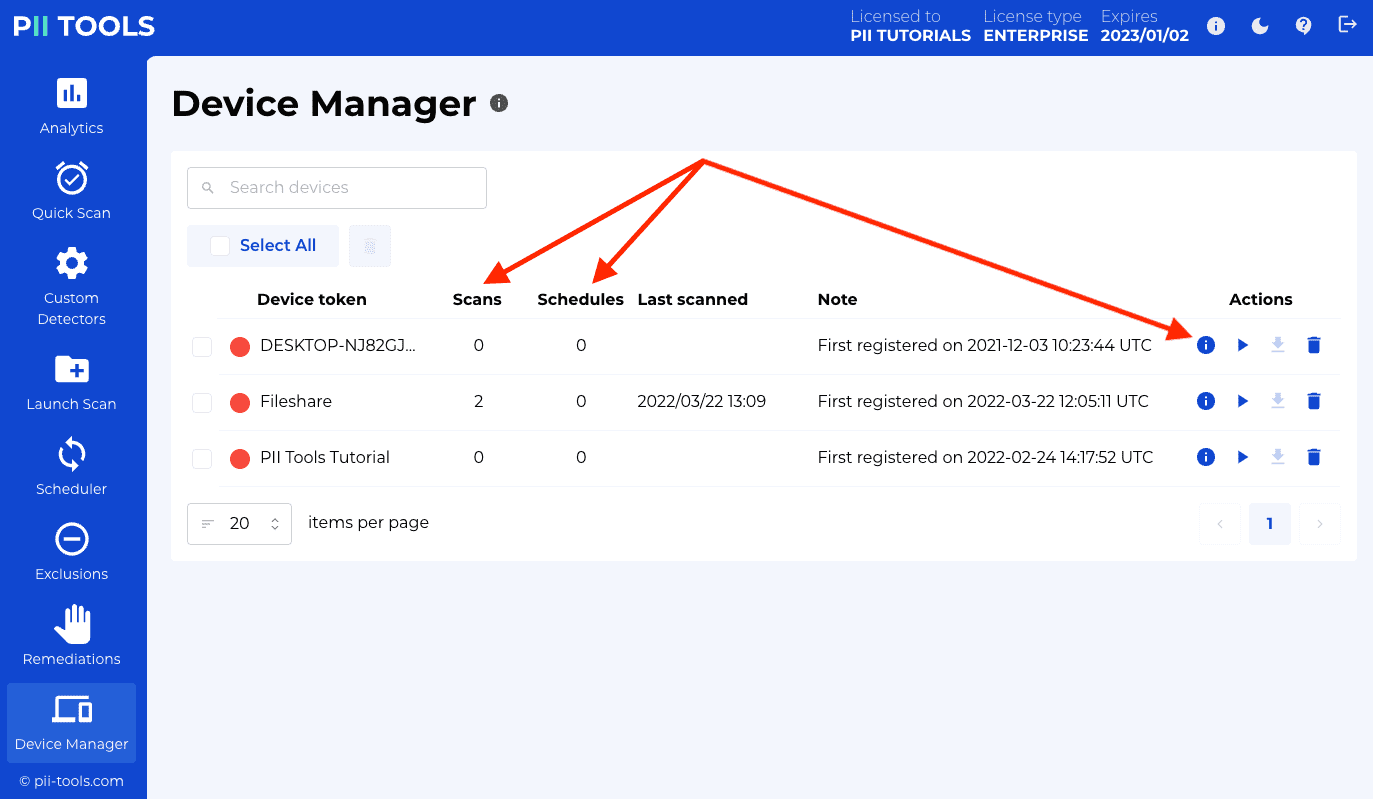
Devices are registered automatically the first time their agent connects to the PII Tools server. To un-register (delist) a device, click its trash icon under Actions.
Running a scan
Scanning documents for sensitive and personal data is the main functionality of PII Tools. This section contains information on how scans work and how to configure and process scanning requests using a REST API.
To run a scan using the web interface, click the "Launch new scan" button in the top-right corner of the "Analytics" tab, and follow the instructions in the right-hand side panel.
When using the REST API, you launch a new scan by POSTing its parameters to the /scans or /stream_scan endpoint, or clicking the corresponding buttons in the web interface.
A scan configuration defines what is to be scanned (input), using what PII detectors, and what to do with the results (output): see Scan configuration.
Multiple scans can be submitted to a single PII Tools instance, even at the same time, concurrently. Each scan gets its own scan name and scan ID which you may use to check the scanning progress and retrieve the scanning report at the end.
Conceptually, PII Tools supports two types of scans:
A batch scan, which runs asynchronously in pull mode, actively fetching documents from the storage to be scanned (local directory, remote S3 bucket, email archive, database…). Instances of discovered personal data from each document are stored within an inventory index, from which a scan report is generated once the scan is complete.
An stream scan, which runs in push mode, accepting a single document or piece of text on input. Stream scan is synchronous and returns any discovered personal data right away, in real-time. With strean scanning, no data is stored locally within PII Tools.
Once a scan is launched, PII Tools immediately starts running its detectors on the input data. The scanning is parallelized for performance, using a distributed pool of scan workers as configured during deployment. In this way, multiple files are being analyzed concurrently.
Scan configuration
A scan configuration is a JSON request payload that defines what is to be scanned (input), using what detectors, and what to do with the results (output).
In its simplest form, without any of the optional parameters, a full configuration for a stream scan looks like this:
{
    "filename": "notes.txt"
    "content": "Contents of notes.txt, in base64 encoding."
}
or for an email:
{
    "storage_parameters": {
        "content": "Contents of email.eml, in base64 encoding.",
        "filename": "email.eml",
        "cleanup_email": true
    }
}
For a Device Agent scan:
{
    "scan_name": "My first agent scan",
    "scan_type": "device",
    "storage_parameters": {
        "token": "24539"
    }
    "root_folder": "C:/Downloads/"
}
For an S3 cloud scan:
{
    "scan_name": "My first S3 scan",
    "scan_type": "s3",
    "storage_parameters": {
        "aws_secret_access_key": "--== AWS_SECREST_ACCESS_KEY ==--",
        "aws_access_key_id": "--== AWS_ACCESS_KEY_ID ==--",
        "bucket": "BUCKET_NAME"
    },
    "root_folder": "some/path/inside_bucket/"
}
For a Microsoft SQL Server database scan:
{
    "scan_name": "My first MSSQL scan",
    "scan_type": "odbc",
    "storage_parameters": {
        "server": "pii-test.database.windows.net:1433",
        "db_type": "mssql",
        "username": "user",
        "password": "pwd"
    },
    "root_folder": "my_database/my_table"  # or empty, to scan all databases and tables
}
For a Google Drive (gdrive) scan:
{
    "scan_name": "My first Gdrive scan",
    "scan_type": "gdrive",
    "storage_parameters": {
        "all_users": true,
        "include_shared_drives": false,
        "owner_only": true,
        "delegated_subject": "admin@my_domain.com",
        "service_account": "…"
    },
    "root_folder": ""
}
For an Oracle database scan:
{
    "scan_name": "My first Oracle scan",
    "scan_type": "odbc",
    "storage_parameters": {
        "server": "175.201.160.29:1521/ORCLPDB1",
        "db_type": "oracle_12c",
        "username": "user",
        "password": "pwd"
    },
    "root_folder": "MY_SCHEMA/MY_TABLE"  # or empty, to scan all schemas and tables
}
Available scan parameters
Example input configuration for a batch scan, scanning all files in the S3 bucket
acme_backupsunder/backups/2018while ignoring files ending intxt,docordocx:
{
    "scan_name": "My first SQL scan",
    "scan_type": "s3",
    "storage_parameters": {
        "aws_access_key_id": "AKIA1234567890123456",
        "aws_secret_access_key": "abCD1234567/qB6",
        "bucket": "acme_backups"
    },
    "root_folder": "/backups/2018",
    "reject_filenames": ".*(txt|doc|docx)$"
}
Example input configuration for a device scan of
C:\Usersof agentlaptop1, scanning only ZIP files:
{
    "scan_name": "My first agent scan",
    "scan_type": "device",
    "storage_parameters": {
        "token": "laptop1"
    },
    "root_folder": "C:/Users/",
    "accept_filenames": ".*(zip)$"
}
This is the list of available parameters you may use when launching a batch or stream scan:
| Parameter | Type | Description | Available | Default |
|---|---|---|---|---|
| scan_name | String | Scan will appear under this name in the inventory | batch | mandatory |
| scan_type | String | Type of storage to scan (see below). | batch | mandatory |
| storage_parameters | Object | Access credentials for the particular storage type. | batch | mandatory |
| root_folder | String (optional) | Only scan files under this location. Storage-specific. | batch | "" (scan everything) |
| root_folders | List[String] (optional) | Scan files under any of these locations. When not specified or empty, fall back to scanning whatever's under root_folder. |
batch | [] |
| content | String | Raw base64-encoded document content. | stream | mandatory |
| filename | String | File name of the file being scanned. | stream | mandatory |
| cleanup_email | Bool (optional) | Automatically detect email headers and signatures in emails, and then exclude them from PII analysis. | batch and stream | false |
| skip_attachments | Bool (optional) | When scanning emails, skip all attachments; scan only the email body itself. Applies to any email source: MSG, EML, MBOX, PST, Exchange Online… | batch and stream | false |
| delta_storage | Bool (optional) | Only scan new or modified files in this storage. If true, all locations that already exist in the PII Tools inventory, whether SKIPPED or SCANNED or FAILED, will be skipped. Only new files or files that have been modified since the last scan will be scanned: "Delta Scanning". |
batch | false |
| use_ocr | Bool (optional) | Run OCR on documents and images? Can lead to much slower processing. | batch and stream | false |
| prestat | Bool (optional) | Collect overall data statistics before a scan begins. Used to display dynamic scan progress. | batch | false |
| scan_views | Bool (optional) | Also scan SQL views? Affects only database scans. | batch | false |
| detectors | List[String] (optional) | List of detector names to use in this scan. If not provided, use all available detectors. | batch and stream | – |
| severity_clf | String (optional) | Classify each scanned document using the custom classifier of this name. | batch and stream | The built-in severity classifier |
| reject_filenames | String (optional) | Skip all files whose filename (including path) matches this regular expression. Case insensitive. | batch | ^$ (skip nothing) |
| accept_filenames | String (optional) | Skip all files whose filename (including path) doesn't match this regular expression. Case insensitive. | batch | .* (skip nothing) |
| max_age | Integer (optional) | Incremental scans: Skip files with "last modified" time older than this many seconds. | batch | no age restriction |
| min_age | Integer (optional) | Incremental scans: Skip files with "last modified" time newer than this many seconds. | batch | no age restriction |
| download_max_bytes | Integer (optional) | Download at most this many bytes from file. Use a special value of 0 to download all bytes (not recommended). |
batch and stream | 5000000 (5 mB) |
| ignore_nist_nsrl | Bool (optional) | Skip all files that appear in the NIST NSRL Reference Data Set. | batch | true |
| wait_reconnect | Integer (optional) | In case an Agent connection drops, wait this many minutes for the Agent to reconnect before failing the scan. | 1440 (1 day) |
|
| analyze_max_text | Integer (optional) | Analyze at most this many characters from extracted plain text per file. Use a special value of 0 to analyze all characters. |
batch and stream | 10000 (10 kB) |
| analyze_max_rows | Integer (optional) | Analyze at most this many rows from tables (in spreadsheets, databases etc). Set to 0 for "scan all rows". |
batch and stream | 100 |
| select_rows_strategy | String (optional) | How to select which rows to analyze in a table. Available strategies: first (scan rows sequentially from the start) or random (scan a random subsample). |
batch and stream | first |
| sample_rows_ratio | Float (optional) | Sample a relative portion of each table, e.g. 0.1 to scan 10% of all rows (but never more rows than analyze_max_rows). |
batch and stream | 1.0 |
| row_batch_size | Integer (optional) | Analyze table rows in batches of this many rows. | batch and stream | 100 |
| pdf_resolution | Integer (optional) | DPI resolution for processing PDFs as images. | batch and stream | 50 |
| max_images | Integer (optional) | Process at most this many pages as images, for example from PDFs. Set to 0 for "scan all pages". |
batch and stream | 5 |
| max_dir_depth | Integer (optional) | Don't descend into directories deeper than this. | batch | 20 |
| passwords | List[String] (optional) | List of passwords to try on encrypted files and archives. | batch and stream | [] |
| apply_exclusions | Bool (optional) | Apply active exclusion rules to the scan output | stream | true |
| ocr_min_file_size | Integer (optional) | Don't OCR images smaller than this many bytes. Small images (icons, logos…) typically just slow down scanning and contribute no real PII. | batch and stream | 50000 |
| ocr_min_dim | Integer (optional) | Don't OCR images where either width or height is smaller than this many pixels. Small images (typically icons, logos…) just slow down scanning and contribute no real PII. | batch and stream | 300 |
| test_connectivity | Bool (optional) | Validate that the storage is accessible and exit without performing the scan or storing the scan in the inventory. Causes scan_id to be null in the response. |
batch | false |
Root folder
The root_folder parameter in batch scans is interpreted based on the type of scan:
- For file storage scans (
s3,gdrive,deviceetc): only scan files under this directory. - For database scans (MS SQL, Oracle etc):
"root_folder": ""(default): Scan all tables under all databases."root_folder": "database_name": Scan all tables under a specific database."root_folder": "database_name/table_name": Scan tables namedtable_nameunder a specific database."root_folder": "database_name/schema_name/table_name": Scan the specified table under the specific schema and database.
- For Microsoft Office 365 scans, see the documentation of the particular scan types below.
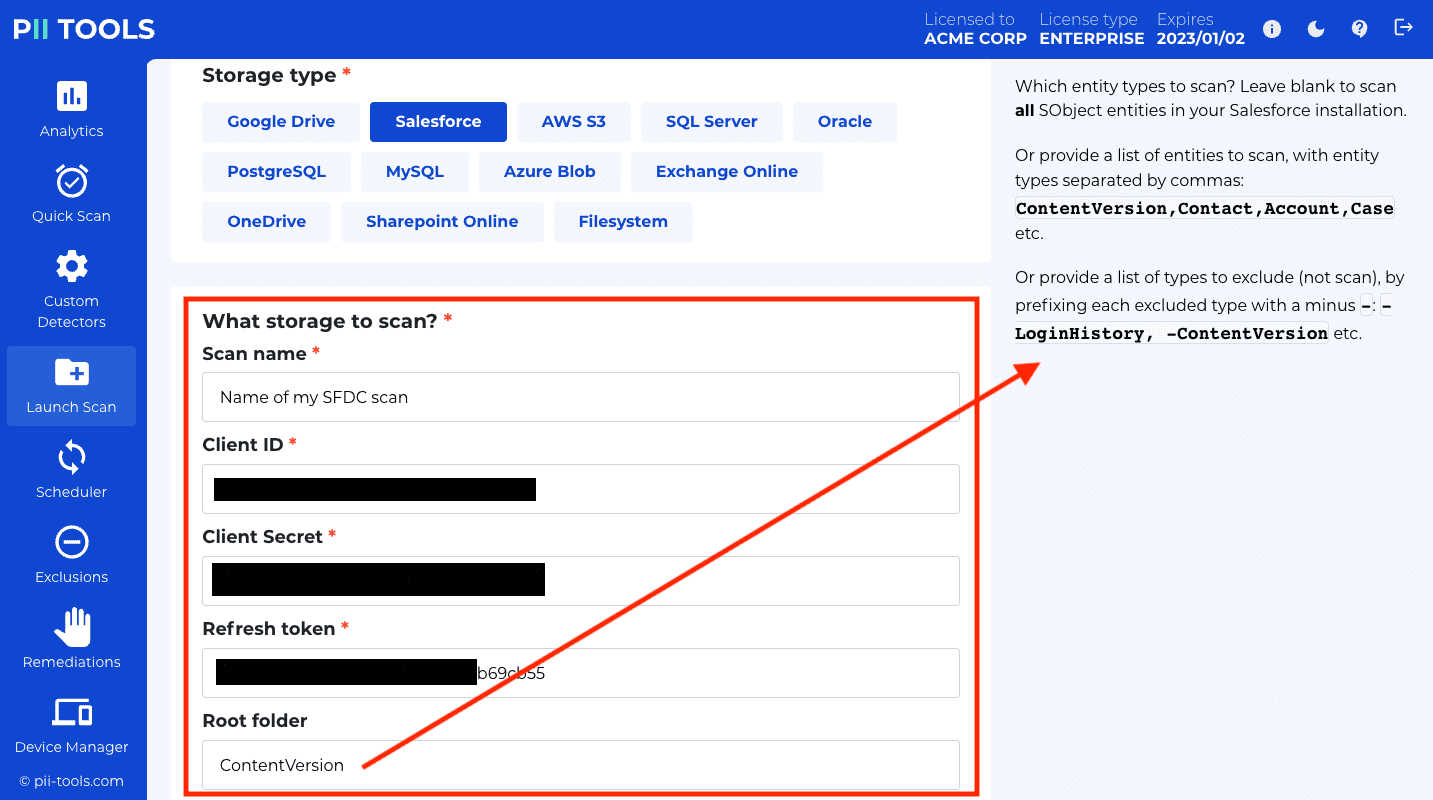
For Salesforce scans: Root folder is a comma-separated list of object types to scan:
"root_folder": ""(default): scan all records under all object types."root_folder": "ContentVersion, User, Contact, Case, -LoginHistory": scan only records under these specified object types, ignoring any types prefixed with the minus sign-.
For a list of all built-in Salesforce types, see here.
See Supported Storages for the full list of supported storage connectors.
Specifying which detectors to use
Example: launch an AWS S3 scan, using only the
face,passwordandnamedetectors:
curl -k -XPOST --user username:pwd https://127.0.0.1:443/v3/scans -H 'Content-Type: application/json' -d'
{
    "scan_name": "My first S3 scan",
    "scan_type": "s3",
    "storage_parameters": {
        "aws_secret_access_key": "AKIA1234567890123456",
        "aws_access_key_id": "abCD1234567/qB6",
        "bucket": "contract_backups"
    },
    "root_folder": "",
    "detectors": ["face", "password", "name"]
}'
To specify which detectors to use in a batch scan, define the "detectors": ["name_1", "name_2"] parameter in the scan configuration. The available names can be retrieved via GET /v3/detectors (see list all existing detectors GET endpoint).
Storage-specific parameters
Scan type device
storage_parameters |
Type | Description |
|---|---|---|
token |
String | Token for the Device Agent to scan. See Device agents. |
tokens |
List[String] | List of tokens for multiple Device Agents to scan. Each device scan will appear as a separate item in your inventory. The suffix "-token" will be automatically appended to each of these individual scan names, in order to differentiate them in the dashboard. |
See Device Agents for how to install agents and scan local and remote filesystems and file shares.
Scan type s3
storage_parameters |
Type | Description |
|---|---|---|
bucket |
String | S3 bucket to scan. For buckets in the AWS China partition, prefix your bucket name with aws-cn: (e.g. aws-cn:my_bucket). |
aws_access_key_id |
String | AWS access key ID for the bucket. |
aws_secret_access_key |
String | AWS secret for the bucket. |
Scan type salesforce
Scan the content of a Salesforce installation. Please see Authenticating connectors for how to obtain the credentials.
storage_parameters |
Type | Description |
|---|---|---|
client_id |
String | Client ID (aka Customer Key) of the Salesforce Connected App. |
client_secret |
String | Client secret (aka Customer Secret) of the Salesforce Connected App. |
refresh_token |
String | Refresh token for the Connected App user account. |
The root_folder of Salesforce scans can be set to one of:
- Empty string
"": will scan all available records for all Salesforce objects (SObjects). sobject_type: scan records under one specified object type. Example:ContentVersion(i.e. scan all Files, including their older versions).-sobject_type: scan records under all object types except one. Example:-LoginHistory.sobject_type1, sobject_type2, sobject_type3…: scan records under multiple object types. Example:ContentVersion, User, Account, Contact.
Scan type gdrive
Scan files in Google Drive storage. Please see Authenticating connectors for how to obtain the credentials.
The Google Drive connector offers three parameters to fine-tune which portion of available Google Drive documents to scan:
owner_only, called 'Scan also "Shared with me" documents?' in the UI. Whenowner_only=1, PII Tools will scan only documents owned by the authenticated Google Drive user. Whenowner_only=0, PII Tools will also scan documents that are "Shared with me" for that authenticated Google Drive user.include_shared_drives, called 'Scan also shared drives?' in the UI. Wheninclude_shared_drives=0, scan only documents within the authenticated user's MyDrive. Wheninclude_shared_drives=1, also include documents from shared drives.all_users, called 'Scan documents of all users? (delegated subject must be an admin)' in the UI. Whenall_users=0, PII Tools will scan documents of only that one authenticated user (while taking into account bothowner_onlyandinclude_shared_drivesoptions above).
When all_users=1 and you are authenticating PII Tools using the Service Account with domain-wide delegation, PII Tools will scan documents of each Google user in turn, effectively scanning the whole tenancy. With all_users=1, the Delegated Subject must be a Google Workspace admin account that is allowed to list all users. Please refer to Authenticating Google Drive for additional steps to configure permission needed for "Scan all users".
With GDrive scans, root_folder must be set either to:
- Empty value, to scan all documents that match the given
owner_only,include_shared_drivesandall_userssettings. rootto scan the entire MyDrive storage of the authenticated user, or- Folder ID to scan the contents of that one particular folder. This folder ID can be retrieved from the URL where the folder can be accessed in Google Drive by taking the string after the last forward slash. For example, in
https://drive.google.com/drive/u/2/folders/1bzcnvs3UCr9t_yWvWYcPSUXGrMna9F79, the folder ID is1bzcnvs3UCr9t_yWvWYcPSUXGrMna9F79.
Google Drive offers two primary modes of authentication: using an OAuth2 refresh token (single user), or using a service account (multiple users, using authority delegation/impersonation). We recommend Service account for its flexibility.
GDrive using refresh token
storage_parameters |
Type | Description |
|---|---|---|
client_id |
String | Client ID. |
client_secret |
String | Client secret key. |
refresh_token |
String | Refresh token. |
GDrive using service account
storage_parameters |
Type | Description |
|---|---|---|
service_account |
String | Service account credentials, as a JSON string. |
delegated_subject |
String | Primary email of the Google Workspace user whose data is to be scanned (a process called "impersonation" in the Google API). To impersonate multiple users, separate their emails with a semicolon ;. When launching "Scan all users" scans (all_users=1, see above), this delegated_subject must be an admin email which will be used to enumerate all Google Workspace users, to impersonate and scan documents of each individual user in turn. |
Scan type odbc
storage_parameters |
Type | Description |
|---|---|---|
| server | String | Host and port where the database server is running. |
| db_type | String | Type of database (see below). |
| username | String | Username for SQL Server. |
| password | String | Password for the specified username. |
Supported db_type types:
mssql: SQL Server (version 2008, 2008R2, 2012, 2014, 2016, 2017 and Azure SQL).oracle_12c: Oracle 12c and later database.oracle_11g: Oracle 11g and earlier database.postgres: PostgreSQL database, version 8 and later, including Amazon RDS.mysql: MySQL or MariaDB database, version 5.1 and later.
To be able to connect to a database, you may need to allow remote access to the IP address where PII Tools Server is running. For example, for Azure MS SQL, this can be done via the Azure portal:

Set root_folder to the desired database, schema and table within your database installation. The supplied username must have at least read-access to the selected tables.
Scan type azure-blob
Scan files in Microsoft Azure Blob storage. Please see Authenticating connectors for how to obtain the necessary credentials.
storage_parameters |
Type | Description |
|---|---|---|
| account_name | String | Account name for a particular Azure Blob storage. |
| account_key | String | Secret key for the account. |
| sas_token | String | SAS token used to authenticate instead of the secret key. |
| container | String (optional) | Container to be scanned. If not specified, all containers in the storage will be scanned. |
The root_folder can optionally be set to a prefix within the container. The root_folder value is ignored when scanning all containers (i.e., when container is not specified).
Scan type mgraph-exchange
Scan emails in Microsoft Exchange Online. Please see Authenticating connectors for how to obtain the credentials.
storage_parameters |
Type | Description |
|---|---|---|
client_id |
String | PII Tools client ID |
client_secret |
String | PII Tools client secret |
tenant_id |
String | Organization's tenant ID |
The root_folder of Exchange Online scans can be set to one of:
- Empty string
"": will scan all emails for all users. user_id: scan emails for one specific user. Example:john@my_company.onmicrosoft.com.user_id1,user_id2,user_id3…: scan emails for multiple users. Example:john@my_company.onmicrosoft.com, arnold@my_company.onmicrosoft.com.-user_id1,user_id2,user_id3…: scan emails for all users except those listed.user_id/folder_id: Scan emails for one specific user in a specific folder, and all its subfolders. Examples:john@my_company.onmicrosoft.com/sentitems,john@my_company.onmicrosoft.com/inbox.- Scanning In-place Archives is no longer possible. Previously (until cca 2023), Microsoft used to allow scanning In-place Archives using the
user_id/ArchiveMsgFolderRootsyntax. Unfortunately Microsoft removed the support for this feature since and PII Tools is unable to access In-place Archives as a result.
Scan type mgraph-onedrive
Scan emails in Microsoft OneDrive. Please see Authenticating connectors for how to geet the Office 365 access credentials.
storage_parameters |
Type | Description |
|---|---|---|
client_id |
String | PII Tools client ID |
client_secret |
String | PII Tools client secret |
tenant_id |
String | Organization's tenant ID |
The root_folder must be one of the following:
users- scan drives for all usersusers/{user-principal-name},{user-principal-name},…- scan drives for one or more usersusers/-{user-principal-name},{user-principal-name},…- scan drives for all users except those listedgroups- scan drives for all user groupsgroups/{group-name}- scan drives for groups with the given namesites- scan all documents inside all your sites and subsitessites/{site-identifier}- scan all documents for a given site, and all its subsites
root_folder examples:
users/john@acmecorp.onmicrosoft.comgroups/My Group/sites/MySite
When scanning a site, you can also use the * wildcard to specify which sites to scan: sites/*ACME* will scan any site with ACME in its name, plus all their subsites.
Scan type mgraph-sharepoint
Scan all documents inside a Microsoft Sharepoint Online site, and all its subsites. Please see Authenticating connectors for how to get the Office365 access credentials.
storage_parameters |
Type | Description |
|---|---|---|
client_id |
String | PII Tools client ID |
client_secret |
String | PII Tools client secret |
tenant_id |
String | Organization's tenant ID |
The root_folder must be set to the site-identifier of the Sharepoint site to be scanned. If left empty, PII Tools will scan all your sites and subsites. You can also use the * wildcard in root_folder to specify which sites to scan. For example, *ACME* will scan any site with ACME in its name, plus all their subsites.
Batch scans
Batch scans are long-running scans against an entire folder, device or storage (database, cloud document storage). The API endpoints below show how to launch a scan, track its progress and generate a report for finished scans.
Internally, each running batch scan indexes the detected information into a database, called "inventory index". See also Data persistence and security.
Once the scan has completed, you can download its results in multiple report formats (HTML, Excel, CSV, JSON…).
For forensic purposes, you can also download an Audit log of all scanned objects, including their exact access timestamps and location.
To set up a repeat scan that will automatically launch at regular intervals (daily, weekly, monthly etc), see the Scheduler.
Launch batch scan
Launch a batch scan of S3 bucket
contract_backupsunder the scan ids3_contracts_march2018, against a PII Tools server that's running on127.0.0.1, REST port443:
$ curl -k -XPOST --user username:password https://127.0.0.1:443/v3/scans -H 'Content-Type: application/json' -d'
{
    "scan_name": "S3 backups",
    "scan_type": "s3",
    "storage_parameters": {
        "aws_secret_access_key": "AKIA1234567890123456",
        "aws_access_key_id": "abCD1234567/qB6",
        "bucket": "contract_backups"
    }
}'
POST /scans
Launch a batch scan, using the provided scan configuration. Runs asynchronously. The request will return immediately; see Batch status for checking the scan progress.
The response will contain scan_id assigned to this newly launched scan. Use this scan ID in all REST API operations related to this scan: when querying the scan progress, deleting the scan, etc.
Batch status
Check the progress status of the scan with id
7:
$ curl -k -XGET --user username:password https://127.0.0.1:443/v3/scans/7
Request response:
{
    "_request_seconds": 0.062,
    "_success": true,
    "config": {
        "scan_name": "s3 scan",
        "scan_type": "s3",
        "root_folder": "",
        "storage_parameters": {
            "aws_access_key_id": "…",
            "aws_secret_access_key": "…",
            "bucket": "my_bucket"
        }
    },
    "end_time": "2019-07-25 14:44:27.046453",
    "last_object": "my_bucket/archives/archive.rar//archive/subdir/resume.xml",
    "objects_per_hour": 46836.0,
    "objects_scanned": 991,
    "objects_skipped": 10,
    "pii_tools_version": "3.0.0",
    "scan_id": "7",
    "scan_name": "s3 scan",
    "scan_type": "s3",
    "start_time": "2019-07-25 14:43:10.106867",
    "status": "FINISHED",
    "status_message": "Scan completed successfully.",
    "time_elapsed": "0d 0h 1m 16s"
}
GET /scans/{scan_id}
Query for status of a batch scan with the given scan ID.
Returns
| Parameter | Type | Description |
|---|---|---|
status |
String | Scan status. One of "RUNNING", "TERMINATING", "PAUSED", "FINISHED", "FAILED" (see below). |
status_message |
String | Additional information associated with the scan status. |
last_object |
String | Location of the last object scanned so far. Used to show scan progress while the scan is under way. |
config |
Object | Original config used to launch the scan. Use to re-launch the same scan, or to verify the scan settings. |
objects_scanned |
Integer | Number of successfully scanned files. |
objects_skipped |
Integer | Number of files for which the scanning was skipped. This can happen for binary files when the file size is too large (over download_max_bytes) AND the analysis cannot be done on a partially downloaded content only. An example would be a large JPEG image. |
objects_failed |
Integer | Number of files for which scanning failed. |
start_time |
String | Date and time the scan started. |
end_time |
String | Date and time the scan ended. Applies only to scans that already finished. |
time_elapsed |
Float | How long has the scan been running so far? |
error |
String | Error message. Only available if status is "FAILED". |
Status reference
RUNNING- Scan in progress.PAUSED- Scan is paused.TERMINATING- Scan is ending, cleaning up.FINISHED- Scan finished successfully.FAILED- Scan failed. Theerrorfield contains a detailed error message. Note that scans manually terminated by the user are consideredFAILED.
Download report
Download the drill-down HTML report for scan id
13into the current directory:
$ curl -k -XGET --user username:password 'https://127.0.0.1:443/v3/scans/13/objects?format=html' -OJ
Same thing but download in JSON-LINES format:
$ curl -k -XGET --user username:password https://127.0.0.1:443/v3/scans/13/objects?format=jsonl -OJ
GET /scans/{scan_id}/objects?format=fmt
You may download scan results in multiple formats. See Scan reports for their description:
format value |
Description |
|---|---|
summary |
Risk summary with overall stats – no concrete PII visible. |
html |
Interactive drill-down HTML report, including PII details. |
names |
Report of "Affected Persons". |
audit |
Audit log for this scan, including a timestamp for each accessed object. |
csv |
Detailed PII report as CSV. |
jsonl |
Detailed PII report as JSON-LINES (one JSON file per line). |
json |
Detailed PII report as one huge JSON object. Not recommended because of RAM footprint; use jsonl instead. |
xlsx |
Detailed PII report as an Excel spreadsheet. |
xlsx_simple |
Simplified PII report as an Excel spreadsheet. |
duplicates |
CSV report with clusters of files with identical content (same content hash). |
person_cards |
The Person Cards report, with PII linked to individuals. |
You can download reports even while a scan is in progress. The report will contain partial results.
To download an aggregated report from multiple scans, submit multiple comma-separated scan_ids, e.g. GET /scans/1,5,20/objects?format=jsonl.
Pause and resume scan
Pause a running batch scan with ID
55:
$ curl -k -XPUT --user username:pwd https://127.0.0.1:443/v3/scans/55 -H 'Content-Type: application/json' -d'{"status": "PAUSED"}'
PUT /scans/{scan_id}
Pause a running scan with {"status": "PAUSED"}, or run a paused scan with {"status": "RUNNING"} payload.
Trying to pause a scan that is not running, or run a scan that is not paused, will return an error response with no effect on the scan.
Delete scan
Delete all data for the batch scan with ID
13:
$ curl -k -XDELETE --user username:pwd https://127.0.0.1:443/v3/scans/13
DELETE /scans/{scan_id}
Once you don't need the results of a scan any more, it is recommended you delete it to get rid of its persisted sensitive data, free up disk space and speed up analytics.
List all scans
To list all existing batch scans (inventory indexes):
$ curl -k -XGET --user username:password https://127.0.0.1:443/v3/scans/
GET /scans/
List all existing scans. Each listed scan is in the format described in Batch status.
Duplicate a scan
For convenience, PII Tools supports functionality for duplicating a scan. This enables you to launch a new scan with the exact same parameters as an existing scan, so you don't have to configure it from scratch again.
When using the web interface, click the "Duplicate scan" icon. This icon is in the "Actions" column next to each existing scan.
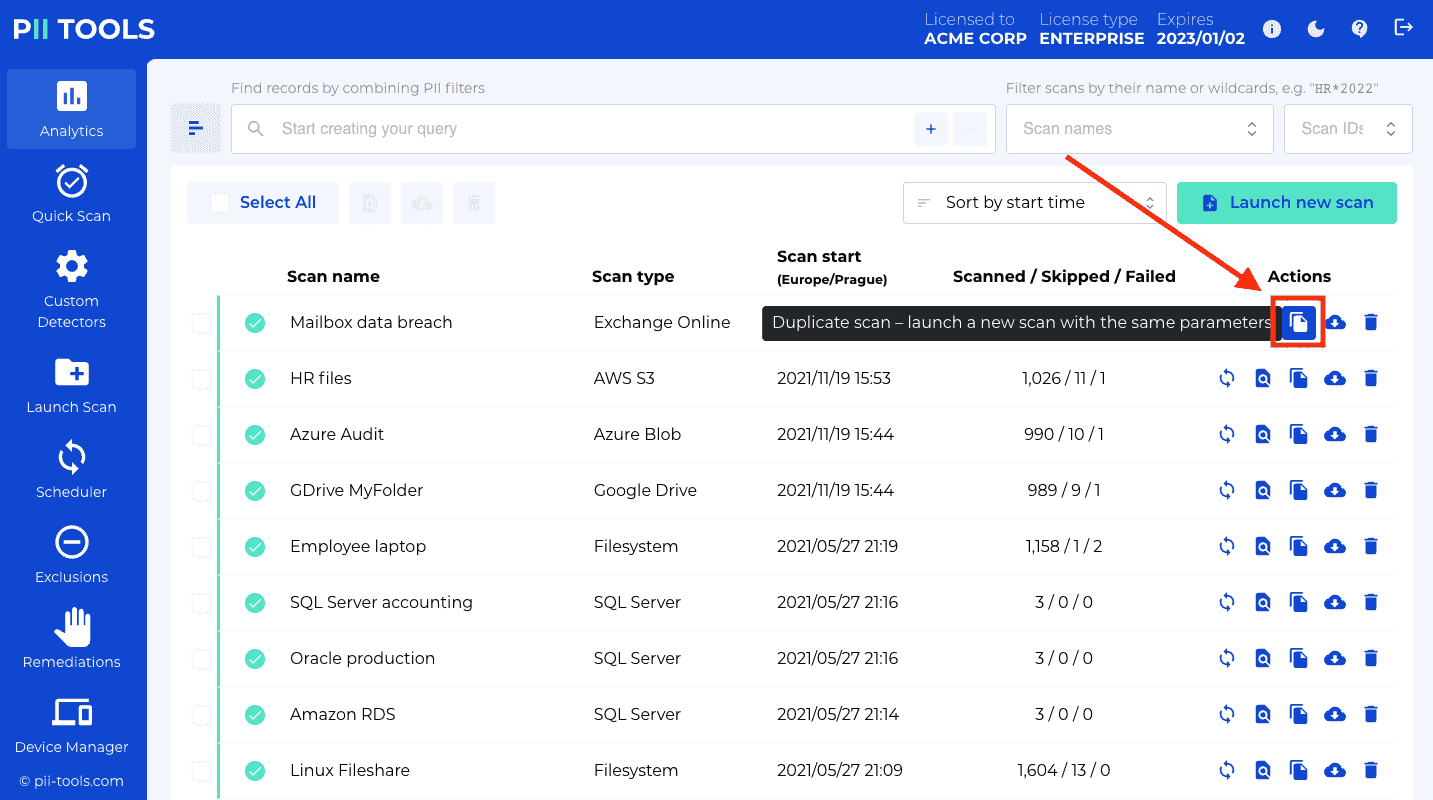
API Endpoint
Retrieve information from an existing batch scan with id
13:
curl -k -XGET --user username:password https://127.0.0.1:443/v3/scans/13
Use the
configparameter from the response to pre-populate and POST a new scan.
To achieve this functionality using the REST API, first retrieve the config of an existing scan with GET /v3/scans/{scan_id}. The relevant parameters can be read from the config field in the response. Use these parameters to pre-populate POST request parameters and launch a new scan with POST /v3/scans/.
Resume a scan
Sometimes a scan may fail, for various reasons – server restarts, a broken network connection, the scanned device goes offline, etc. For this case, PII Tools includes functionality for resuming a scan. Resuming saves time because you don't have to scan again from scratch.
To resume a batch scan, click the "Resume scan" icon under "Actions":
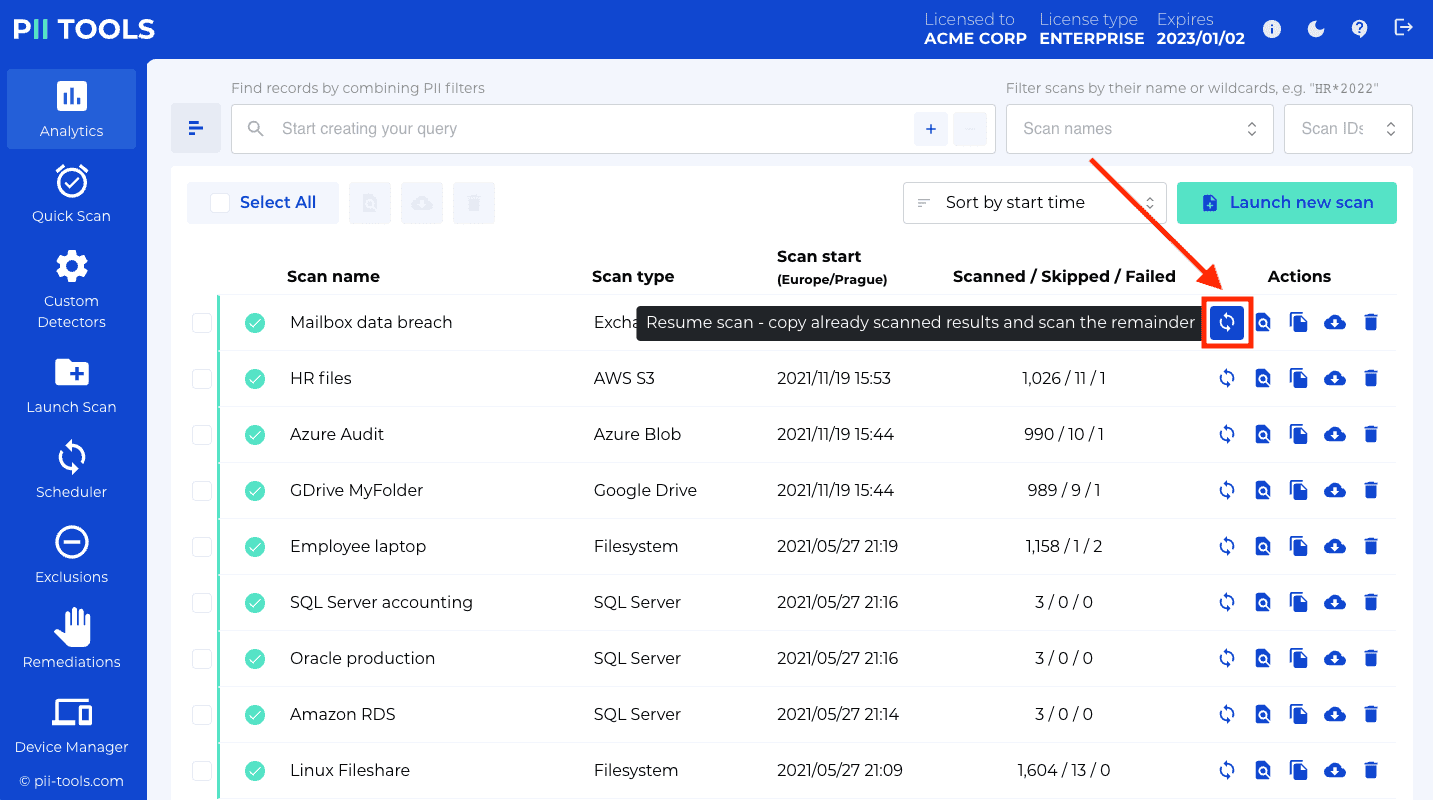
How does resuming a scan work, behind the scenes?
- PII Tools will create a new, empty scan. This will be the "resumed scan".
- PII Tools will collect all already-scanned locations from the original scan (the one being resumed), plus from its own original scan(s) in case the original scan was itself resumed.
This phase may take several minutes and the newly created resumed scan may appear "frozen" during this time, as no new objects are being scanned. - The new scan continues scanning the remaining files, i.e. files that have not been SCANNED, SKIPPED, nor FAILED yet in the original.
Continue scanning from a FAILED scan:
API Endpoint
curl -k -XPOST --user username:password https://127.0.0.1:443/v3/scans/13
POST /scans/{scan_id}
Launch a new batch scan and continue scanning from an existing scan scan_id. Runs asynchronously. The request will return immediately; see Batch status for checking the scan progress.
The response will contain scan_id assigned to this newly launched scan. Use this scan ID in all REST API operations related to this scan: when querying the scan progress, deleting the scan, etc.
Stream scans
Scan a single PDF file:
$ curl -k -s --user username:password -XPOST https://127.0.0.1:443/v3/stream_scan -H 'Content-Type: application/json' -d'
{
    "filename": "bank_form.pdf",
    "content": "'$(base64 -w0 /tmp/bank_form.pdf)'"
}'
This request will generate a JSON response similar to this:
{
    "status": "SCANNED",
    "processing": {
        "_time": 0.2773430347442627,
        "_time_children": 0.2770969867706299,
        "_time_self": 0.0002460479736328125,
        "language": "en",
        "language_confidence": 1.0,
        "severity": "3-CRITICAL"
    },
    "pii": [
        {
            "confidence": 1.0,
            "pii": "Mustafa Abdul",
            "context": "\nFrom: Name: Mustafa Abdul\nThe Branch Manager\nAddress",
            "pii_category": "Personal",
            "pii_type": "name",
            "position": {
                "bboxes": [
                    [
                        [0.5627627403907527, 0.16604167283183396],
                        [0.6775784461326848, 0.16604167283183396],
                        [0.6775784461326848, 0.17992424242424243],
                        [0.5627627403907527, 0.17992424242424243]
                    ]
                ],
                "page": 0
            }
        },
        {
            "confidence": 1.0,
            "pii": "2201 C Street NW I Washington, DC 20520",
            "context": "Abdul  \nThe Branch Manager                                 Address: 2201 C Street NW I Washington, DC 20520 \nBank of America                                 Phone No",
            "pii_category": "Personal",
            "pii_type": "address",
            "position": {
                "page": 0,
                "bboxes": […]
            }
        },
        {
            "confidence": 1.0,
            "pii": "GL28 0219 2024 5014 48 ",
            "context": "Account Transfer  \nA/c No. GL28 0219 2024 5014 48",
            "pii_category": "Financial",
            "pii_type": "bank_account",
            "position": {
                "page": 0,
                "bboxes": […]
            }
        }
    ],
    "storage": {
        "content_type": "application/pdf",
        "doctype": "pdf",
        "file_hash": "gs5RE4Eyj10OvS2VSHNt",
        "filename": "bank_form.pdf",
        "filesize": 43019,
        "location": "bank_form.pdf"
    },
    "errors": [],
}
POST /stream_scan
Scan a given file and return the detected PII right away.
To run a stream scan, encode the file content into Base64 encoding and include the encoded string as the content parameter.
For selecting which PII detectors to use in the scan and additional tuning parameters, see Scan configuration. If you don't specify detectors, all available detectors will be used (including custom detectors, if any).
Unlike a batch scan, the request will block until the response is ready (synchronous). In case the file to be scanned is large, or an archive or mailbox, use the asynchronous batch scan instead to avoid timeouts.
Returns
The returned metadata fields are:
"status": <str>– Scan status of this file. One ofPENDING,SCANNING,SKIPPED,SCANNED,FAILED."pii": <Array[Object]>– List of all detected PII. Each hit includes the actual detected instance, its context, confidence and position in the original document."storage": <Object>– The file's metadata taken from the original storage, such as its file size, location, owner, permissions, last modified date etc. Different data storages offer different metadata."processing": <Object>– Additional non-PII file attributes inferred from its content, such as the document's language or severity level."errors": Array<Object>– List of errors that occurred while scanning this file. If a file was SKIPPED or FAILED, you'll find the reason here.
Scheduler
To create a scheduled scan from the API, use a standard Launch Batch Scan POST request with an extra
scheduleparameter:
$ curl -k -XPOST --user username:password https://127.0.0.1:443/v3/scans -H 'Content-Type: application/json' -d'
{
    "scan_type": "s3",
    "scan_name": "S3 backups",
    "storage_parameters": {
        "aws_secret_access_key": "AKIA1234567890123456",
        "aws_access_key_id": "abCD1234567/qB6",
        "bucket": "contract_backups"
    },
    "schedule": {
        "start": "2020-05-17 15:00",
        "repeat": "monthly",
        "end": "2021-01-01 21:15"
    }
}'
PII Tools allows for scheduling scans to run in the future. This is useful for:
- Deferred scans: instead of launching a scan now, launch it at a specified time and date.
- Recurring scans: Have a scan run repeatedly at a specified date and time. For example run daily, weekly, monthly etc.
To view or delete your existing schedules, go to the Scheduler tab in the left-hand menu:
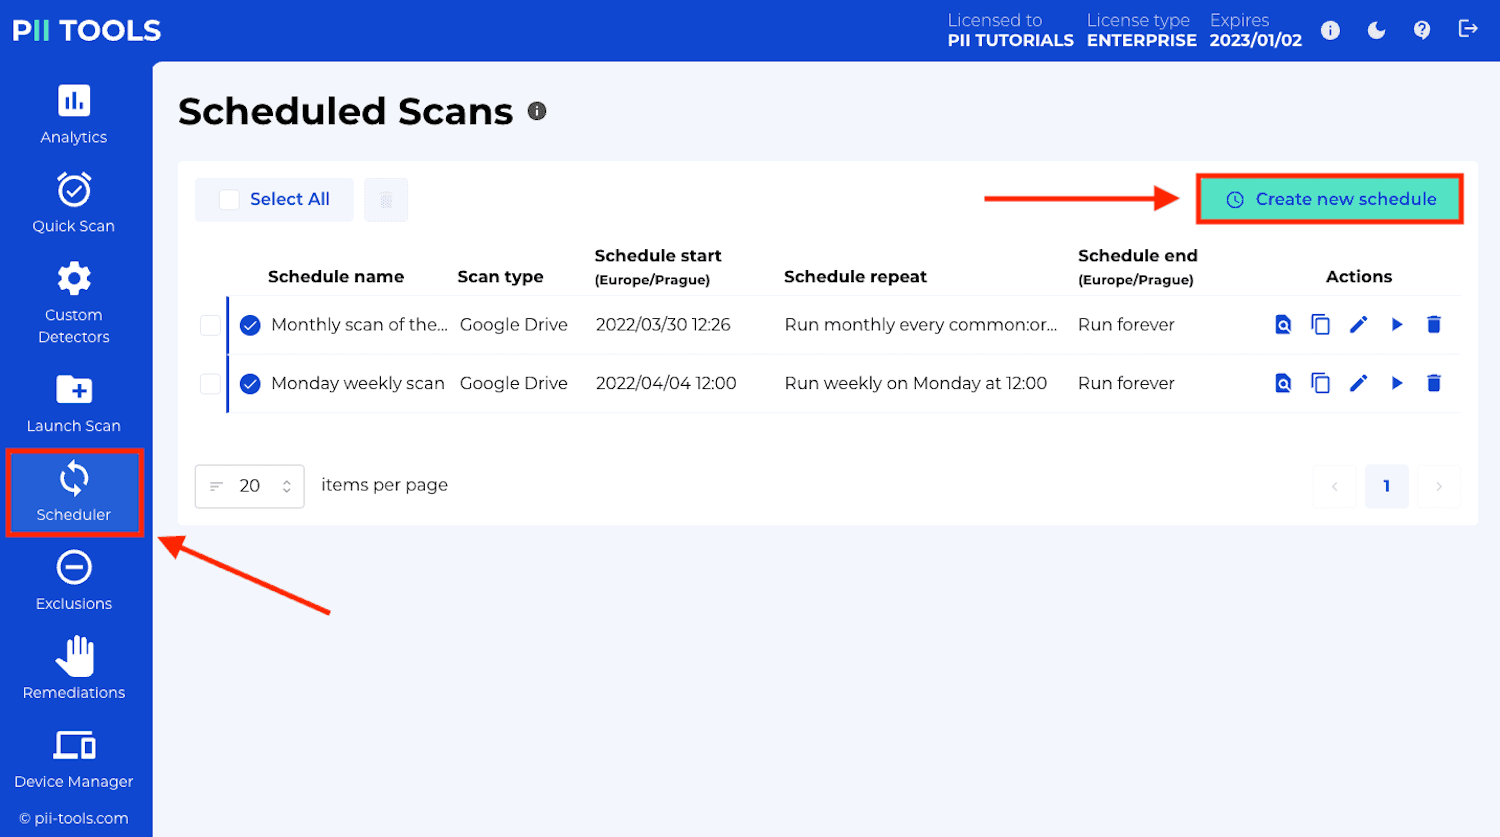
To create a new schedule, fill in the Schedule scan section of the Launch New Scan or Create New Schedule window:
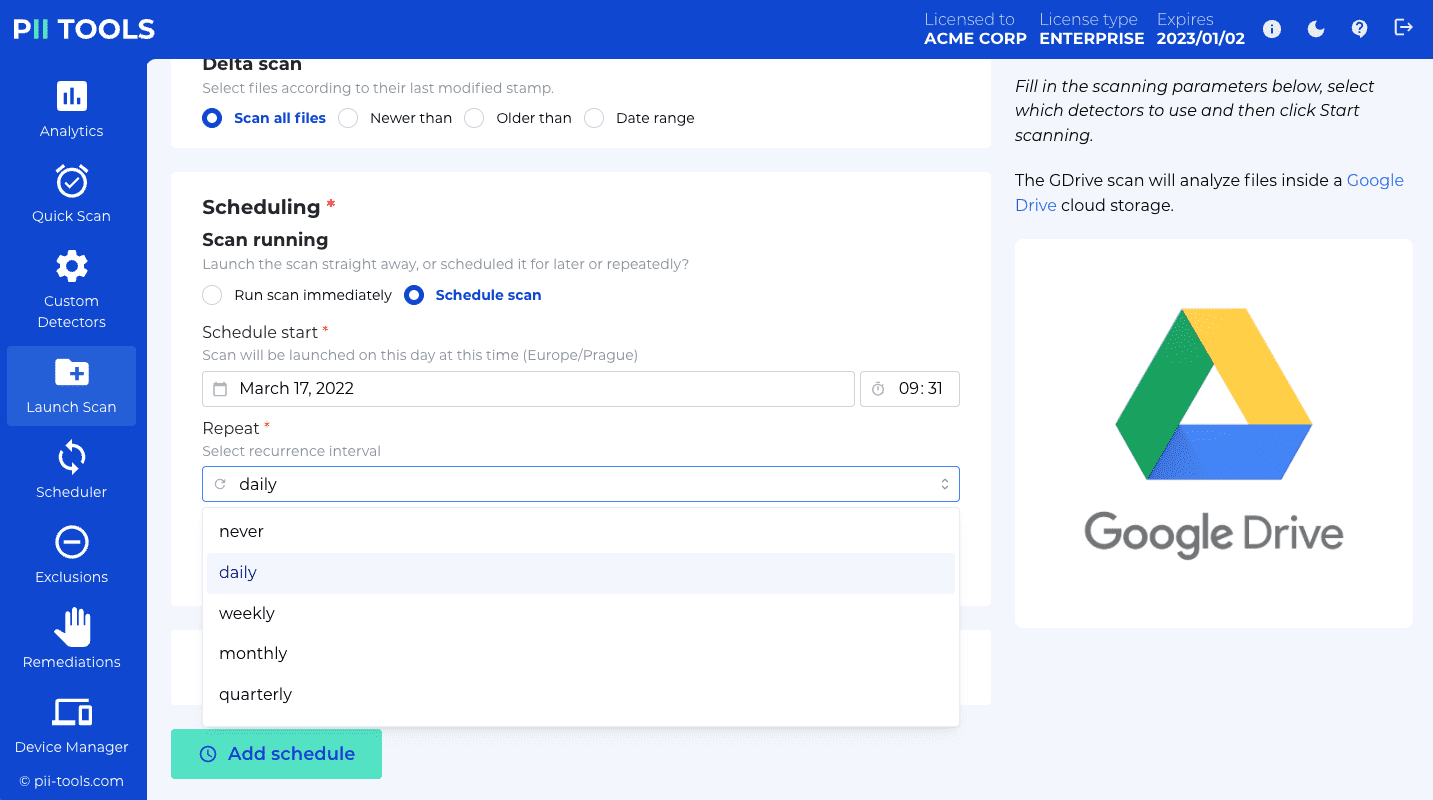
| Parameter | Type | Description |
|---|---|---|
start |
String | Mandatory. Date and time to first run the scheduled scan. Example: "2020-05-17 4:00". |
repeat |
String | Mandatory. How often to run the scan. Example: "quarterly". |
| "never" | Run just once, at the time and date specified in start. Effectively a "deferred scan". |
|
| "daily" | Run every day at the time specified in start. |
|
| "weekly" | Run once a week on the same time and day of the week as start. For example, if start is a Sunday 4:00, the scan will run every Sunday at 4am. |
|
| "monthly" | Run once a month on the same time, day of the week and week of the month as start. For example, if start is the third Sunday of the month, the scan will run every 3rd Sunday of each month at 4am. |
|
| "quarterly" | Same as monthly, but run every third month. | |
| "yearly" | Run once a year, on the same date and time as specified in start. |
|
end |
String | Optional. Schedule stops after this date, no more scans are run. If not specified, will run scans indefinitely. Example: "2021-05-17 11:00". |
Any newly created scan that has the "Schedule scan" section filled in will automatically become a scheduled scan.
To turn a regular existing scan into a scheduled scan:
- Click its "Duplicate Scan" button on the Analytics tab.
- Fill in the desired schedule.
- Hit the "Add schedule" button at the bottom of the form.
Conversely, to run an existing scheduled scan out-of-order, as a regular scan right now:
- Click its "Run scan now" action button on the Scheduler tab.
- Avoid filling in the "Schedule scan" section.
- Hit the "Start scanning" button at the bottom of the form.
PII Analytics
PII Tools indexes all discovered file metadata internally which allows you to search, filter and export selected records by concrete PII, file size, file name, file owner etc. This is especially useful for collecting information in order to answer GDPR Data Subject Access Requests (SAR), and for identifying affected and high-risk files for auditing.
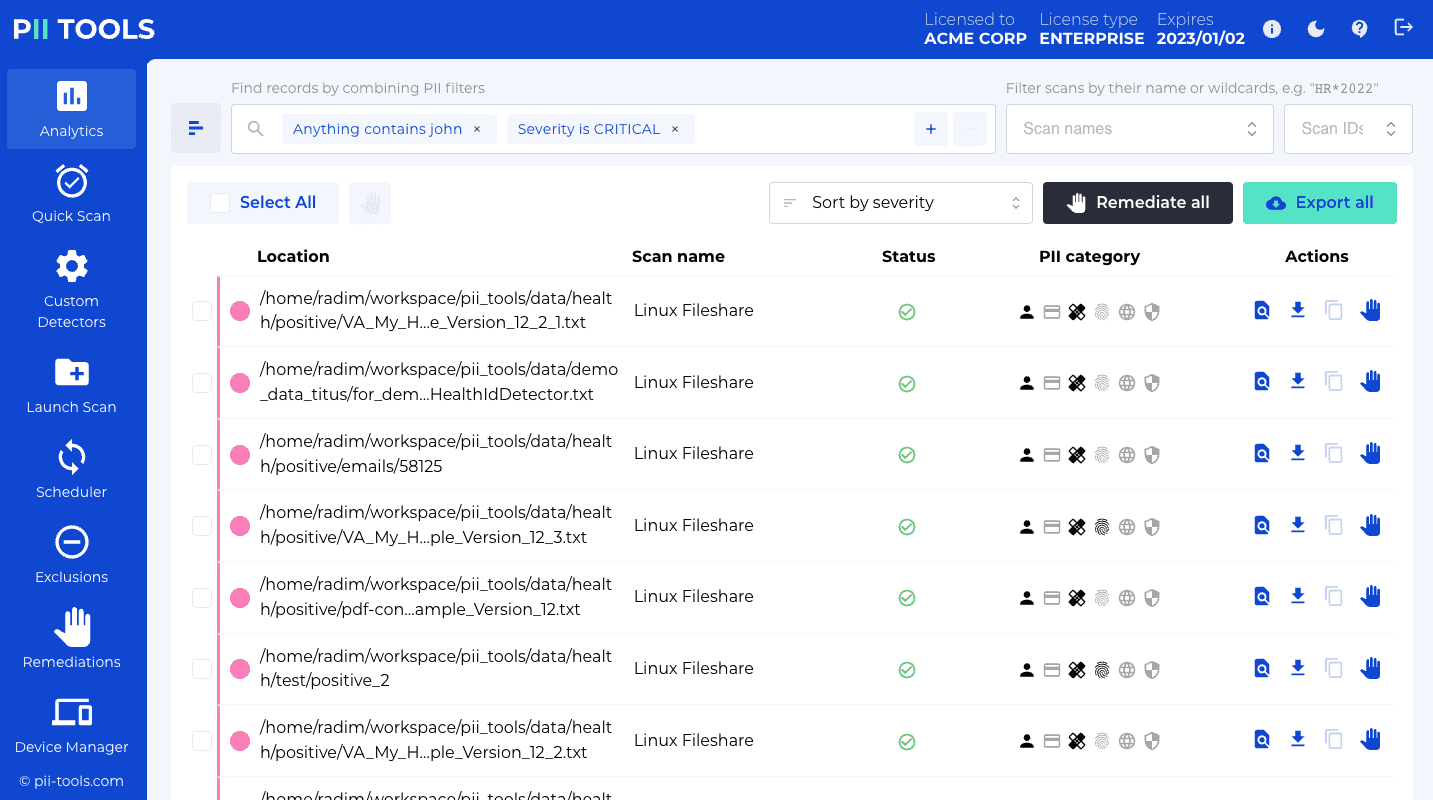
The reported file metadata includes detailed information on:
- each detected PII instance
- the context of each detected PII instance
- the position of each PII instance
- the detection confidence of each PII instance
- severity classification of the entire scanned file
- additional storage metadata of each scanned file (e.g. its size, location, owner, permissions, etc)
Analytics Dashboard
To use Analytics from the PII Tools web dashboard, go the Analytics tab.
You'll see a page that lists all your scans, both running and completed. In case you have many scans, use the pagination buttons at the bottom to navigate between pages. Or use the search bar on top and enter "Scan name" to look files from a specific scan.
For example, click the search bar on top, select Scan name from the drop-down menu, and type fileshare + ENTER. The view will change, showing you files from all scans where the scan name contains the word fileshare.
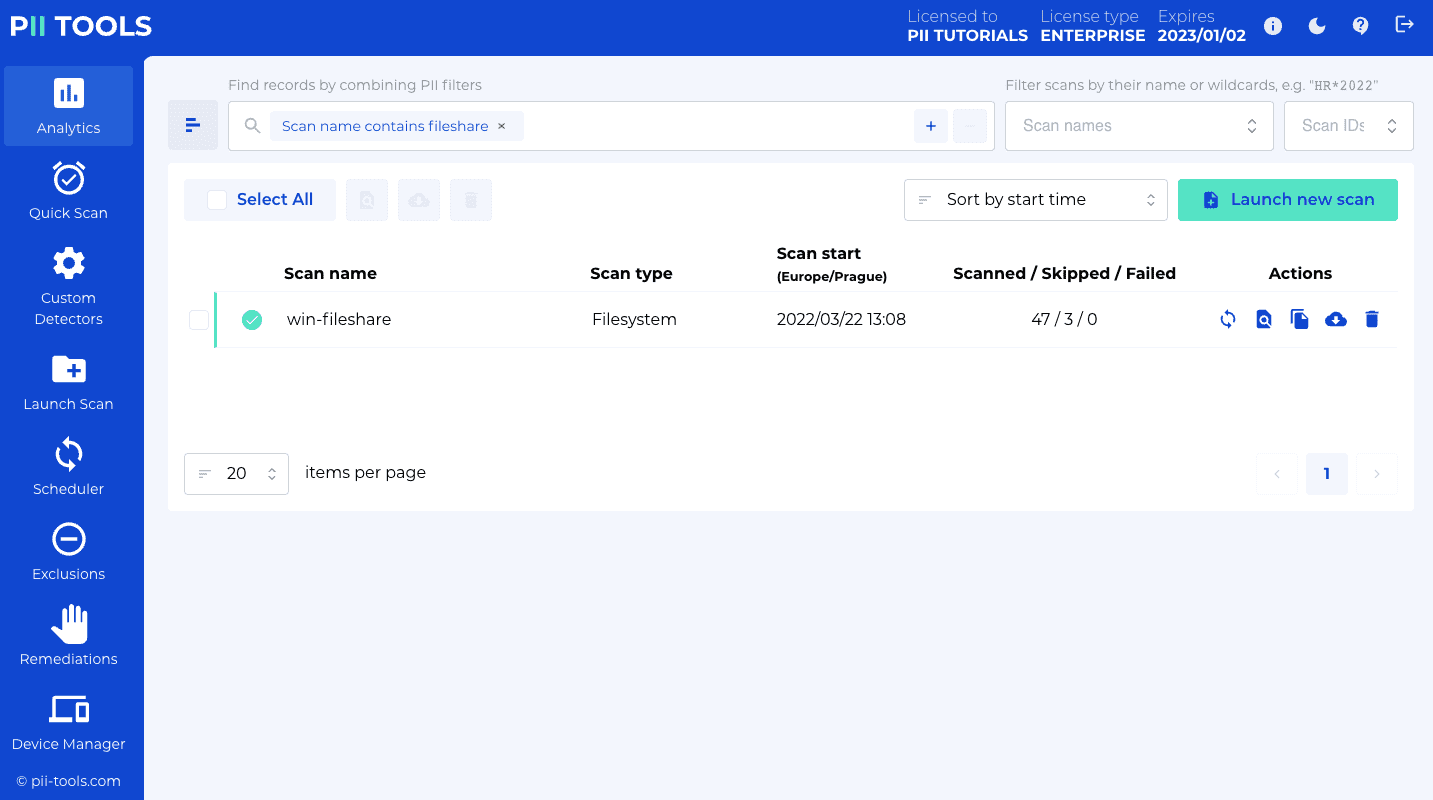
To list all objects that contain a specific personal information, select the metadata field you want to match in the drop-down menu, and then type the value you wish to search.
Examples:
Select
Person name, typeJohn Smith, and press ENTER. The web view will change to show all files that contain the name "John Smith".To "search for objects that contain a credit card number": select
PII,Financial,Credit card numberandEXISTS.Some metadata fields also support querying by the count of detected PII instances. For example, to find all files that contain more than two home addresses, click inside the Search bar on top and select
PII,Personal,Home Address,>, type2and press ENTER.
For each displayed file, you can inspect the actual PII by clicking the "Show detailed report" button under Actions:
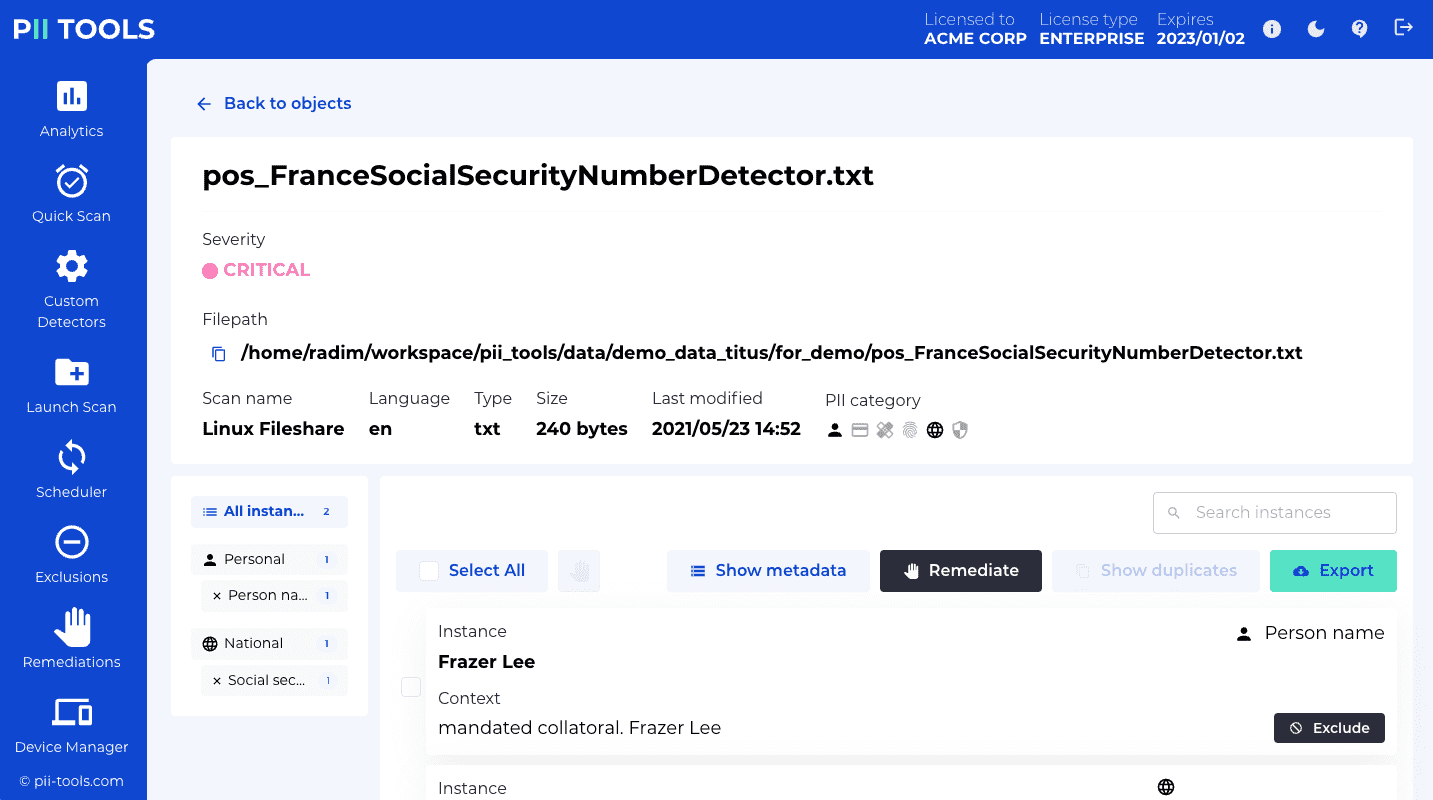
Analytics REST API
Run an analytics query from the REST API, download the result as CSV:
$ curl -XPOST --user username:pwd https://127.0.0.1:443/search -H 'Content-Type: application/json' -OJ -d'
{
  "output": "csv",
  "async": false,
  "query": {
    "scan_ids": ["1"],
    "scan_name_patterns": ["*"],
    "or_clauses": [
        [
            ["any", "CONTAINS", "john"],
            ["severity", "CONTAINS", "CRITICAL"]
        ]
    ],
    "sort": "start_time",
    "limit": 20,
    "offset": 0
  }
}'
The Analytics API can be used to search over scans and return a list of matching files programmatically. This list is returned in any of the supported formats: HTML, CSV, JSON, Excel or Audit log.
Endpoint
POST /search
POST /analytics (equivalent alias)
Run analytics search and return matched objects, in the selected response format.
Note that the method is POST (not GET), because the parameter payload can be potentially large and we avoid huge URLs for technical reasons.
Input (JSON)
| Field | Type | Description | Example |
|---|---|---|---|
query |
Object | Query that selects desired files across the entire inventory index. See below. | {} |
output |
String | Export output format: one of {json, jsonl, csv, html, xlsx, xlsx_simple, names, audit, duplicates}. See Scan reports. |
– |
async |
Boolean | If true, return an HTML page that refreshes periodically until the generated report is ready. If false, wait until the report is fully generated and return it directly as the response. |
false |
The query parameter specifies fine-grained criteria for object matching. See the sample query on the right for an example. query supports the following fields:
query key |
Type | Description | Example |
|---|---|---|---|
scan_ids |
List[String] | List of scan ids to search in. If not specified, search in all scans. | "scan_ids": ["1"] |
scan_name_patterns |
List[String] | List of scan names to search in. If not specified, search in all scans. Special * wildcard character will match any substring. |
"scan_name_patterns": ["*"] |
or_clauses |
List[List[List[String]]] | A list of search filters. A file will be matched if at least one of the OR clauses matches. | See example on the right. |
sort |
String | How to sort the response. One of {object_id, status, enqueued, ended, severity, doctype, language, location, filename, filesize, last_modified}. |
status |
limit |
Integer | Pagination: Return limit number of matched and sorted files, starting at the index offset." |
20 |
offset |
Integer | Pagination: Return limit number of matched and sorted files, starting at the index offset." |
0 |
The search uses a combination of one or more OR clauses. A file matches and will appear in the result if:
- At least one of the OR clauses matches.
- Each OR clause is a combination or one or more AND clauses. If all AND clauses match, the whole OR clause matches.
- AND clauses are of the form
(metadata_key, operator, value)or(metadata_key, EXISTS). Any PII instance or storage parameter is a validmetadata_key. The full list of supported metadata keys can be retrieved viaGET /v3/analytics/_field_mapping.
Supported AND operators are:
EXISTS: match if the given key exists in the objectCONTAINS: match if the given key contains the search valueCONTAINS_CASEsame asCONTAINSbut case-sensitiveEQUALS: match if the given key matches exactly the search valueEQUALS_CASE: same asEQUALSbut case-sensitive>,<,=,<=,>=: match if the integer value (count)
For example, or_clauses = [["name", "CONTAINS", "John"], ["file_age", ">", "5"]] contains a single OR clause, which is comprised of two AND clauses. It will match all files that contain the name "John" AND are older than 5 hours.
Returns
A list of all matched objects in output format:
jsonl: Return all matched objects in JSON-LINES format (one object per line).json: Return all matched objects in JSON format (all objects in one huge JSON array). Takes up a lot of RAM; preferjsonlinstead, it's more efficient.csv: Return all matched objects in CSV format.xlsx: Return all matched objects in Excel XLSX format.xlsx_simple: Return all matched objects in simplified Excel XLSX format.audit: Return all matched objects in audit CSV format.html: Return all matched objects as an interactive HTML drill-down report.summary: Return all matched objects as an HTML summary overview.duplicates: Return all duplicate files (files with the same content hash) clustered, as a CSV.
Each returned object contains several fields, including detected PII, its context, severity and storage metadata; see Scan report for the description of the returned file metadata.
Endpoint
DELETE /analytics
Run analytics search and delete all matched objects from PII Tools.
This only cleanses the PII inventory of these objects, not the remote storage (i.e. not the fileserver, database, device, etc).
This operaton is called "Forget objects" in the PII Tools user interface.
All DELETE /analytics parameters are exactly the same as in POST /analytics, except they must be passed via URL querystring as a single large (URL-encoded) JSON string: DELETE /analytics?%7B%22query%22%3A%7B%22scan_name_patterns%22…
Parameters limit and offset are ignored – all objects matched by the query are deleted from PII Tools.
Retrieve File Metadata
Get all indexed metadata for one file:
$ curl -k -s --user username:pwd -XGET https://127.0.0.1:443/v3/scans/1/objects/1
Example response:
{
    "scan_id": "1",
    "object_id": "1",
    "scan_name": "s3 small",
    "status": "SCANNED",
    "ended": "2019-07-25 14:43:12.704326",
    "enqueued": "2019-07-25 14:43:10.822782",
    "errors": [],
    "pii": [
        {
            "confidence": 1.0,
            "context": ", From : Name : Mustafa Abdul The Branch Manager Address :",
            "pii": "Mustafa Abdul",
            "pii_category": "Personal",
            "pii_type": "name",
            "position": 105
        },
        {
            "confidence": 1.0,
            "context": "Account Transfer  \nA/c No. GL28 0219 2024 5014 48",
            "pii": "GL28 0219 2024 5014 48 ",
            "pii_category": "Financial",
            "pii_type": "bank_account",
            "position": 418
        }
    ],
    "processing": {
        "_time": 1.592280626296997,
        "_time_children": 1.5919265747070312,
        "_time_self": 0.0003540515899658203,
        "language": "en",
        "language_confidence": 1.0,
        "severity": "3-CRITICAL"
    },
    "storage": {
        "content_type": "application/pdf",
        "doctype": "pdf",
        "filename": "bank_form.pdf",
        "filesize": 47134,
        "last_modified": 1543349581.0,
        "location": "my_bucket/bank_form.pdf",
        "owner": "johndoe",
        "storage_type": "s3"
    }
}
It is also possible to retrieve metadata for a single object, given its id.
API endpoint:
GET /v3/scans/<scan_id>/objects/<object_id>
Retrieve full metadata for the given file, uniquely identified by its scan id + object id.
Input
| Field | Type | Description |
|---|---|---|
| scan_id | String | Scan identifier. Note that this is the scan id, not scan name. |
| object_id | String | Object identifier as it appears in reports. |
Output:
Object metadata with status 200 if all OK, or {"error": "error text"} and a corresponding HTTP status in case of a failure.
Each returned object contains several fields, including detected PII, its context, severity and storage metadata; see Scan report for the description of the returned file metadata.
Find duplicates
The Analytics dashboard offers a way to find duplicate files. This is useful to declutter your inventory, or to find the same file on other devices and storages. Duplicates are identified based on their file content, not file name – so the same file with a different name counts as a duplicate.
Internally, PII Tools keeps a hash of the content of each and every file scanned. This hash is indexed and available from the Analytics search, under Storage - File Hash.
To find all duplicates of a particular file, simply click the Show Duplicates button under Actions:
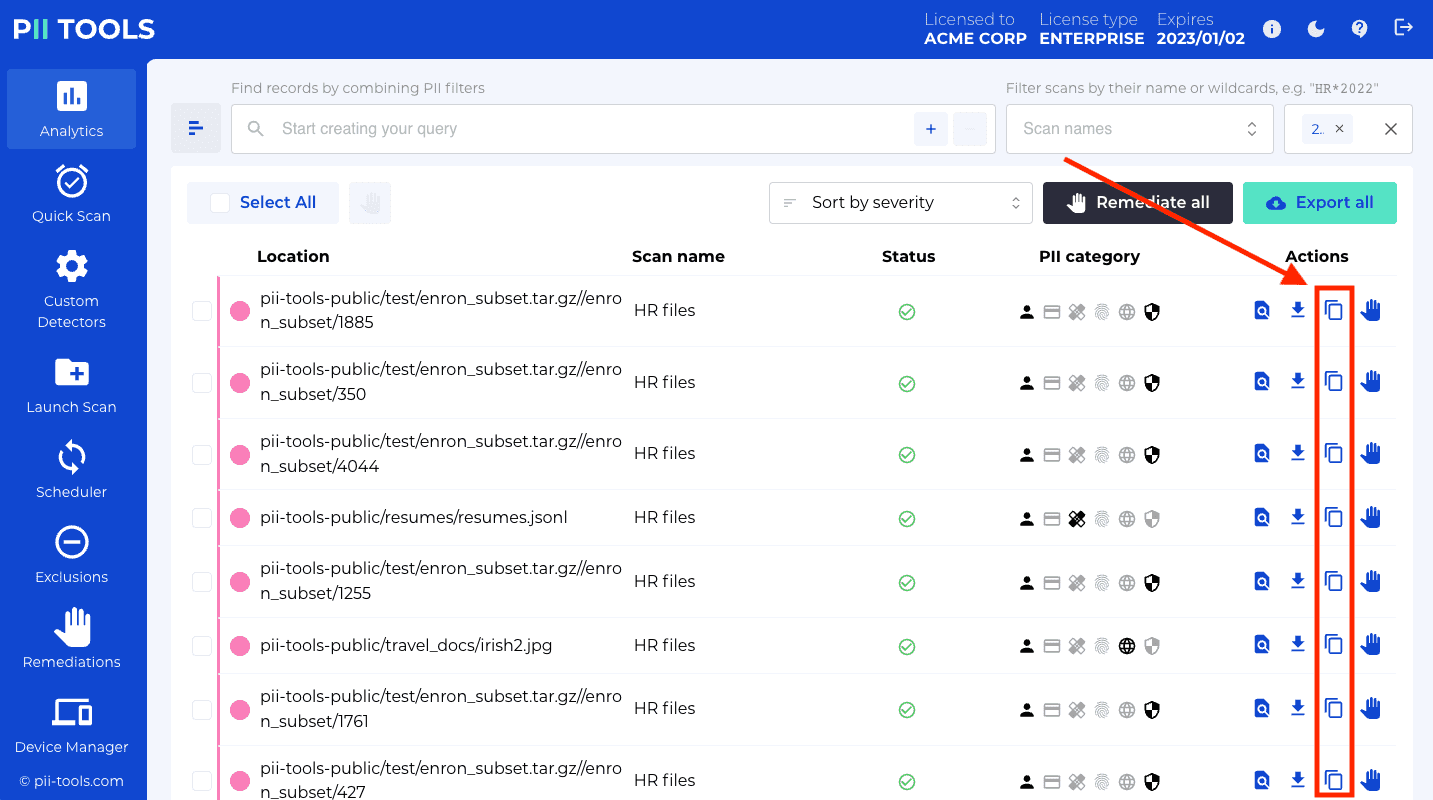
Clicking this Show Duplicates button will launch a new Analytics search, with all files with the same content hash (i.e. all duplicates) listed in the search results.
The file hash is also included in the following reports: JSON, CSV, Excel Full, Drill-down report.
Custom detectors
You can define your own custom patterns to discover with each scan, in addition to the built-in detectors that come out of the box with PII Tools.
Examples of custom patterns include organization-specific information such as "student ID" or "contract number". These patterns are called custom detectors, and when matched, will appear in the scanning results alongside other detections.
Unlike the built-in detectors that use machine learning, the custom detectors are simpler, using regular expressions to define what to match ("instance regexp"), plus what must appear nearby the instance for the match to be valid ("context regexp").
In the web interface, use the "Custom detectors" tab in the left menu. For adding/deleting custom detectors programmatically, see the REST API endpoint documentation below.
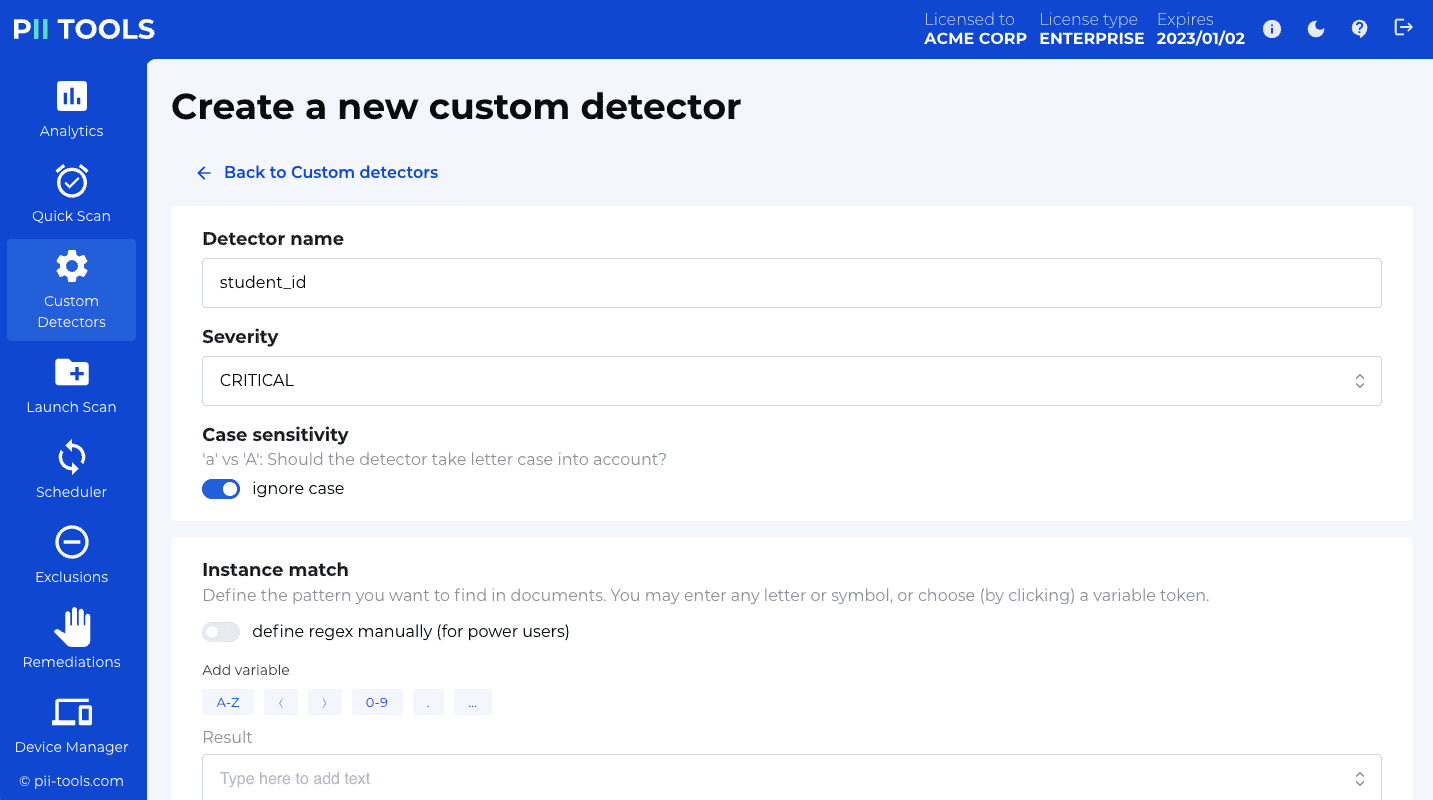
Example of a custom PII detector for a 6-digit student id:
{
  "pii_type": "student_id",
  "pii_category": "other",
  "instance_regexps": ["\\bID[0-9]{6}\\b"],
  "context_regexps": ["student"],
  "severity": "LOW",
  "ignore_case": true
}
How detectors work
Each custom detector is run alongside the standard out-of-the-box detectors on the text of each scanned object. Images are ignored and do not affect custom detectors.
When a potential PII candidate instance is found matching any of the
instance_regexpsrules, its context (surrounding text, column headers) is checked using thecontext_regexpsrules. Unless at least one ofcontext_regexpsmatches, the candidate is discarded.If a candidate instance passes the context check, this PII instance is indexed just like any other PI, and will appear in the Scan report. The
severityyou provided (e.g.LOWin the example above) will be combined with the severity of other PIs detected in this object, to assign the final severity for the entire object.
Custom detector parameters
| Parameter | Type | Description | Default |
|---|---|---|---|
pii_type |
String | Name of the detector. Use lowercase_with_underscores. | - |
pii_category |
String | PI category. | Other |
instance_regexps |
List[String] | Candidate PIs must match at least one regexp in this list. | - (mandatory parameter) |
context_regexps |
List[String] | Candidate contexts must match at least one regexp in this list. No context checking if empty. | [] |
severity |
String | Severity level to assign to each hit. One of LOW, HIGH, CRITICAL. |
- |
ignore_case |
Boolean | Ignore text upper/lower case when matching. | true |
Add a custom detector
Add a new detector named
my_detector:
curl -k -XPOST --user username:pwd https://127.0.0.1:443/v3/detectors/custom -H 'Content-Type: application/json' -d'
{
  "pii_type": "student_id",
  "pii_category": "Other",
  "instance_regexps": ["\\bID-[0-9]{6}\\b"],
  "context_regexps": ["student"],
  "severity": "LOW",
  "ignore_case": true
}'
You can define new custom detectors using either the web interface, or programmatically using the REST API.
API endpoint
POST /v3/detectors/custom
See the example to the right for a REST API example. This example detector will look for patterns like ID-0123456 inside any file. The pattern is ID- followed by 6 digits, and delimited by word boundaries from either side, so that words like PID-01234567 won't match.
In addition, we require the word student must appear nearby, otherwise the match is discarded. Note that we didn't put the word boundary around student here, so that words like "student", "students", "student's" etc will pass the context check too.
Since we defined ignore_case to be True, letter casing is ignored. Both id- and ID- or Id- will match, and any of Student, STUDENTS etc will pass the context check.
After you've created your custom detector, use it in REST API scans by entering its pii_type name into the optional detectors field during scan configuration.
List all existing detectors
Get a list of all custom detectors:
curl -k -XGET --user username:pwd https://127.0.0.1:443/v3/detectors/custom
Response:
{
    "_request_seconds": 0.012,
    "_success": true,
    "custom_detectors": [
        {
            "context_regexps": [
                "student"
            ],
            "context_window": 5,
            "id": "3",
            "ignore_case": true,
            "instance_regexps": [
                "\\bID-[0-9]{6}\\b"
            ],
            "pii_category": "Other",
            "pii_type": "student_id",
            "severity": "LOW",
            "threshold_fullmatch_lower": 0.0,
            "threshold_fullmatch_upper": 1.0,
            "threshold_mismatch_lower": 0.0,
            "threshold_mismatch_upper": 1.0,
            "threshold_partialmatch_lower": 0.0,
            "threshold_partialmatch_upper": 1.0
        }
    ]
}
Get a list of all custom detectors.
Endpoint
GET /v3/detectors/custom
Output
| Field | Type | Description |
|---|---|---|
| custom_detectors | List[Object] |
List of all user-defined custom detectors. |
Delete a custom detector
Delete the custom detector with id
3:
curl -k -XDELETE --user username:pwd https://127.0.0.1:443/v3/detectors/custom/3
{
    "_request_seconds": 0.046,
    "_success": true
}
Permanently delete a custom detector.
Endpoint
DELETE /v3/detectors/custom/{id}
Input
| Field | Type | Description |
|---|---|---|
| id | String | Id of the custom detector to remove. |
Output: JSON with 200 status if all OK, or {"error": "error text"} if something went wrong.
Migrate custom detectors
If you need to transfer your custom detectors between different PII Tools installations, export them from one PII Tools instance and import into another.
The export is a single .json file which you can conveniently move between installations; see Export / import.
Custom classifiers
You can define your own rules for how to classify scanned objects, to assign a Severity level in line with your company policies.
There's one classifier that always exists and cannot be deleted: the built-in classifier. This built-in classifier takes into account all PII detected inside each file, and automatically assigns one of the CRITICAL, HIGH, LOW, NONE severity labels.
If that built-in classifier doesn't match your needs, or you'd like more flexibility in what constitutes low/high risk documents in your organization, use the Custom classifiers as described in this section. When launching a scan, you'll be able to choose which classifier to apply in that scan, or even reclassify already-scanned objects in your PII Tools inventory:
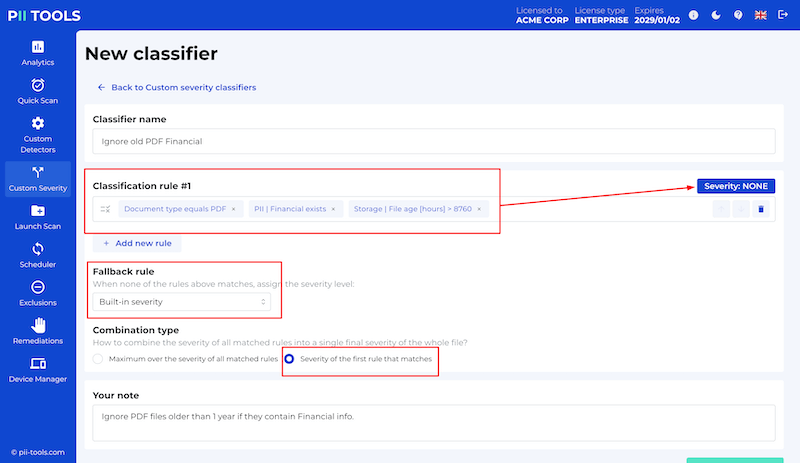
Unlike the built-in classifier that uses machine learning, the custom classifiers you create are a combination of explicit rules based on the file age, location, owner, document type, PII found inside etc.
In the web interface, use the "Custom Severity" tab in the left menu. For adding/deleting custom classifiers programmatically, see the REST API endpoint documentation below.
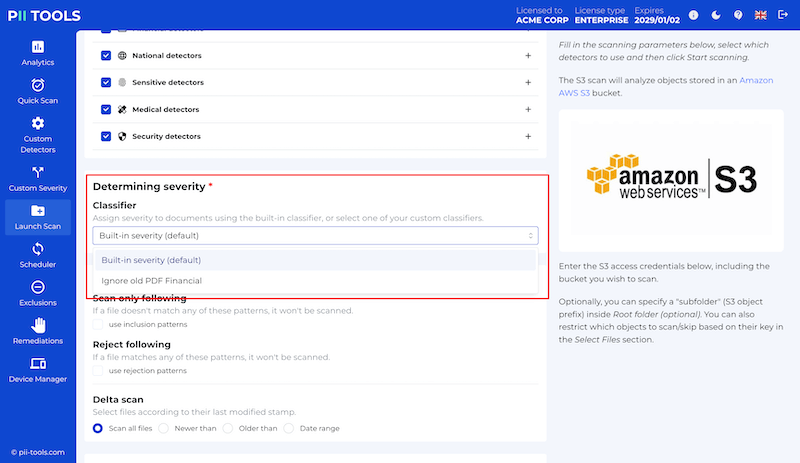
How classifiers work
Right after each object (file, email, DB record…) has finished scanning for PII, PII Tools runs the selected classifier to calculate its severity label. This label is then stored alongside the object, allowing you to filter by severity.
If you wish to reclassify one or more existing objects from a previous scan using a new (or modified) classifier, select those objects in PII Analytics and click the "Reclassify all" button. The severity label of all selected objects will be recalculated and updated.
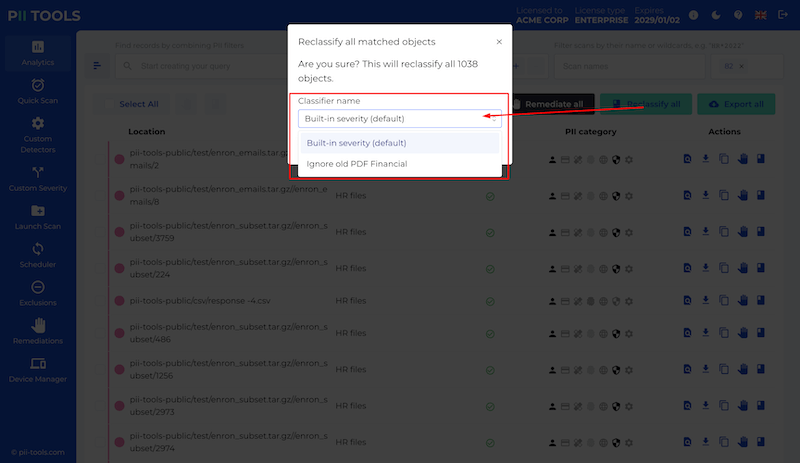
Custom classifier parameters
| Parameter | Type | Description | Default |
|---|---|---|---|
name |
String | Name of the classifier. | - (mandatory parameter) |
rules |
List[Object] | Non-empty ordered list of severity rules. Each rule must be an object with two keys: query which corresponds to an Analytics query, and severity which is the target severity when query matches on this object. |
- (mandatory parameter) |
aggregator |
String | Either max or first. If max, evaluate all rules and assign the highest severity across all matching rules. If first, assign the severity of the first rule that matches. |
- (mandatory parameter) |
fallback |
String | If none of the rules match, assign this severity. Must be one of builtin, NONE, LOW, HIGH, CRITICAL. |
NONE |
note |
String | A text note describing this classifier, for your convenience. | – |
Add a custom classifier
Add a new classifier named
Ignore old PDF Financial:
curl -k -XPOST --user username:pwd https://127.0.0.1:443/v3/custom_severity 'Content-Type: application/json' -d'
{
    "id": "8",
    "name": "Ignore old PDF Financial",
    "rules":
    [
        {
            "query":
            {
                "or_clauses":
                [
                    [
                        [
                            "storage.doctype",
                            "equals",
                            "PDF"
                        ],
                        [
                            "pii.financial",
                            "exists"
                        ],
                        [
                            "storage.file_age",
                            ">",
                            "8760"
                        ]
                    ]
                ]
            },
            "severity": "NONE"
        }
    ],
    "aggregator": "first",
    "note": "Ignore PDF files older than 1 year if they contain Financial info.",
    "fallback": "builtin"
}'
You can define new custom classifiers using either the web interface, or programmatically using the REST API.
The classifier name must be unique. You won't be able to create multiple classifiers with the same name.
API endpoint
POST /v3/custom_severity
See the example to the right for a REST API example. This example classifier will always assign the built-in severity label, except in the case where the scanned document is a PDF older than 1 year that contains Financial information, in which case it assigns severity NONE.
After you've created your custom classifier, use it in REST API calls by entering its name in the optional severity_clf field during scan configuration.
List all existing classifiers
Get a list of all custom classifiers:
curl -k -XGET --user username:pwd https://127.0.0.1:443/v3/custom_severity
Response:
{
    "_request_seconds": 0.002,
    "_success": true,
    "custom_severity":
    [
        {
            "aggregator": "first",
            "fallback": "builtin",
            "id": "8",
            "name": "Ignore old PDF Financial",
            "note": "Ignore PDF files older than 1 year if they contain Financial info.",
            "rules": […]
        }
    ]
}
Get a list of all custom classifiers. The built-in classifier is always present and is not returned.
Endpoint
GET /v3/custom_severity
Output
| Field | Type | Description |
|---|---|---|
| custom_severity | List[Object] |
List of all user-defined custom classifiers. |
Delete a custom classifier
Delete the custom classifier with id
3:
curl -k -XDELETE --user username:pwd https://127.0.0.1:443/v3/custom_severity/8
{
    "_request_seconds": 0.046,
    "_success": true
}
Permanently delete a custom classifier.
Endpoint
DELETE /v3/custom_classifier/{id}
Input
| Field | Type | Description |
|---|---|---|
| id | String | Id of the custom classifier to remove. |
Output: JSON with 200 status if all OK, or {"error": "error text"} if something went wrong.
Migrate custom classifiers
If you need to transfer your custom classifiers between different PII Tools installations, export them from one PII Tools instance and import into another.
The export is a single .json file which you can conveniently move between installations; see Export / import.
Remediations
Once you've established your company-wide inventory of personal and sensitive data, and gone through the review process of Reporting and Exclusions, you can also securely erase files you don't want to keep, straight from the PII Tools dashboard.

How remediation works
File remediation in PII Tools is a flexible process. Follow the steps below to remediate files and emails chosen for deletion or quarantine.
First, identify the files you want to remediate.
- This can be done either in bulk, using the PII search and filtering in PII Analytics, or individually for selected files.
- With Secure erase, files will be deleted from the same storage where they were discovered, i.e. from the remote endpoints, laptops, file servers, mailboxes, sharepoint sites, etc.
- If the device agent from which the file should be deleted is not running, PII Tools will wait until the agent comes back online, and erase the file then.
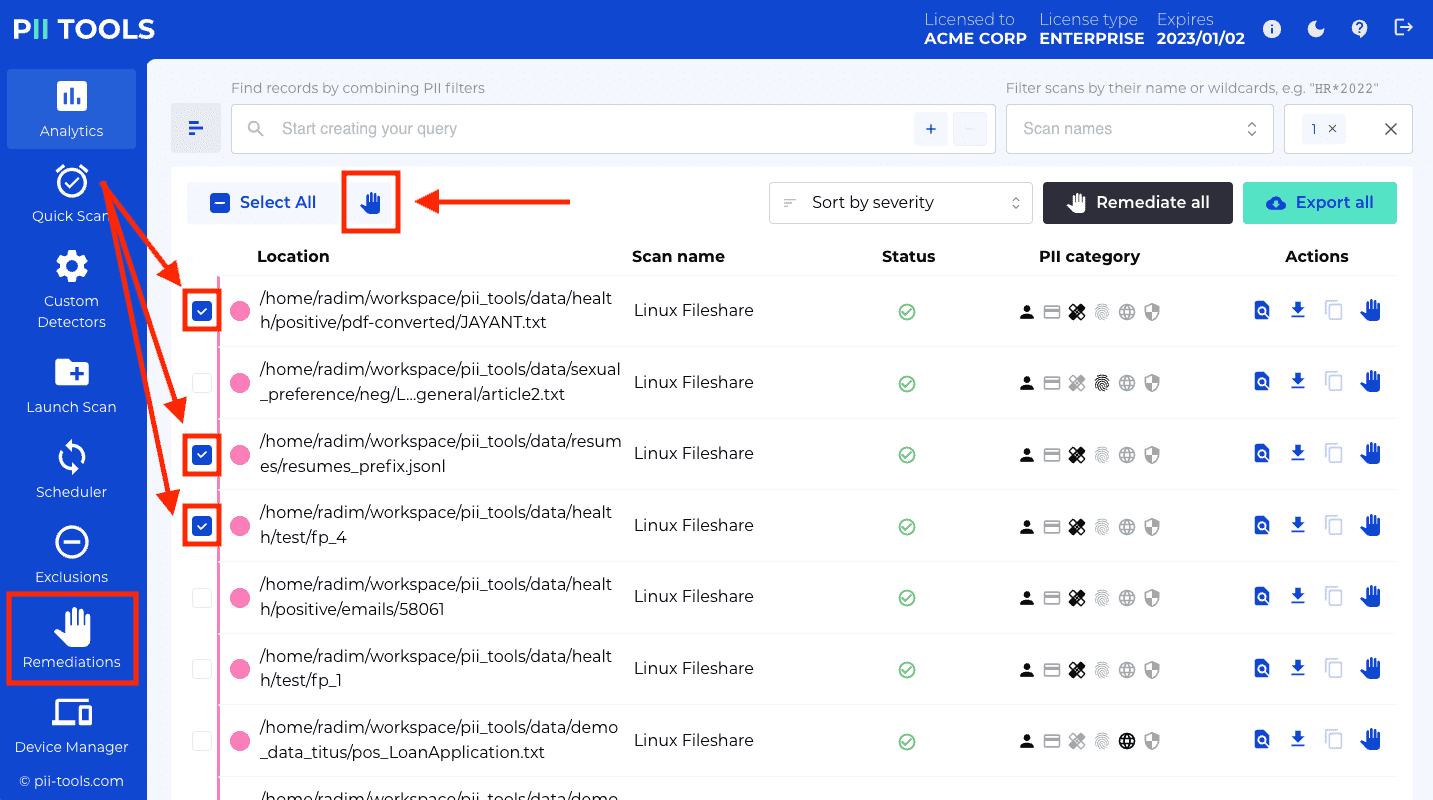
Click the "Forget objects", "Secure erase", "Quarantine", "Redact in-place", "Label in Purview", "Download redacted", or "Remediate from locations" buttons to bring up a confirmation dialog with additional options.
- "Forget objects" will remove the selected objects from the PII Tools inventory, but does not affect the original storage.
- "Secure erase" removes objects both from PII Tools inventory and from the original storage.
- "Quarantine" will copy the select objects to a different location. To set up availabale quarantine destinations, see the device agent setup. The original files or emails are not affected – quarantine only creates a fresh copy, under that target device agent's quarantine folder.
- "Redact in-place" redacts PII in place, inside the original storage. Several options for how exactly to redact the PII are available, such as "when redacting detected SSNs, leave the last four SSN digits unredacted".
- "Label in Purview" sets or removes Microsoft Purview sensitivity labels on supported storage types (Microsoft OneDrive and SharePoint). Note that your application must be configured to use metered APIs and services and must be granted the required permissions.
- "Download redacted" downloads an archive with selected objects with PII redacted. The original files or emails are not affected.
- "Remediate from locations", located in the Remediation tab, lets you upload a list of files to remediate. You can curate this list any way you like, e.g. let your end users copy locations of objects they wish erased. Once you collect all locations to be erased, put them into a text file, with one location per line. Upload this file into the "Remediate from locations" dialog box, and PII Tools will erase all the listed locations, in bulk.
For "Secure erase" and "Redact in-place", in the dialog that pops up, choose whether you want to also quarantine your files before PII Tools deletes them.
- The quarantine destination must be an active device agent – possibly the same device on which the erased file lives, but can also be a completely different agent, on a different remote machine.
- The quarantine agent must have its Quarantine Folder set and must be running. See device agent setup.
- Quarantined files will be copied from the original location to this Quarantine folder first, before they are permanently deleted from the original location.
If you select the "Into a subdirectory by file owner" option, PII Tools will structure the files in the quarantine folder according to the File Owner. For example, a quarantine file that was owned by
MY_DOMAIN\bobwill be stored into theMY_DOMAIN/bobsubfolder of the quarantine folder. This can be useful if you assign different user privileges to different subfolders with the quarantine server, so that users can look at their own quarantined files but not files of other users.The "Enter subfolder manually" option allows you to enter arbitrary subpath of the quarantine folder, to copy the quarantined files into.
Please note that in all cases, all quarantined files are stored within the quarantine folder defined when installing the quarantine agent. Storing files outside this folder is not possible.
For "Redact in-place", in the dialog that pops up, you can choose a redacted file suffix that will allow you to easily distinguish the filenames of redacted objects from other objects in the original storage.
In-place redaction also supports specifying how to redact the detected PII. The default option (the default redaction profile) will irrevocably mask the PII with XXX characters, or black rectangles in case of PDFs and images. This operation is not reversible.
Optionally, you can also fill in a note with each remediation.
- This note is not used by PII Tools in any way, but serves as your own future reminder for "What was this remediation about?". Its rationale and additional context. Feel free to enter any text you like.
- The note will also appear in the Remediation log, for auditing purposes.
Once you're happy with your remediation task setup, confirm the dialog by clicking the red "Quarantine" or "Erase" button. PII Tools will quarantine and/or secure-erase all selected files.
- No undelete is possible after you confirm the erasure!
- If you wish to preserve the erased file in a different location (such as in a access-restricted central folder), use the Quarantine option above.
Remediate from search
To submit a new remediation task programatically, issue a DELETE query against
/analytics:
curl -XDELETE --user username:pwd https://127.0.0.1:443/analytics?action=erase¬e=MyNote -H 'Content-Type: application/json' -d'
{
"query": {
"or_clauses": [
[
["location", "CONTAINS", "my_folder"],
["severity", "CONTAINS", "CRITICAL"]
]
]
}
}'
Note the
action(one oferase,forgetorquarantine) and thenotequerystring parameters.The response will look like this:
{
   "_request_seconds":1.309,
   "_success":true,
   "remediation_id":"18"
}
You can remediate the results of an Analytics search. This means there are two ways to remediate:
Remediate files in bulk
Tune your analytics query to match all files from the scans, folders, PII, severity, age, etc you need. Once happy with the result set, click the "Remediate all" button:
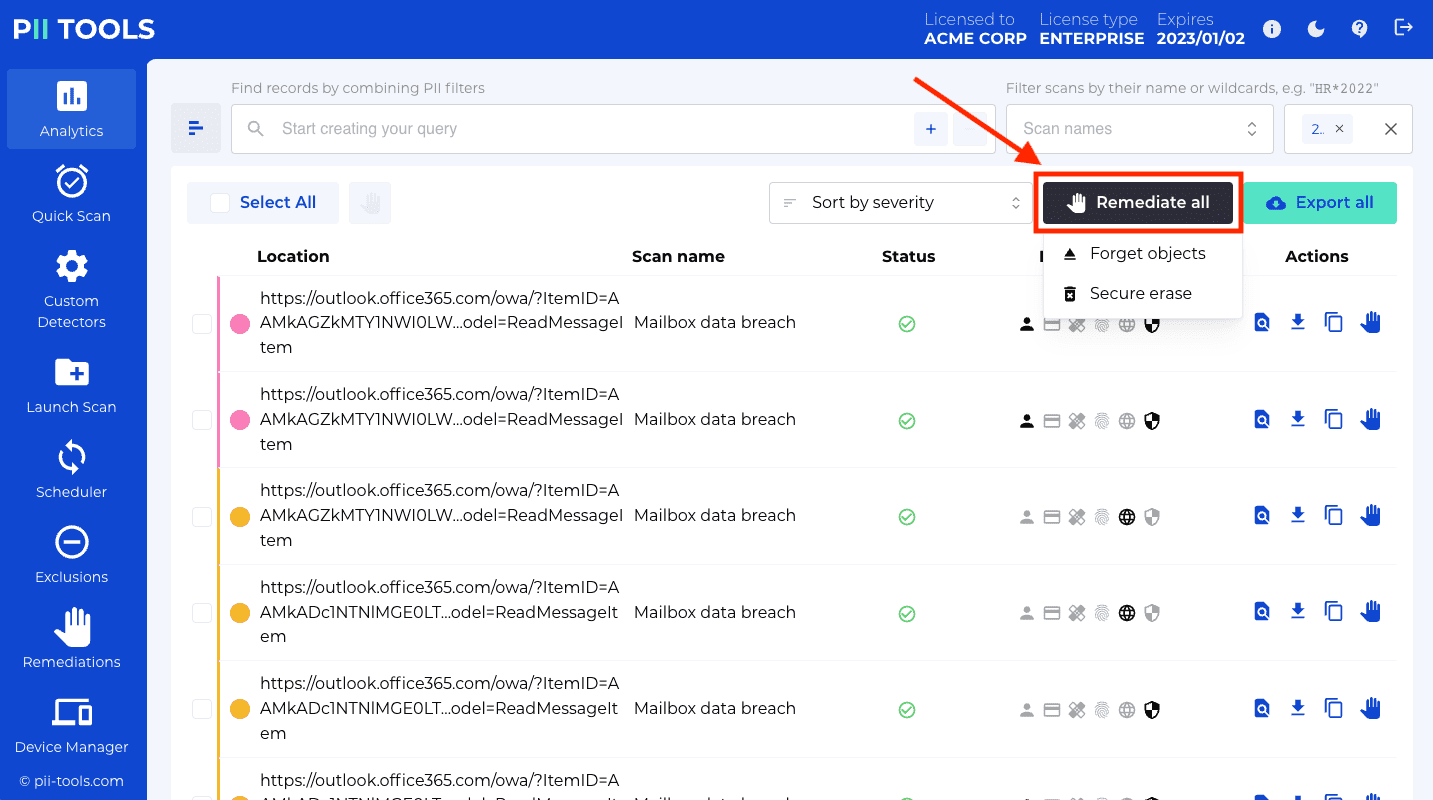 In this way, you can remediate thousands of files or emails at once, with a click of a button.
Remediate individual files
Click the check box to the left of the files or emails you wish to remediate, then click the "Secure erase selected objects" icon:
Next, in the confirmation pop-up, choose your remediation options as described above in How remediation works.
Remediate from file
To submit a new remediation task programatically, issue a DELETE query against
/analytics:
curl -XPOST --user username:pwd https://127.0.0.1:443/remediations?action=erase&quarantine_token=mbp¬e=MyNote -F "file=@locations.txt"
Note the
action(one oferase,forgetorquarantine) and thenotequerystring parameters.The response will look like this:
{
   "_request_seconds":1.309,
   "_success":true,
   "remediation_id":"18"
}
Another way to remediate files or emails in bulk is to collect their locations into a text file, and then submit this file to PII Tools.
This workflow is convenient if you have an additional review step in your remediation pipeline:
Find a set of results in Analytics search.
Export the results into one or more reports, send these reports to individual users for review.
Users go through their report and mark the locations they wish remediated (erased).
Combine the locations from all users into a single plain text file, with one location-to-be-erased per line.
Go to the
Remediationtab and click onRemediate from locationsin the top right corner.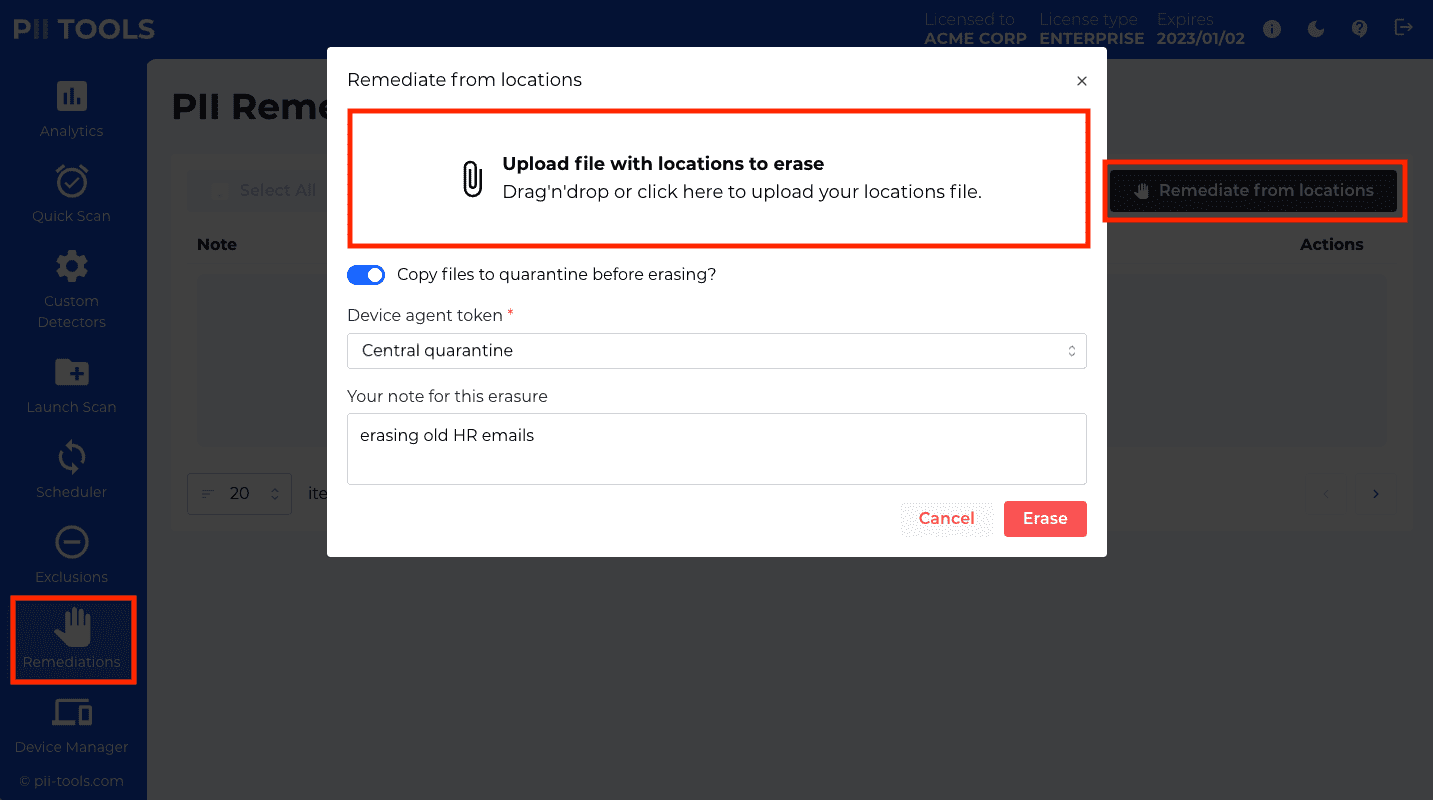
Upload your text file with locations to erase.
Click "Secure erase" to start the remediation process. The remediations are not reversible!
If you wish to back up the erased files and emails first, make sure to select a quarantine destination as per How remediation works.
Remediate on-the-fly
To redact a single file, first scan it using the stream scan, and then submit the detected PII for redaction in a second request:
$ curl -XPOST -k -s --user username:pwd https://127.0.0.1:443/stream_scan/_download?transform=redact&async=0 -H 'Content-Type: application/json' -d'
{
    "scan_config": {
        "filename": "bank_form.pdf",
        "content": "'$(base64 -w0 /tmp/bank_form.pdf)'",
        …all other JSON parameters from the original stream_scan POST request
    },
    "storage": {
        …`storage` field copied from a previous stream_scan response
    },
    "pii": {
        …`pii` field copied from a previous stream_scan response
    }

}' > bank_form_redacted.pdf
A successful redaction returns the redacted file in a response attachment. In the above example, this response is stored into a new
bank_form_redacted.pdffile – this is your redacted PDF output.
Endpoint
POST /stream_scan/_download
Remediate (typically, redact) a single input file using PII detected in a previous stream scan. Return the redacted file in response.
No additional scanning happens inside a /stream_scan/_download call. Which portions of the document to redact must be specified on input inside the pii input field – usually taken verbatim from the response of a previous POST /stream_scan
call.
Each redaction request will block until the redacted response file is ready (a synchronous call, may take longer on larger inputs).
Input (query string data)
| Field | Description | Example |
|---|---|---|
transform |
What remediation action to apply. Currently one of redact or highlight. |
&transform=redact |
async |
Whether to return the redacted file right away in the response. Always use 0. |
&async=0 |
Input (JSON POST data)
| Field | Type | Description | Example |
|---|---|---|---|
scan_config |
Object | POST data of the original stream_scan call |
"scan_config": {"filename": "my_file.pdf", "content": "…", "analyze_max_text": 10000, "use_ocr": "1", …} |
storage |
Object | The storage value copied verbatim from the original stream_scan response. |
"storage": {"content_type": "application/pdf", "doctype": "pdf", "filesize": 43019, …} |
pii |
Object | The pii value copied verbatim from the original stream_scan response. This is the PII that will be redacted. |
"pii": [{"confidence": 1, "pii": "202-555-0129", "pii_category": "Personal", "pii_type": "phone", …}, …] |
Returns
On success, status 200 with the redacted file directly as a response attachment.
On failure, see the JSON message of the 4xx/5xx response for error details.
Remediation log
API call to download a remediation log programmatically, as a CSV file:
$ curl -k -XGET --user username:pwd https://127.0.0.1:443/v3/remediations/18 -OJ
You can download a remediation log for a particular remediation task, or even for multiple tasks at once. This log is a CSV file displaying detailed information for each remediated file, kept for auditing purposes.
In case the remediation action failed on any file, the log will also show the concrete error.
To download a remediation log:
- Navigate to the "Remediations" tab in the left-hand side menu.
- Select one or more tasks to download the log for, by clicking the checkbox to their left.
- Click the "Download remediation report" icon.
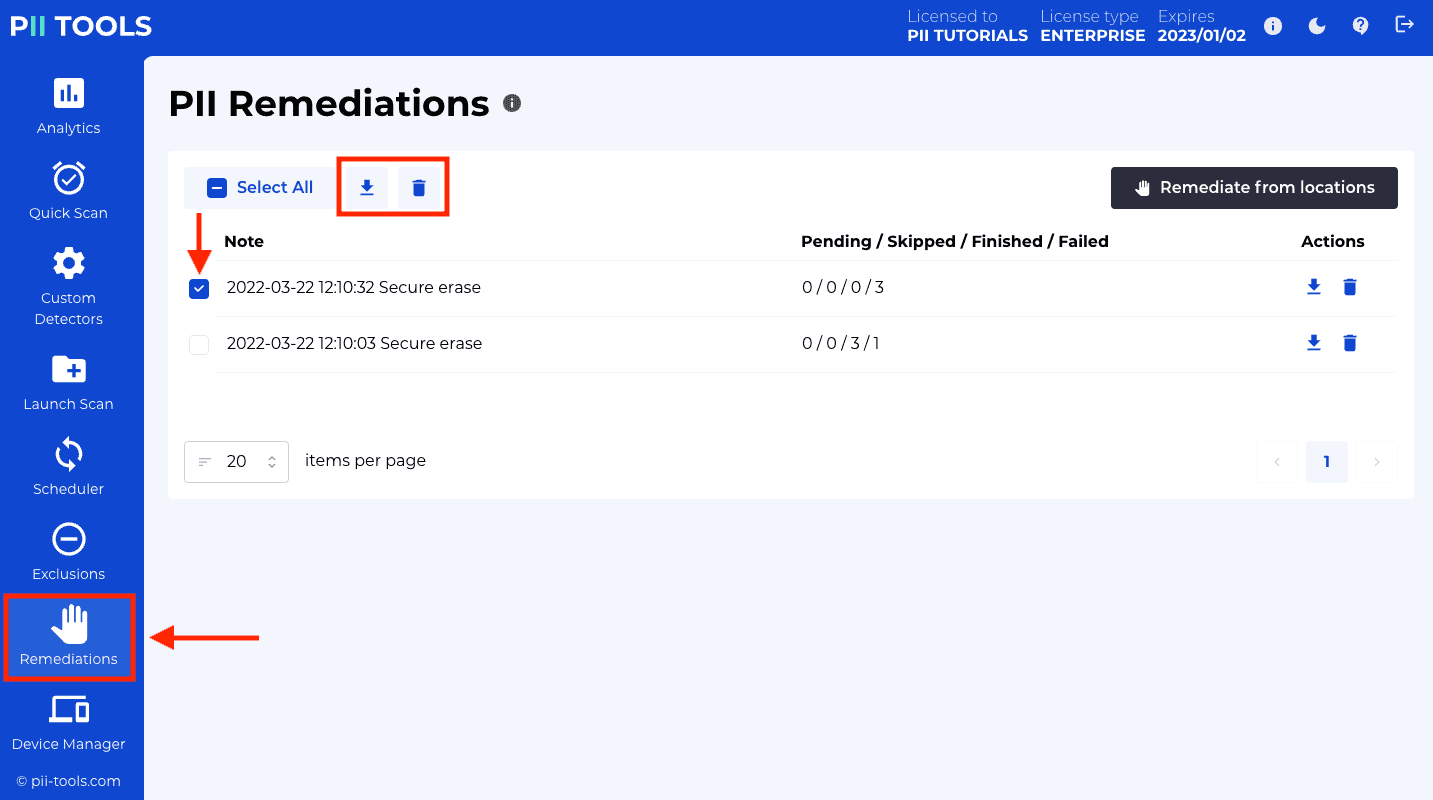
API endpoint
To download the remediation log for a particular remediation task programmatically:
GET /v3/remediations/<id>
The remediation id is the same ID as returned from the DELETE /analytics call that created the remediation task. See also the API to List remediations.
Redaction profiles
API call to list existing redaction profiles:
$ curl -k -XGET --user username:pwd https://127.0.0.1:443/v3/redaction_profiles

{
  "_request_seconds": 0.002,
  "_success": true,
  "redaction_profiles": [
    {
      "default": {
        "transformation": "mask_none"
      },
      "id": "1",
      "name": "PCI: mask only CCs",
      "note": "Mask only credit card numbers. -JM",
      "pii_types": {
        "credit_card": {
          "transformation": "mask_all"
        }
      }
    },
    {
      "default": {
        "transformation": "mask_all"
      },
      "id": "2",
      "name": "SSN leave 4 + leave email",
      "note": "We need those 4 SSN digits for QA review. Emails are irrelevant. -JM",
      "pii_types": {
        "email": {
          "transformation": "mask_none"
        },
        "ssn": {
          "transformation": "leave_last_four_characters"
        }
      }
    }
  ]
}
By default, whenever you redact PII instances, PII Tools will redact the whole PII value: irreversibly replace that PII by a black rectangle in images and PDFs, or by XXX characters in text formats like Excel, Word or CSV.
This is the "Mask all" transformation, but other transformations are possible too:
- "Mask none": leave the PII value as-is.
- "Leave last N characters": leave the last N (for example, the last four) PII characters unredacted, i.e. visible in the clear.
- "Leave first N characters": leave the first N characters unredacted.
For greater flexibility, you can select which transformation to apply on which PII type. For example, you may want to leave the last four SSNs characters unredacted, but redact everything in all other PII types ("Mask all") except for emails, which should be left unredacted ("Mask none"):
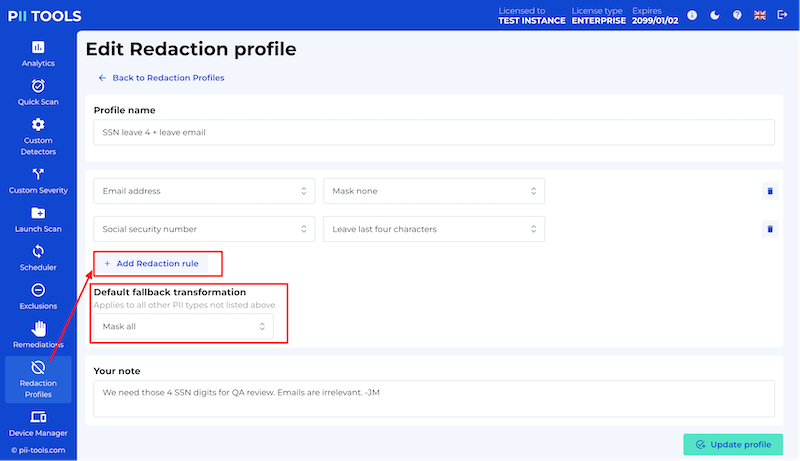
You can give a combination of such "PII type + transformation" rules (called Redaction rules) a name and store them persistently, allowing you to re-use the same rules throughout your Remediation workflows easily. Click the "Redaction profiles" tab in the left-hand side menu to set up a new Redaction Profile.
Later, when running redactions, select your desired redaction profile from the drop-down menu:
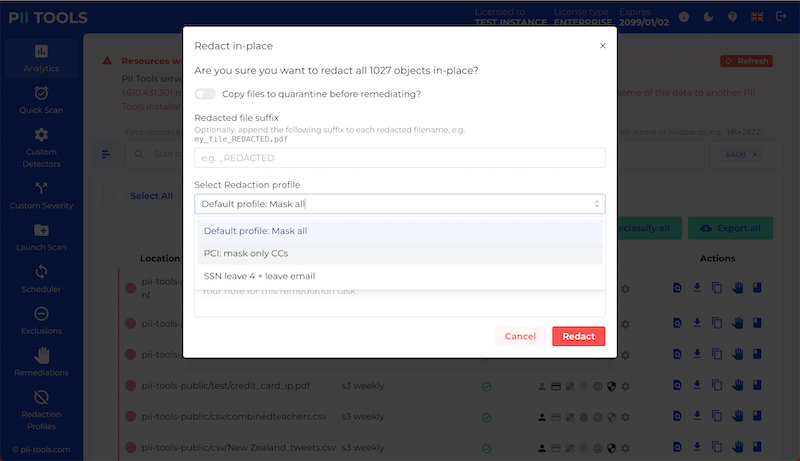
The default redaction profile will redact all PII in full: functionality equivalent to "Mask all" across all PII types, including from Custom detectors.
List remediations
API call to list existing remediation tasks:
$ curl -k -XGET --user username:pwd https://127.0.0.1:443/v3/remediations?offset=0&limit=10

{
   "_request_seconds": 0.017,
   "_success": true,
   "limit": 10,
   "offset": 0,
   "remediations": [
      {
         "last_object": "-",
         "note":"2021-04-02 12:39:57 MyNote",
         "objects_pending": 697,
         "remediation_id": 18
      }
   ],
   "total_count": 1
}
To list all remediations, both for already completed and in-progress tasks, navigate to the "Remediations" tab in the left-hand side menu.
The web page will display your remediation tasks along with their note, size and the last remediated object (for remediations that are still in progress).
Use the pagination buttons at the bottom to leaf through your remediation tasks, in case there are too many to fit on one page.
API endpoint
To list remediation tasks programmatically:
GET /v3/remediations/
Delete a remediation
To delete a remediation task programmatically:
> curl -k -XGET --user username:pwd https://127.0.0.1:443/v3/remediations/18

{
   "_request_seconds":0.006,
   "_success":true,
}
To permanently delete a remediation task and all its associated data:
- Navigate to the "Remediations" tab in the left-hand side menu.
- Select one or more tasks to delete, by clicking the checkbox to their left.
- Click the "Delete selected remediations" icon.
API endpoint
To delete an existing remediation programmatically:
DELETE /v3/remediations/<id>
The remediation id is the same ID as returned from the DELETE /analytics call that created the remediation task. See also the API to List remediations.
Exclusions
Some PII detections may be undesirable – either because they're wrong (false positives), or because that particular PII instance is not relevant to the current review task.
For example, during a breach incident investigation, you may want to hide known employee names, so that only the breached customer names appear in your reports.
Such undesirable PII detections can be hidden from reports on a case-by-case basis, in a process called exclusions.
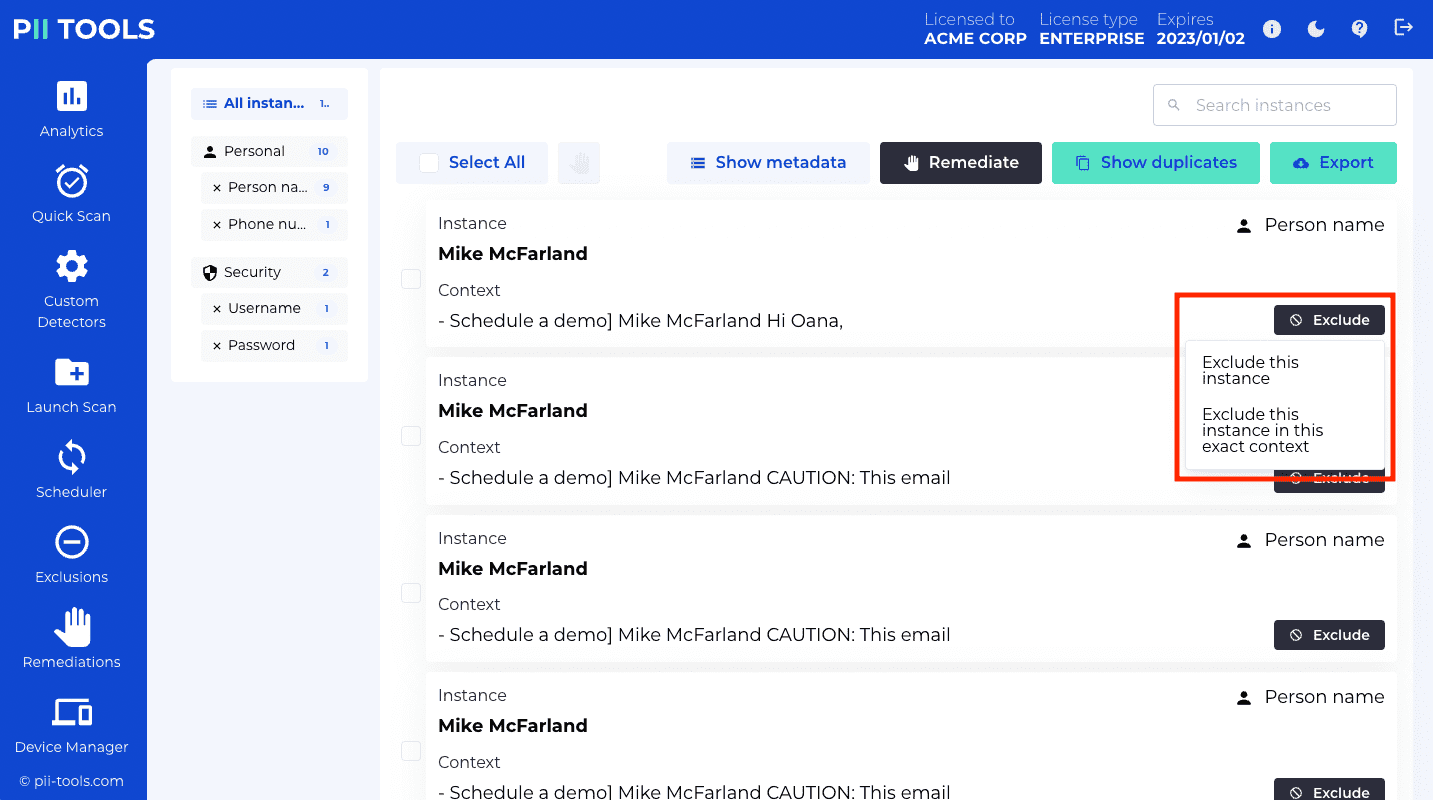
How it works
- Each exclusion consists of a rule and a note. The rule is a regular expression ("regex") applied to each PII instance and context, in all scans and all files. If the rule matches, the PII is not displayed in reports.
- Optionally, you can also fill in a note for each exclusion. This note is not used for matching, nor is it displayed anywhere. Its use is solely as your internal note, such as
Employee name, don't show this to customers --John 28/5/20, to keep things tidy.
- Optionally, you can also fill in a note for each exclusion. This note is not used for matching, nor is it displayed anywhere. Its use is solely as your internal note, such as
- All exclusions are applied at the time of report generation. That is, the PIIs are still detected during a scan, but excluded PIIs are not displayed later in PII Analytics and in scan reports.
- This means that if you change your mind later and delete an exclusion, the PII hidden by that exclusion will re-appear again in your reports.
- To manage exclusions, navigate to the "Exclusions" tab in the left-hand side menu. Here you can create a new exclusion, edit existing, or delete exclusions. You can also add exclusions directly from Analytics; see Add new exclusion.
Add new exclusion
There are two ways to add exclusions: from an existing detection in Analytics, and from the Exclusions tab.
From Analytics
- Using PII Analytics, navigate to a file that contains the unwanted PII.
- Click the "Exclude" button next to the PII instance to be hidden.
- In the menu that appears, select either "Exclude this instance" or "Exclude this instance in this exact context":
- "Exclude this instance" will hide all PII that matches this instance text. For example, if you "Exclude this instance" on an instance of PII name
John Doe, thenJohn Doewill disappear from files, emails, database reports. - "Exclude this instance in this exact context" will hide all PII that matches not just the instance, but also its exact context. This allows you to hide a name only in one file (one context), while keeping the same name visible in another file (another context).
- "Exclude this instance" will hide all PII that matches this instance text. For example, if you "Exclude this instance" on an instance of PII name
- The dashboard will refresh and you will no longer see the excluded PII. Note that other files may be affected too, in case the new exclusion rule also applies to them.
From scratch
- Navigate to the "Exclusions" tab in the left-hand side menu.
- Click the "Create new exclusion" button in the top-right corner.
- Enter the desired
ruleandnote.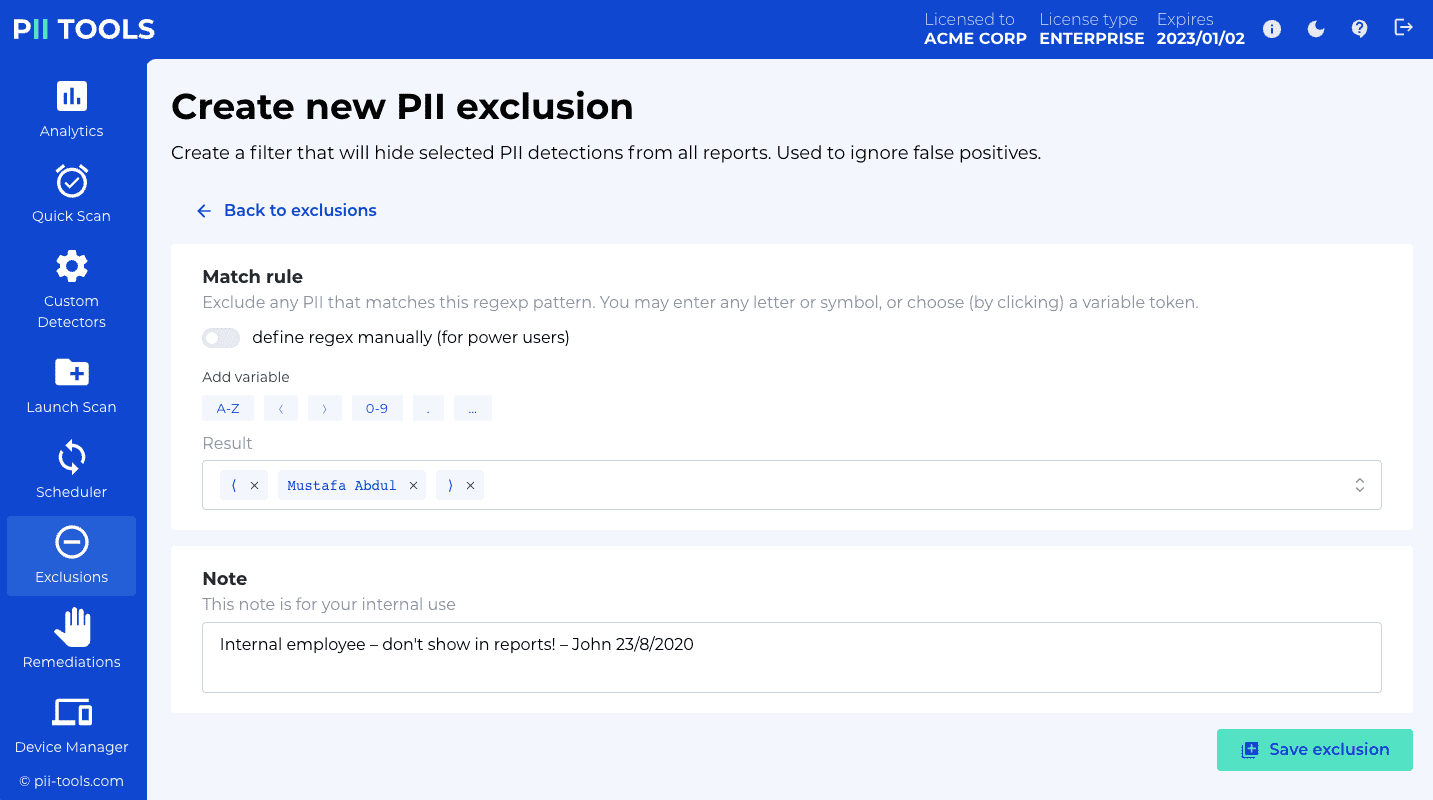
- Click the "Create exclusion" button to submit and store the exclusion.
Create a new exclusion. The returned id is
18in this example:
$ curl -k -XPOST --user username:pwd https://127.0.0.1:443/v3/exclusions -H 'Content-Type: application/json' -d'
{
    "rule": ".*Branch Manager.*",
    "note": "example note"
}'
The response will look like this:
{
   "_request_seconds":0.009,
   "_success":true,
   "id":"18",
   "note":"example note",
   "rule":".*Branch Manager.*"
}
API endpoint
To create a new exclusion programmatically:
POST /v3/exclusions
The payload accepts JSON with two mandatory parameters:
| Parameter | Type | Description | Default |
|---|---|---|---|
rule |
String | Regexp. Any PII whose instance or context matches this regexp will be hidden from reports. | - |
note |
String | Any text; for your internal use. | - |
See the curl code on the right for one example POST call.
Edit exclusion
API call to update an existing exclusion:
$ curl -k -XPUT --user username:pwd https://127.0.0.1:443/v3/exclusions/18 -H 'Content-Type: application/json' -d'
{
    "rule": ".*Branch Manager.*",
    "note": "example note"
}'

{
   "_request_seconds":0.009,
   "_success":true,
   "id":"18",
   "note":"example note",
   "rule":".*Branch Manager.*"
}
To edit an existing exclusion:
- Navigate to the "Exclusions" tab in the left-hand side menu.
- Use the search bar on top to filter down all existing rules to just the ones you wish to edit. You can enter words or parts of text to make your search easier. The search works over both rules and notes.
- Click the pencil button under "Actions". A new window will open that allows you to adjust both the rule and the note.
- When finished editing, don't forget to press the "Update exclusion" button.
API endpoint
To update an existing exclusion programmatically:
PUT /v3/exclusions/<id>
The exclusion id is the same ID as returned from GET and POST requests and must be valid (not deleted).
The PUT payload accepts the parameters as creating a new exclusions.
List exclusions
> curl -k -XGET --user username:pwd https://127.0.0.1:443/v3/exclusions

{
   "_request_seconds":0.006,
   "_success":true,
   "limit":100,
   "offset":0,
   "rules":[
      {
         "id":"16",
         "note":"Created from 'credit_card_ip.pdf' on Mon, 24 Aug 2020 17:47:17 GMT",
         "rule":"^20.152.182.237$"
      },
      {
         "id":"15",
         "note":"John Doe",
         "rule":"^John Doe$"
      }
   ],
   "total_count":2
}
You can list your existing exclusions under the "Exclusions" tab in the left-hand side menu.
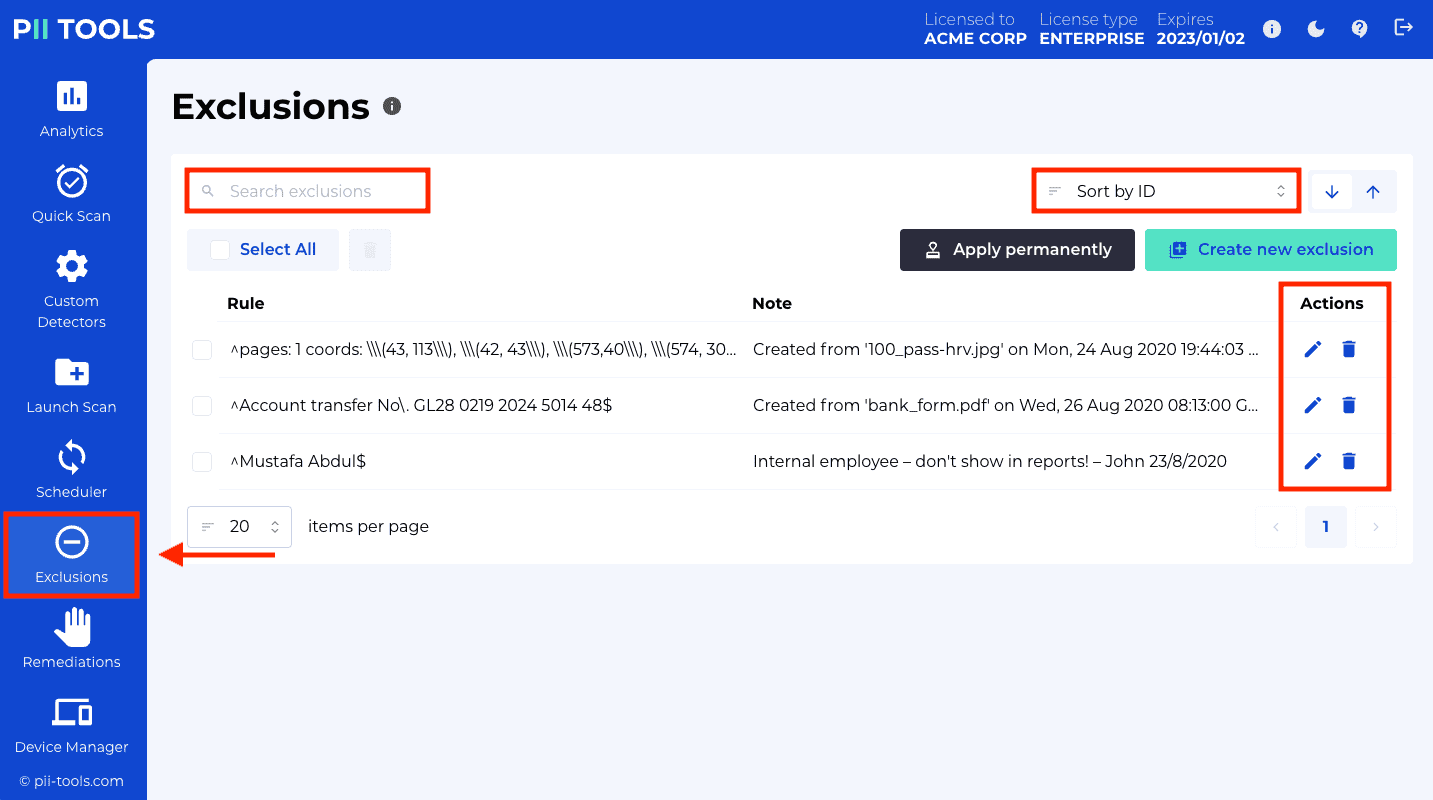
For your convenience, there's a search bar on top that allows you to filter exclusions by a word or part of text. Only exclusions with a rule or note that match your search will be displayed.
API endpoint
To list an existing exclusion programmatically:
GET /v3/exclusions/
The response is in JSON format. See the curl example to the right for a sample output.
Delete exclusion
curl -k -XDELETE --user username:pwd https://127.0.0.1:443/v3/exclusions/1
To delete an existing exclusion:
- Navigate to the "Exclusions" tab in the left-hand side menu.
- Use the search bar on top to filter down all existing rules to just the ones you wish to delete. You can enter words or parts of text to make your search easier. The search works over both rulesa and notes.
- To delete an exclusion, click the garbage bin button under "Actions". Confirm the pop-up asking you whether you're sure.
API endpoint
To delete an existing exclusion programmatically:
DELETE /v3/exclusions/<id>
The exclusion id is the same ID as returned by GET and POST requests.
Apply permanently
curl -k -XPOST --user username:pwd https://127.0.0.1:443/v3/exclusions/_apply
Normally, when you add an exclusion, PII Tools still stores the original PII instances – it just stops displaying them in the Analytics dashboard and reports. This allows you to go back and forth, "hide and unhide" PII instances simply by adding or deleting exclusion rules.
However, you may also choose to apply all exclusions permanently. This means removing the matched PII instances from the inventory completely, and then recalculating all object statistics such as PII counts and PII severity.
To remove excluded PII permanently, go to the Exclusions tab and click the "Apply permanently" button.
Once you click the "Apply permanently" button, the removal process is started. This operation is not reversible. Only the already completed (i.e. SCANNED or FAILED) scans are affected; PII instances are not removed from scans that are currently in progress, nor from future scans.
To see whether the "Apply permanently" operation finished yet, check the spinner within the "Apply permanently" button, or call GET /exclusions/_apply programmatically.
Migrate exclusions
If you need to transfer your exclusions between different PII Tools installations, export them from one PII Tools instance and import into another.
The export is a single .json file which you can conveniently move between installations; see Export / import.
Export / import
PII Tools offers functionality to customize your installation, such as by adding Custom PII detectors and PII Exclusions. These customizations are local to that one installation, but sometimes you might want to migrate them to another installation, another PII Tools server.
Typical reasons for migrating the service state include:
- PII Tools product upgrade that is not backward compatible, which makes you wipe your inventory.
- To keep multiple PII Tools servers in sync, including their custom state, for load balancing.
- As a backup.
PII Tools supports these workflows through export / import.
Export
Export the state of this instance into a single JSON file:
$ curl -k -XGET -JLO --user username:pwd https://127.0.0.1:443/v3/state

Saved to filename 'pii-export-2020-08-26-12:32:58.json'
To export the state of your instance from your web dashboard, click the "Export" button in the ⓘ information panel.
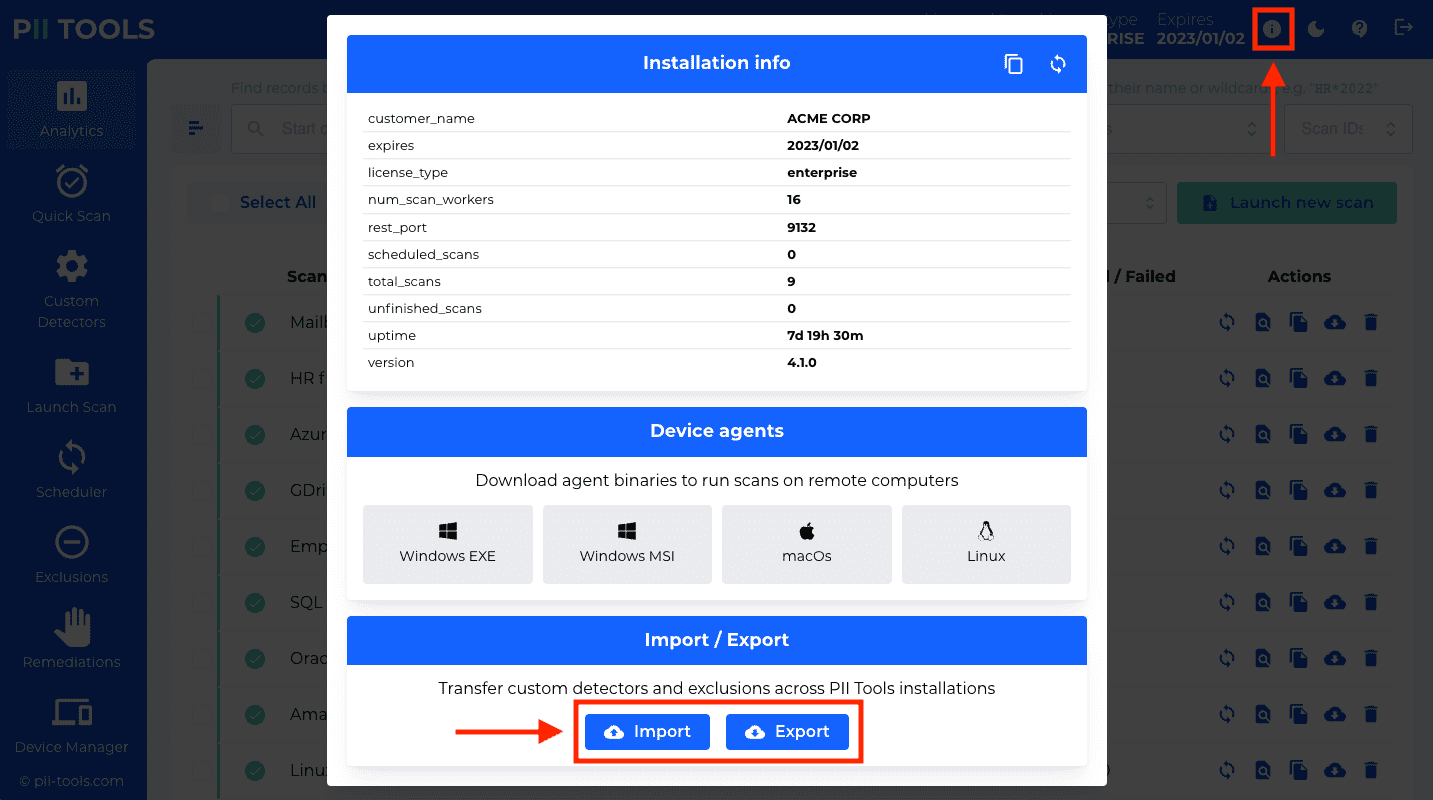
The export will produce a single .json file which contains all the state information. You can store, archive, and later import this file into another instance.
API endpoint
To export the state of PII Tools programmatically:
GET /v3/state
The response will be a file attachment in the JSON format, which you can store or rename for later use. See on the right for a curl example.
Import
$ curl -k -XPOST --user username:pwd https://127.0.0.1:443/v3/state -H 'Content-Type: application/json' -d @'pii-export-2020-08-26-12:32:58.json'

{
   "_request_seconds":0.007,
   "_success":true,
   "custom_detectors":{
      "created":0,
      "updated":0
   },
   "exclusions":{
      "created":0,
      "updated":3
   }
}
To import custom detectors and exclusions, click the "Import" button in your dashboard and select a previously exported .json file.
API endpoint
To import the state of another PII Tools instance programmatically:
POST /v3/state
The POST payload must be a valid export file, in the .json format from Export. See on the right for a curl example.
Scan reports
Scanning results can be accessed in two ways:
- Machine-readable formats, such as JSON, CSV and Excel. These formats make it easy to export and integrate the ouput of PII Tools in automated workflows.
- Human-readable formats, namely the interactive Drill-down report, Risk Summary and Person Cards reports. These formats are meant to be reviewed and processed by humans, during breach investigations and DSAR / subpoena discovery requests.
All types of reports can be downloaded through the web dashboard button under "Actions" in each scan, from the PII Analytics, or automatically using the Download report API.
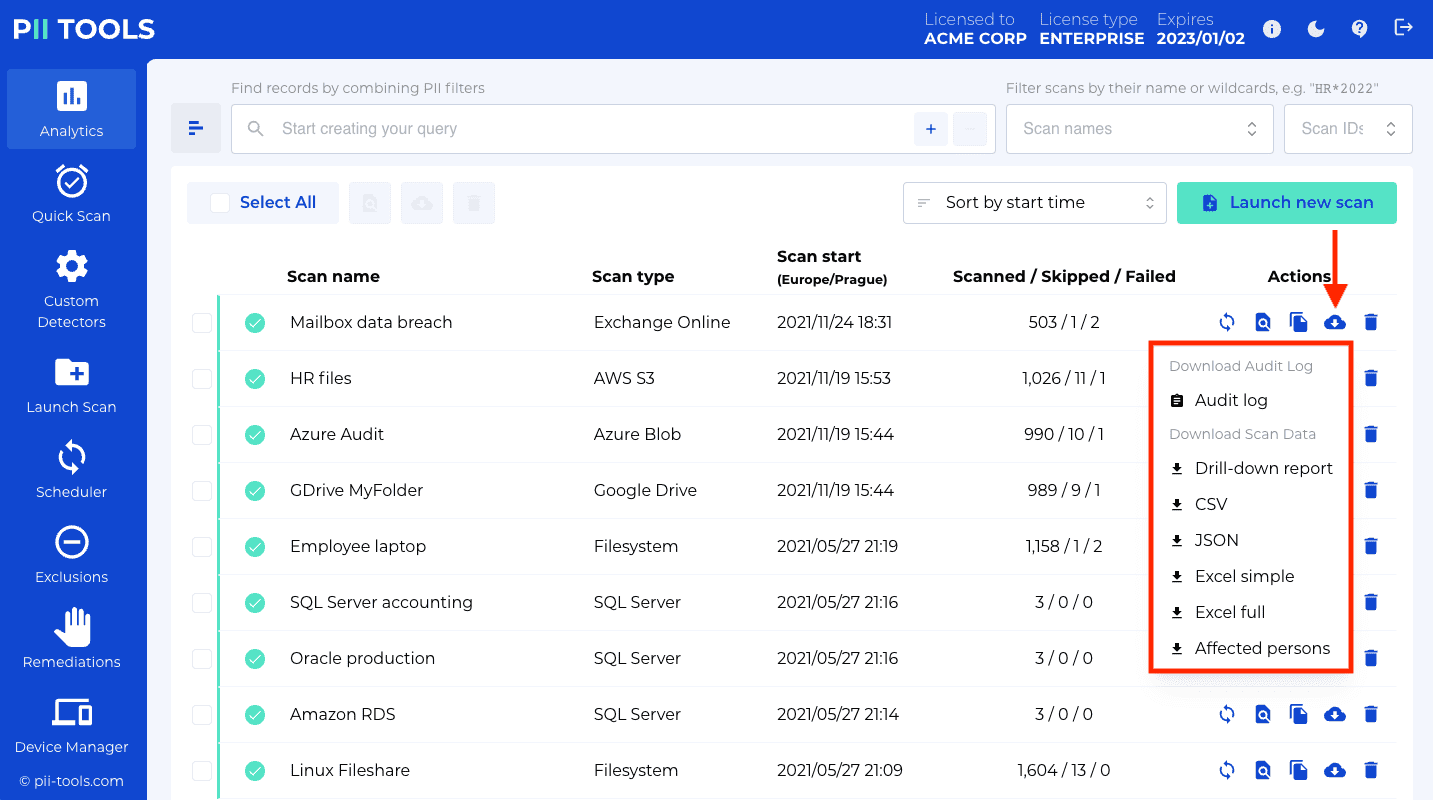
Risk Summary report
Risk Summary is an executive overview report, consisting of a ZIP'ed HTML page. On that page:
Information about aggregate PII statistics: how many files, how many GBs, from which scans, plus a breakdown by severity:
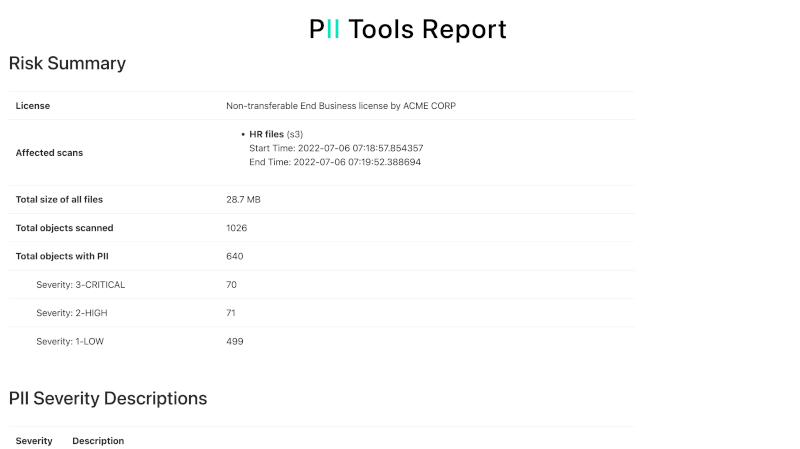
PII summary per-PII-category, per-document type and per-owner:

And finally, for each storage, a list of 100 paths (directories, mailboxes, SQL tables depending on storage type) that hold the most risk:
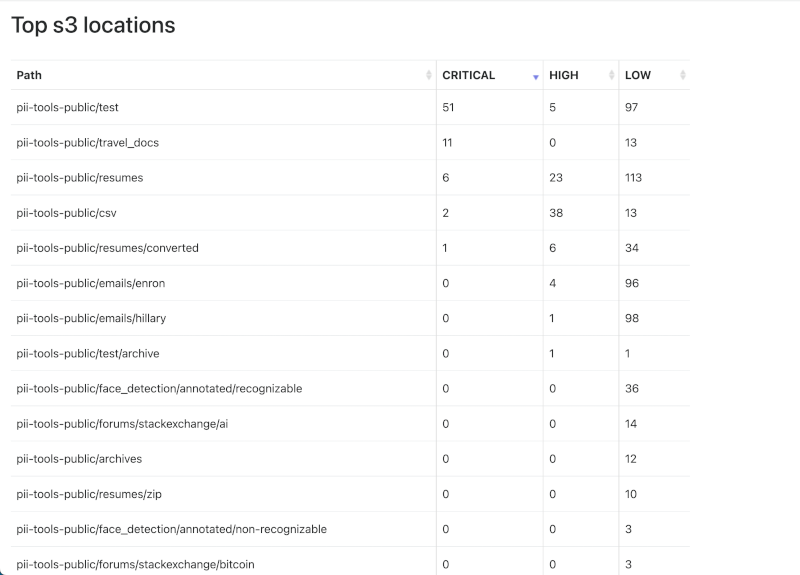
The Risk Summary report can be downloaded as a ZIP archive from the web UI, or using the Download report API.
Drill-down report
These reports are interactive HTML web pages at three successively finer levels of resolution:
- Summary page (
index.html)- Summarizes overall PII statistics by file type (PDF, CSV, archive etc), PII type and Severity.
- Listing page
- Files and directories that match search criteria, grouped by location.
- Filter by severity, file type and PII type.
- Listing is a table that provides metadata about the matching file: file name, location, size, file type, severity, PII types.
- File page
- Details about the PII detected in a particular file, with PII instances highlighted in context.
The report can be downloaded as a ZIP page archive from the web UI, or using the Download report API.
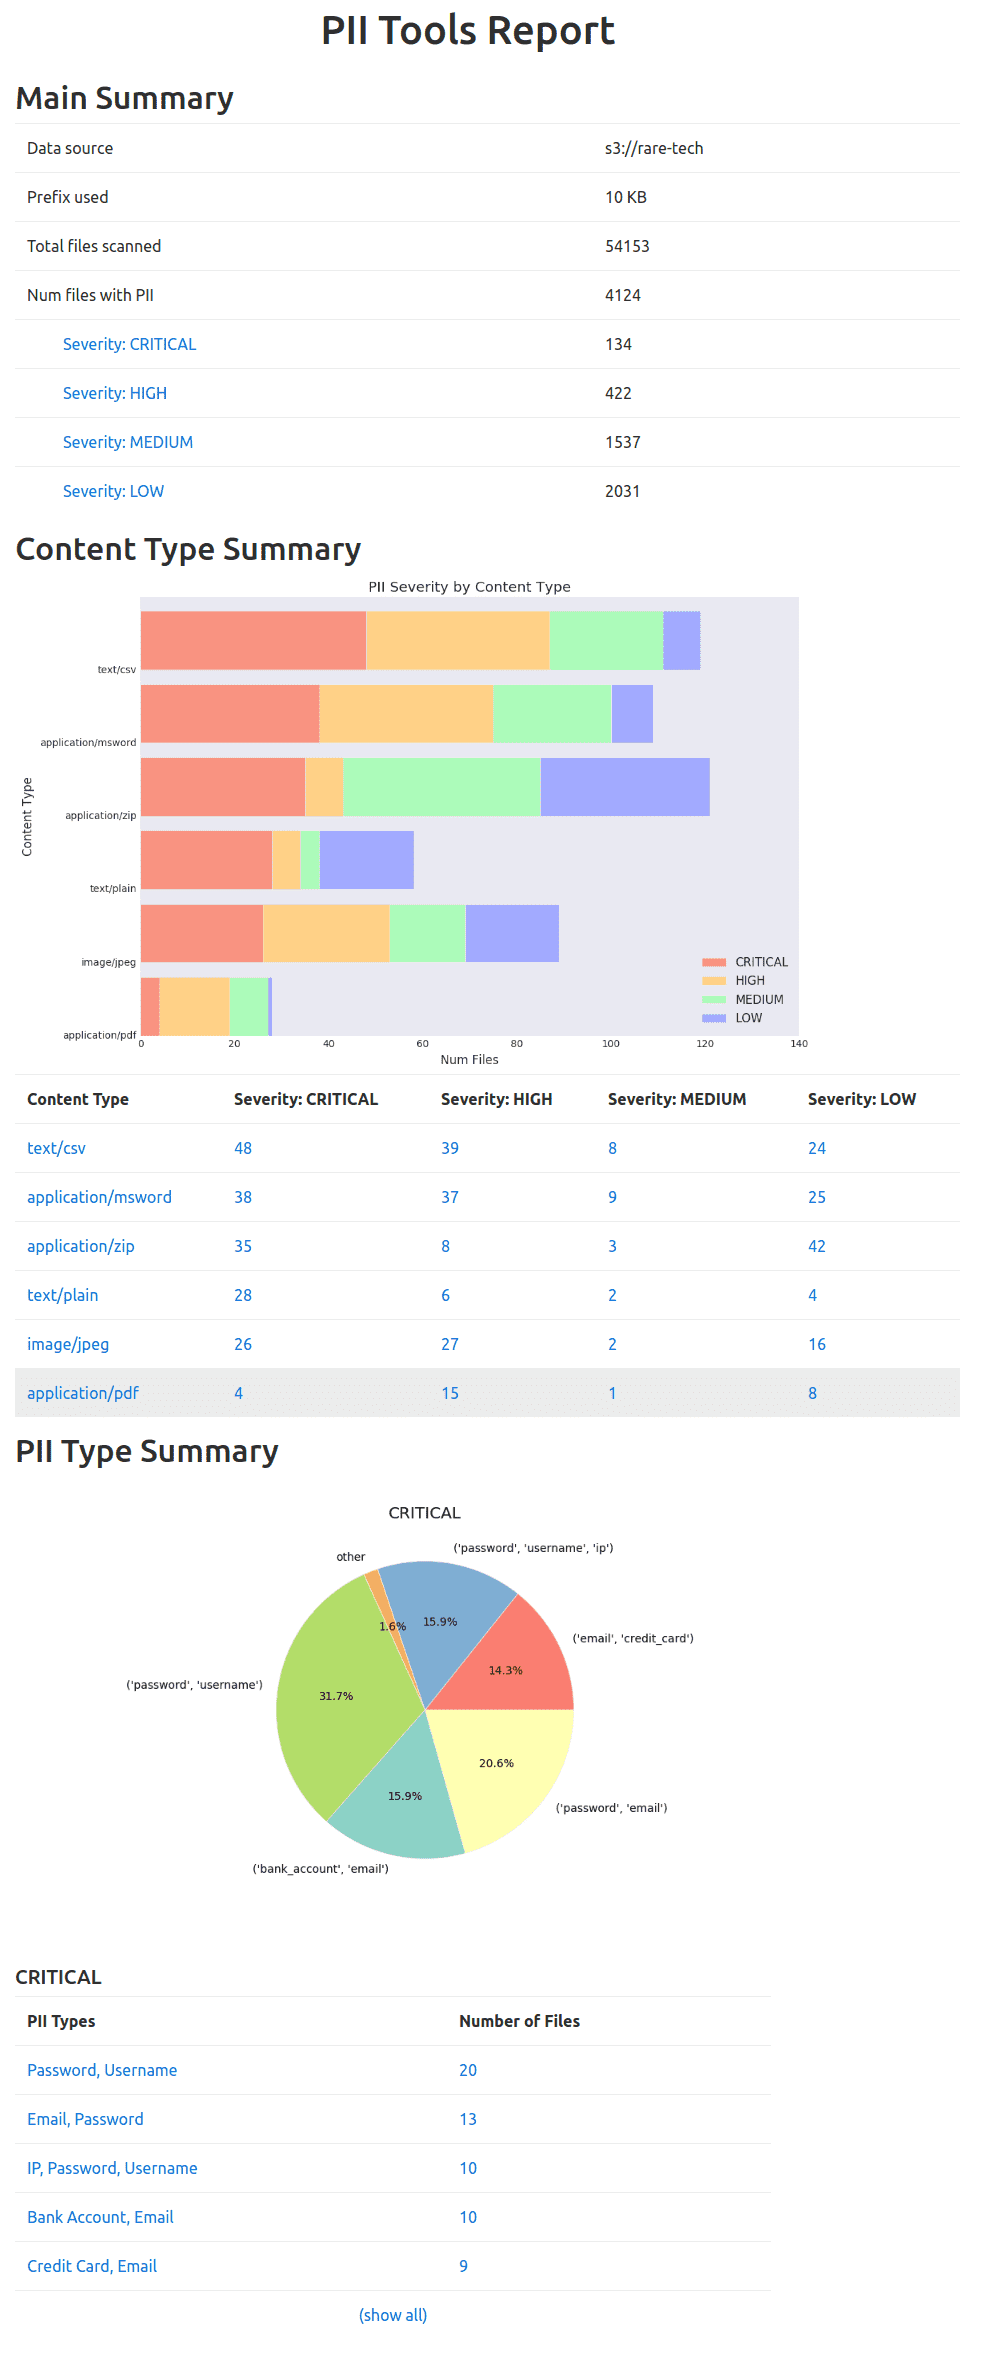
JSON report
Example of one JSON line (reformatted for easier reading):
{
    "scan_id": "1",
    "object_id": "1",
    "scan_name": "s3 small",
    "status": "SCANNED",
    "ended": "2019-07-25 14:43:12.704326",
    "enqueued": "2019-07-25 14:43:10.822782",
    "errors": [],
    "pii": [
        {
            "confidence": 1.0,
            "context": ", From : Name : Mustafa Abdul The Branch Manager Address :",
            "pii": "Mustafa Abdul",
            "pii_category": "Personal",
            "pii_type": "name",
            "position": 105
        },
        {
            "confidence": 1.0,
            "context": "Account Transfer  \nA/c No. GL28 0219 2024 5014 48",
            "pii": "GL28 0219 2024 5014 48 ",
            "pii_category": "Financial",
            "pii_type": "bank_account",
            "position": 418
        }
    ],
    "processing": {
        "_time": 1.592280626296997,
        "_time_children": 1.5919265747070312,
        "_time_self": 0.0003540515899658203,
        "language": "en",
        "language_confidence": 1.0,
        "severity": "3-CRITICAL"
    },
    "storage": {
        "content_type": "application/pdf",
        "doctype": "pdf",
        "filename": "bank_form.pdf",
        "filesize": 47134,
        "last_modified": 1543349581.0,
        "location": "my_bucket/bank_form.pdf",
        "owner": "johndoe",
        "storage_type": "s3"
    }
}
To access the detected information in a computer-friendly way, without the HTML formatting and summaries, you can download it in the standard JSON format. This format is convenient for further processing or integration.
The JSON record schema (see an example to the right):
| Field | Type | Description |
|---|---|---|
scan_id |
String | ID of the scan this file belongs to. Uniquely identifies a scan. |
scan_name |
String | Name of the scan this file belongs to. Multiple scans can have the same name. |
object_id |
String | ID of the object. Uniquely identifies each object. |
status |
String | Scan status of this file. One of PENDING, SCANNING, SKIPPED, SCANNED, FAILED. |
pii |
List[Object] | List of all detected PIIs. Each element includes the actual detected instance under pii, its context under context, detection confidence in confidence, instance character offset in the original document as position, and pii_type and pii_category as the type and category classes of the instance. |
storage |
Object | The file's metadata taken from the original storage, such as its file size, location, owner, permissions, last modified date etc. Different data storages offer different metadata. |
processing |
Object | Additional non-PII file attributes inferred from its content. Includes auto-detected language and severity level. |
errors |
List[Object] | List of errors that occurred while scanning this file. If a file was SKIPPED or FAILED, you'll find the reason here. |
Duplicates
The duplicates CSV export will list clusters of identical files. Files are considered identical when they share identical content, i.e. the file name or file owner is irrelevant. Only the actual content bytes matter.
The Duplicates CSV export will contain one file per line, listing its exact location, owner, creation date, last modified date and so on. Which cluster the file belongs to is determined by the first column, cluster id.
Only clusters with at least two duplicate files are exported. Files that do not share content with any other file do not appear in the Duplicates report.
Simple Excel report
This is a simplified Excel report. Each sheet row corresponds to one object (a file, email, SQL rows…), and contains only summary information about the object location, severity and what types of PII were detected inside. The actual PII instances are not listed in the Simple Excel report.
Use this format if you don't need as much detail as in the JSON or Full Excel reports.
CSV report
Use the csv export format for a flat listing in a widely supported plain-text format. Each CSV row represents one metadata item of one object:
| CSV format column | Description |
|---|---|
scan_name |
Name of the scan this file belongs to. |
scan_type |
Storage type of the scan (S3 bucket, endpoint device, SQL database, etc). |
object_id |
Unique identifier for this file. |
category |
Category of the metadata key: processing, storage, or a PI category like Personal or Financial. |
field |
Name of the metadata key, e.g. location, credit_card, filesize etc. |
value |
Value of the metadata key, e.g. 2-HIGH for severity, or 109308 for filesize, or my_bucket/csv/metrics.csv for location on an S3 scan. |
pii_context |
Context surrounding the PI instance. Only present in PII rows. |
pii_position |
Character offset of the PI instance in the file. Only present in PII rows. |
pii_confidence |
Detection confidence of the PI instance. Only present in PII rows. |
This format is very similar to the Excel report format, but in a flat .csv file rather than a formatted .xslx Excel file.
Affected persons
This report is similar to the interactive drill-down report, but focuses on presenting data from the perspective of individual people.
The interactive report has three layers:
- Summary page (
index.html)- How many people appear in the data? Who are they?
- Each person's name is listed, along with information about how many files contain that name.
- Listing page
- For each name, a list of all locations that contain this name.
- File page
- Full details about the PII detected in a particular file, including the name and all other PII information.
The report can be downloaded as a ZIP archive from the web UI, or using the Download report API.
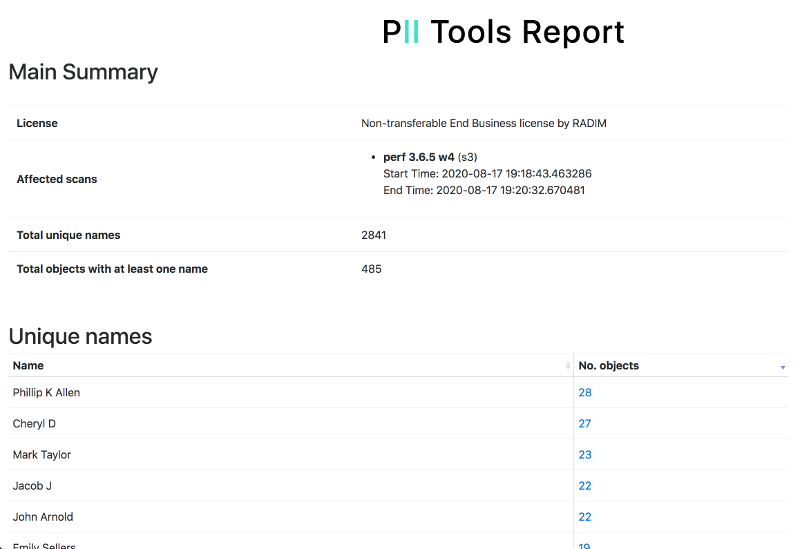
Person Cards
Similar to the Affected persons report, the Person Cards report links up all information that PII Tools discovered on each person, across all the exported files, and presents it in a single unified CSV spreadsheet.
- Each CSV row represents all PII linked to one person.
- The columns contain all PII found for that person, such as their name, email, address, SSN, etc.
- In case PII Tools linked multiple values to a person (for example, several alternative emails of an individual), all the values are presented, separated by a semicolon
;
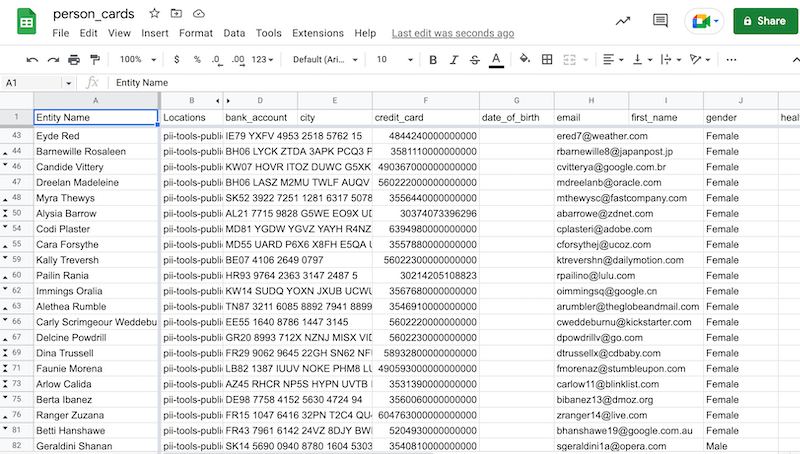
Audit log
An audit report is a detailed listing of all files accessed during a scan, no matter their scanning result. FAILED and SKIPPED files are included too, along with timestamps of access and error messages (if any).
The report is a CSV file, with one file per line. The CSV columns are as follows:
| Audit format column | Description |
|---|---|
scan_name |
Name of the scan this file belongs to. |
scan_type |
Storage type of the scan (S3 bucket, endpoint device, SQL database, etc). |
object_id |
Unique identifier for this file. |
location |
Full location of this file. |
scan_started |
When was this file put into the scanning queue. |
scan_ended |
When was the processing of this file finalized. |
status |
Scan status of this file. One of PENDING, SCANNING, SKIPPED, SCANNED, FAILED. |
severity |
Automatically assigned severity level classification for this file. |
note |
Notes and error messages associated with this file. |
Available PII types
These are the concrete personal, sensitive and intimate data types PII Tools can detect:
| PII Category | PII Type | Example instance | Note |
|---|---|---|---|
| Financial | credit_card |
3547011095740842 |
VISA, MASTERCARD, MASTERCARD_NEW, AMEX, CHINA T_UNION, CHINA UNION_PAY, DINERS, DINERS_2, DINERS/ENROUTE, DISCOVER, RUPAY, INTER_PAYMENT, INTER_PAYMENT_2, MAESTRO, DANKORT, MIR, JCB, LASER, SWITCH, TROY, UATP, VERVE, SOLO, FORBRUGSFORENINGEN |
| Supported language context: Any. | |||
| Financial | bank_account |
RS39 2712 7251 5923 5161 28 |
Both international and domestic account number formats. |
| Supported language context: EN, FR, BE, DE, SE, FI, IT, ES, PT, BR, SA, NL, PL, CZ. | |||
| Financial | check |
PDF scan or image | An image detector that looks for image regions (pixels) that contain a US check (cheque). Supports rotated images. |
| Supported language context: Any. | |||
| Financial | routing_number |
111000012 |
ABA, Sort code, BSB, SWIFT, Canadian Transit Number |
| Supported language context: EN, DE, FR. | |||
| Sensitive | race |
Asian |
Only available for structured data (CSV, XLS, SQL etc) |
| Supported language context: EN. | |||
| Sensitive | gender |
Female, M |
Available for structured data (CSV, XLS, SQL etc), plus extracted from the MRZ of ID scan images |
| Supported language context: EN, PT, BR, ES, NL, SA, PL, CS. | |||
| Sensitive | religious_views |
about consciousness are generally shunned as psudo-scientific heretics by the hard science community. Conciousness is a meta-physical or philosophical concept.</p>\n\n<p>"I think, therefore I am." is the only proof that consciousness exists that I am aware of. Therefore, you cannot even prove that a person other', "a program that simulates the results of consciousness?</p>\n\n<p>I don't believe that you can program conscious AI, nor could you prove that you have done so. Consciousness isn't something that can ever be marketed. You can only market the AI on the basis of it's |
|
| Supported language context: EN. | |||
| Sensitive | sexual_preference |
It's only recently that I've come out to myself as being bisexual and learning to not just tolerate it but honor it. |
|
| Supported language context: EN. | |||
| Personal | name |
Sean Connery |
Full name |
| Supported language context: Any. | |||
| Personal | address |
2201 C Street NW I Washington, DC 20520 |
Full address |
| Supported language context: Any. | |||
| Personal | face |
[59, 51, 112, 112] |
Profile picture (person's face) bounding box coordinates |
| Supported language context: Any. | |||
| Personal | date_of_birth |
1962 |
|
| Supported language context: EN, PT, BR, DE, FR, ES, IT, NL, SA, TR, RO, PL, CS. | |||
| Personal | phone |
408.555.1296 |
|
| Supported language context: EN, PT, BR, TR, PL, CS, DE, ES, NL, SA. | |||
| Personal | email |
john.arnold@enron.com |
|
| Supported language context: Any. | |||
| Personal | street |
1930 Second St |
Only available for structured data (CSV, XLS, SQL etc) |
| Personal | city |
Adams |
Only available for structured data (CSV, XLS, SQL etc) |
| Supported language context: EN, FR, DE, ES, PT, BR, NL, SA. | |||
| Personal | country |
USA |
Only available for structured data (CSV, XLS, SQL etc) |
| Supported language context: EN, PT, BR. | |||
| Personal | country_code |
SN |
Only available for structured data (CSV, XLS, SQL etc) |
| Supported language context: EN. | Personal | postcode |
WA14 2PU |
Postal code / ZIP code |
| Supported language context: Any. | Personal | first_name |
Garth |
Only available for structured data (CSV, XLS, SQL etc) |
| Supported language context: EN, FR, PT, BR, NL, SA, PL, CS, TR. | |||
| Personal | last_name |
Stofko |
Only available for structured data (CSV, XLS, SQL etc) |
| Supported language context: EN, FR, PT, BR, NL, DA, PL, CS, TR. | |||
| Medical | health |
Patient Information Name: Monica Latte Patient ID: 0000-44444 Birth Date: 04/04/1950 Gender: Female Marital Status: Divorced Problems: DIABETES MELLITUS (ICD-250.) HYPERTENSION, BENIGN ESSENTIAL (ICD-401.1) Medications: PRINIVIL TABS 20 MG (LISINOPRIL) 1 po qd Last Refill: #30 x 2 : Carl Savem MD (08/27/2010) HUMULIN INJ 70/30 (INSULIN REG & ISOPHANE (HUMAN)) 20 units ac breakfast Last Refill: #600 u x 0 : Carl Savem MD |
|
| Supported language context: EN. | |||
| Medical | health_id |
1234-123-123-AZ |
Medicare and Medicaid number or equivalent (USA, Canada, Australia, UK NHS, France CV) |
| Supported language context: EN, FR. | |||
| Medical | icd |
G44.311 |
World Health Organization ICD codes (version 9, 10, 11) |
| Supported language context: EN. | |||
| Security | ip |
25.27.159.60 |
|
| Supported language context: EN. | |||
| Security | username |
UserID: MNETTEL |
|
| Supported language context: EN, NL, SA, DE, ES, PT, BR, FR, IT, RO, CS, PL. | |||
| Security | password |
password: enron4 |
|
| Supported language context: EN, NL, SA, DE, ES, PT, BR, FR, IT, RO, CS, PL. | |||
| National | id_scan |
scan or photograph (image) | Digital scans or camera snapshots of passports with machine-readable zone (MRZ), driving licenses and other personal IDs. Reported context equals the X,Y coordinates of the ID within the input image. |
| Supported language context: Any for IDs with MRZ. | National | expiry_date |
2025-10-17 | Date of ID expiration, as extracted from the machine-readable zone (MRZ) of an ID scan. |
| Supported language context: Any for IDs with MRZ. | |||
| National | driving_licence |
609-53-5588 |
US states, Canada, Australia, UK, France. Note that driving license ID scans (images) are detected under `id_scan`. |
|
Supported language context (unstructured): EN, FR, PT, BR, NL, SA, PL. Supported language context (structured): EN, FR, PT, BR, NL, SA, PL, RO, ES, DE, TR. |
|||
| National | passport |
CX2345678 |
International passports: EU, USA, Canada, JP, KR, TK, UK, SA, RU. |
| Supported language context: EN, FR, PT, BR, DE, NL, SA, PL, KR, JP, ES, RO, TR, RU. | |||
| National | tax_id |
988-88-8889 |
National Tax ID or equivalent: USA TIN, UK UTR, NINO, Australia TFN, Canada SIN, EU VAT, Brazil CPF, Germany Steuernummer, Germany IDNR, Spain NIF, Spain DNI, Spain NIE, Spain CIF, Finland Veronumero, Poland NIP, France NIF, Italy IVA, India PAN. Please note that in some countries there's overlap between tax_id and ssn (see SSN below). |
| Supported language context: EN, BR, FR, DE; all EU (VAT). | |||
| National | ssn |
296-12-3298 |
Social security number or equivalent: USA SSN, Canada SIN, UK NINO, Australia CRN, France CNI, France INSEE NIR, Italy Codice Fiscale, Netherlands BSN, Belgium NN, Belgium NISS, Belgium BIS, Czech RČ, Finland HETU, Ireland PPS, Poland PESEL, Sweden Personnummer, Germany SVNR, South Africa SA ID, Hong Kong HKID, India Aardhaar, Singapore NRIC, Saudi Arabia ID, Emirates ID, Bahrain ID, Qatar ID. Please note that in some countries there's overlap between tax_id and ssn (see Tax ID above). |
| Supported language context: EN, FR, IT, NL, CZ, SE, FI, IE, PL, DE. | |||